1. Introduksjon
The Atlas Sound AA120 is a 120-watt, six-input mixer amplifier designed for commercial audio applications. It features five microphone/line inputs with phantom power, one stereo summing auxiliary input, and versatile output options including 8-ohm, 25V, 70V, and 100V speaker outputs. This manual provides detailed instructions for the proper installation, operation, and maintenance of your AA120 mixer amplivligere.
2. Viktige sikkerhetsinstruksjoner
- Les instruksjoner: Les og forstå alle sikkerhets- og bruksanvisninger før du bruker dette produktet.
- Ta vare på instruksjonene: Ta vare på disse instruksjonene for fremtidig referanse.
- Vær oppmerksom på advarsler: Følg alle advarsler på produktet og i bruksanvisningen.
- Følg instruksjonene: Følg alle bruks- og bruksanvisninger.
- Vann og fuktighet: Ikke bruk dette apparatet i nærheten av vann.
- Rengjøring: Rengjør kun med en tørr klut.
- Ventilasjon: Do not block any ventilation openings. Install in accordance with the manufacturer's instructions. Ensure adequate airflow around the unit.
- Varme: Ikke installer i nærheten av varmekilder som radiatorer, varmeelementer, ovner eller andre apparater (inkludert ampløftere) som produserer varme.
- Strømledningsbeskyttelse: Beskytt strømledningen mot å bli tråkket på eller klemt, spesielt ved støpsler, stikkontakter og punktet der de kommer ut av apparatet.
- Service: Overlat all service til kvalifisert servicepersonell. Service er nødvendig når apparatet har blitt skadet på noen måte, for eksempel strømledning eller støpsel er skadet, væske har blitt sølt eller gjenstander har falt inn i apparatet, apparatet har vært utsatt for regn eller fuktighet, ikke fungerer normalt , eller har blitt droppet.
3. Bakpanel overview
The rear panel of the Atlas Sound AA120 provides all necessary connections for power, inputs, and speaker outputs. Familiarize yourself with these connections before installation.
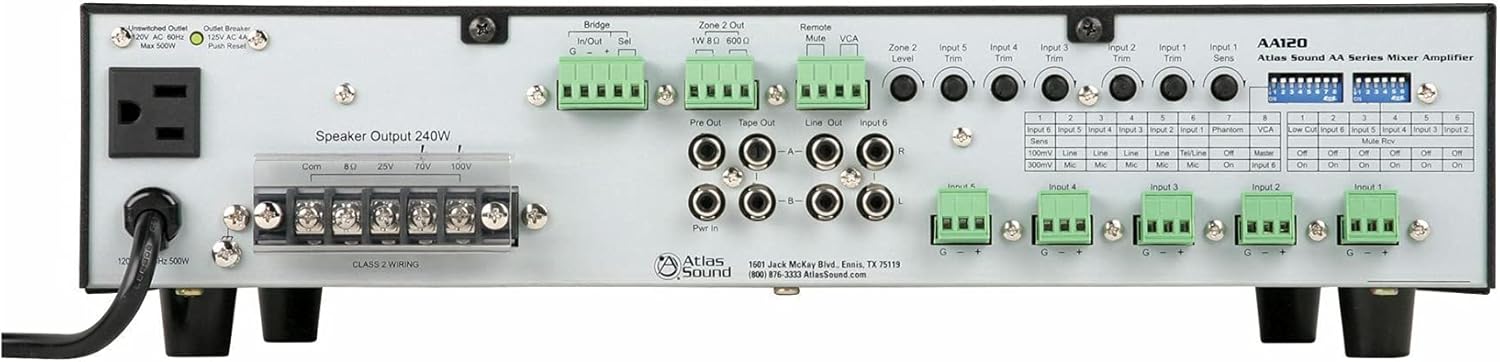
Figure 1: Rear Panel of the Atlas Sound AA120 Mixer Amplivligere
Komponenter på bakpanelet:
- Unswitched Outlet (120V AC 60Hz, Max 500W): A convenience outlet for powering external equipment.
- Outlet Breaker (125V AC 4A, Push Reset): A resettable circuit breaker for the unswitched outlet. Press to reset if tripped.
- Speaker Output 240W (Com, 8Ω, 25V, 70V, 100V): Terminal block for connecting speakers. Supports common, 8-ohm, 25-volt, 70-volt, and 100-volt speaker systems. Ensure Class 2 wiring is used.
- Bridge In/Out (G, -, +): Terminals for linking multiple amplifiers or integrating with external processing. 'Sel' switch selects bridging mode.
- Zone 2 Out (1W 8Ω, 600Ω): Output for a secondary audio zone, providing 1W at 8 ohms or a 600-ohm line level output.
- Remote Mute: Terminals for connecting an external remote mute switch.
- VCA (voltage Kontrollert Amplivligere): Terminals for external VCA control.
- Pre Out / Tape Out / Line Out / Input 6 (RCA): RCA jacks for pre-amplifier output, tape recording output, general line output, and stereo auxiliary input (Input 6).
- Pwr In (RCA): RCA jacks for power amplifier input, allowing external pre-amplifiers to drive the AA120's power section.
- Input Trim Controls (Input 1-5, Zone 2 Level): Rotary potentiometers for adjusting the input sensitivity of individual channels and the output level of Zone 2.
- Input 1-5 Terminal Blocks (G, -, +): Balanced input terminals for microphone or line-level sources.
- DIP-brytere: A bank of switches for configuring various amplifier functions, including input sensitivity, phantom power, VCA assignment, low-cut filter, and mute reverse.
4. Oppsett og installasjon
4.1 Utpakking
Carefully remove the AA120 from its packaging. Inspect the unit for any signs of damage that may have occurred during transit. Retain the packaging for future transport or storage.
4.2 Plassering
Plasser amplifier in a location that allows for adequate ventilation. Avoid placing it near heat sources or in direct sunlight. Ensure the unit is on a stable, level surface. Do not obstruct the ventilation openings.
4.3 Strømtilkobling
Koble den medfølgende strømledningen til amplifier's power inlet and then to a grounded 120V AC, 60Hz power outlet. The unswitched outlet on the rear panel can provide power to other equipment, up to a maximum of 500W. If this outlet's breaker trips, press the 'Push Reset' button to restore power.
4.4 Høyttalertilkoblinger
The AA120 supports various speaker configurations. Connect your speakers to the 'Speaker Output 240W' terminal block. Ensure proper polarity and impedance matching.
- 8 Ohm: For direct connection to low-impedance speakers.
- 25V, 70V, 100V: For konstant voltage distributed speaker systems. Connect the common (Com) terminal to the negative speaker wire and the appropriate voltage terminal (25V, 70V, or 100V) to the positive speaker wire.
Note: Sørg alltid for amplifier is powered off before making or changing speaker connections. Use Class 2 wiring for speaker connections.
4.5 Inngangstilkoblinger
The AA120 offers six input channels:
- Inputs 1-5 (Balanced Terminal Blocks): These inputs accept either microphone or line-level signals. Connect balanced audio cables to the G (ground), - (negative), and + (positive) terminals.
- Input 6 (Stereo RCA): This input is designed for stereo line-level sources such as CD players or media players. The stereo signal is summed to mono internally.
4.6 DIP-bryterkonfigurasjon
The DIP switches on the rear panel allow for fine-tuning of input characteristics and other functions. Refer to the table below for their functions:
| Bryter nr. | Funksjon | AV -innstilling | ON-innstilling |
|---|---|---|---|
| Input 6 Sens (1) | Input 6 Sensitivity | 100mV Line | 300mV Mic |
| Input 5 Sens (2) | Input 5 Sensitivity | Linje | Mic |
| Input 4 Sens (3) | Input 4 Sensitivity | Linje | Mic |
| Input 3 Sens (4) | Input 3 Sensitivity | Linje | Mic |
| Input 2 Sens (5) | Input 2 Sensitivity | Linje | Mic |
| Input 1 Sens (6) | Input 1 Sensitivity | Tel/Line | Mic |
| Phantom (7) | Fantomkraft | Av | On |
| VCA (8) | VCA Control Assignment | Herre | Inngang 6 |
| Low Cut (1) | Lavkuttfilter | Av | On |
| Input 6 Mute Rev (2) | Input 6 Mute Reverse | Av | On |
| Input 5 Mute Rev (3) | Input 5 Mute Reverse | Av | On |
| Input 4 Mute Rev (4) | Input 4 Mute Reverse | Av | On |
| Input 3 Mute Rev (5) | Input 3 Mute Reverse | Av | On |
| Input 2 Mute Rev (6) | Input 2 Mute Reverse | Av | On |
| Input 1 Mute Rev (7) | Input 1 Mute Reverse | Av | On |
Viktig: Slå alltid av amplifier before changing DIP switch settings to prevent potential damage or unexpected behavior.
5. Bruksanvisning
5.1 Slå på/av
For å slå på amplifier, ensure all connections are secure, then press the power switch located on the front panel (not visible in rear panel image, but standard). To power off, press the switch again.
5.2 Justering av inngangsnivåer
Use the 'Input Trim' rotary controls on the rear panel for Inputs 1-5 to adjust the sensitivity of each input channel. This allows you to match the input level of your source device to the amplifier. For Input 6, adjust the source device's output level or use the VCA control if assigned.
5.3 Hovedvolumkontroll
The master volume control (typically on the front panel, not shown in rear image) adjusts the overall output level of the amplifier. Start with the master volume at a low setting and gradually increase it to the desired listening level.
5.4 Dempingsfunksjoner
The AA120 supports remote or VOX (Voice Operated Switch) mute capabilities. The 'Remote Mute' terminals allow for an external switch to mute the audio. The 'Mute Rev' DIP switches (1-7) allow you to reverse the mute logic for individual inputs, useful for paging systems where other audio is muted when a microphone is active.
5.5 Zone 2 Operation
The 'Zone 2 Out' provides a separate audio output. The 'Zone 2 Level' control adjusts the output level for this zone. This can be used for a separate listening area or to feed another amplivligere.
5.6 Low Cut Filter
The low-cut filter (6 dB per octave at 400 Hz) can be engaged via the DIP switch. This filter is particularly useful when using paging horns, as it helps to reduce low-frequency content that can cause distortion or reduce intelligibility in such speakers.
6. Vedlikehold
6.1 Rengjøring
For å rengjøre amplifier, disconnect it from the power source. Use a soft, dry cloth to wipe down the exterior. Do not use liquid cleaners or aerosol sprays, as they may damage the finish or internal components.
6.2 Ventilasjon
Periodically check that the ventilation openings are clear of dust and debris. Proper airflow is crucial for preventing overheating and ensuring the longevity of the amplivligere.
7. Feilsøking
If you encounter issues with your AA120, refer to the following common problems and solutions:
- Ingen strøm:
- Sørg for at strømledningen er ordentlig koblet til begge amplifier and a working AC outlet.
- Check the main circuit breaker for your building.
- If using the unswitched outlet, check its dedicated 'Outlet Breaker' and press 'Push Reset' if tripped.
- Ingen lyd:
- Verify that speakers are correctly connected to the appropriate output terminals (Com, 8Ω, 25V, 70V, or 100V).
- Check all input connections and ensure source devices are playing audio.
- Ensure input trim controls and master volume are set to audible levels.
- Check DIP switch settings for mute functions; ensure no inputs are inadvertently muted.
- Forvrengt lyd:
- Reduce input trim levels if the input signal is too strong.
- Sørg for at høyttalerimpedansen samsvarer med amplifier output (e.g., 8Ω speakers to 8Ω terminal).
- Sjekk høyttalerledningene for kortslutninger eller løse forbindelser.
If the problem persists after attempting these troubleshooting steps, contact Atlas Sound customer support for assistance.
8. Spesifikasjoner
| Trekk | Spesifikasjon |
|---|---|
| Strømutgang | 120W at 8 ohms, 25V, or 70V |
| Speaker Output Capability | Up to 240W total (Com, 8Ω, 25V, 70V, 100V) |
| Kanaler | 1 |
| Innganger | 5 Mic/Line inputs (with Phantom power), 1 Stereo Summing Aux input |
| Mute Capabilities | Remote or VOX mute |
| Lavkuttfilter | 6 dB per octave at 400 Hz (selectable) |
| Bridge Circuit | In/Out with balanced link/internal relay |
| VCA Control | Assignable to Input 6 (BGM) or global mix bus |
| Pre Out/Power Amp In | For external processors |
| Produktdimensjoner | 16.75"W x 4.25"H x 14.25"D (42.55 x 10.8 x 36.2 cm) |
| Varevekt | 26.4 lbs (11.97 kg) |
| Strømbehov | 120V AC 60Hz |
9. Garanti og støtte
9.1 Garantiinformasjon
Atlas Sound products are manufactured to high standards and are backed by a limited warranty. For specific warranty terms and conditions, please refer to the warranty card included with your product or visit the official Atlas Sound webnettstedet. Ta vare på kjøpsbeviset for garantikrav.
9.2 Kundestøtte
For technical assistance, service, or replacement parts, please contact Atlas Sound customer support:
- Adresse: 1601 Jack McKay Blvd., Ennis, TX 75119, USA
- Telefon: (800) 876-3333
- Webnettsted: AtlasSound.com