1. Introduksjon
This manual provides essential information for the safe and effective use of your Brüder Mannesmann 92570 Mini Drill Bit Set. This versatile 80-piece hobby tool kit is designed for various tasks including drilling, milling, separating, and polishing. Please read these instructions thoroughly before operating the tool and retain them for future reference.
2. Sikkerhetsinstruksjoner
Always observe basic safety precautions to reduce the risk of injury or damage. Failure to follow these instructions may result in electric shock, fire, and/or serious injury.
- Sikkerhet på arbeidsområdet: Hold arbeidsområdet rent og godt opplyst. Rotete eller mørke områder innbyr til ulykker. Ikke bruk elektroverktøy i eksplosive atmosfærer, for eksempel i nærheten av brennbare væsker, gasser eller støv.
- Elektrisk sikkerhet: Støpsler på elektroverktøy må passe til stikkontakten. Aldri modifiser støpselet på noen måte. Unngå kroppskontakt med jordede overflater. Ikke utsett elektroverktøy for regn eller våte forhold.
- Personlig sikkerhet: Bruk alltid øyevern. Bruk hørselsvern ved lengre tids bruk. Kle deg riktig; unngå løse klær eller smykker som kan sette seg fast i bevegelige deler.
- Bruk og stell av verktøy: Ikke bruk makt på elektroverktøyet. Bruk riktig elektroverktøy til ditt bruk. Trekk ut støpselet fra strømkilden før du foretar justeringer, bytter tilbehør eller oppbevarer elektroverktøy.
- Vedlikehold: Vedlikehold elektroverktøy og tilbehør. Sjekk for feiljustering eller binding av bevegelige deler, brudd på deler og andre forhold som kan påvirke elektroverktøyets funksjon.
3. Pakkens innhold
The Brüder Mannesmann 92570 Mini Drill Bit Set includes the following components:
- Mini Drill (130W)
- Flexible Shaft attachment
- Tabell Clamp / Stand
- Assortment of 80 accessories (various drill bits, grinding stones, sanding bands, cutting discs, polishing wheels, collets, wrenches)
- Oppbevaringsboks

Figur 3.1: Overview of the Brüder Mannesmann 92570 Mini Drill Bit Set, showing the main drill unit, flexible shaft, table clamp, and a selection of the 80 included accessories.

Figur 3.2: The mini drill and its accessories neatly organized within the provided storage case, ready for transport or storage.
4. Produktet er overview
The Brüder Mannesmann 92570 is a corded electric mini drill designed for precision tasks. It features a 130W motor and variable speed control, allowing for optimal performance across different materials and applications.
Nøkkelfunksjoner:
- Makt: 130 watt
- Voltage: 230 volt
- Fart: Variable, 8,000 to 30,000 RPM
- Fleksibel aksel: For detailed work in hard-to-reach areas.
- Tabell Clamp/Stand: For stationary operation and improved control.
5. Oppsett
5.1 Attaching Accessories to the Main Drill
- Sørg for at verktøyet er koblet fra strømkilden.
- Press and hold the spindle lock button on the drill.
- Skru av spennhylsemutteren.
- Insert the desired accessory shank into the appropriate collet.
- Tighten the collet nut securely using the provided wrench.
5.2 Bruk av den fleksible akselen
The flexible shaft allows for greater maneuverability and precision in intricate tasks.
- Unplug the main drill.
- Remove any accessory from the main drill's collet.
- Unscrew the collet nut and remove the collet from the main drill.
- Screw the flexible shaft coupling onto the main drill's spindle.
- Insert the flexible shaft's inner drive cable into the main drill's spindle opening.
- Secure the flexible shaft's handpiece collet nut and insert the desired accessory.

Figur 5.1: The mini drill mounted on its table clamp stand, with the flexible shaft attached for extended reach and detailed work.
5.3 Mounting the Tool on the Stand
The included table clamp and stand allow for stable, hands-free operation, particularly useful when using the flexible shaft.
- Fest bordklemmenamp to a sturdy workbench or table.
- Assemble the vertical stand rod into the clamp.
- Hang the mini drill from the top hook of the stand.
6. Bruksanvisning
Before starting, ensure your work area is clear and you are wearing appropriate personal protective equipment.
6.1 Powering On and Speed Adjustment
- Koble verktøyet til en 230 V stikkontakt.
- Vri strømbryteren til «PÅ»-posisjonen.
- Adjust the rotational speed using the variable speed dial. Start at a lower speed and gradually increase as needed for the material and task.
6.2 Vanlige applikasjoner
The mini drill is suitable for a variety of precision tasks:
- Boring: Use appropriate drill bits for wood, plastic, or soft metals. Apply light, consistent pressure.
- Sliping: Attach grinding stones for shaping, sharpening, or deburring.
- Gravering: Use engraving bits for detailed work on various surfaces.
- Kutting: Use cutting discs for small cuts in metal, plastic, or wood. Ensure the workpiece is secured.
- Sliping: Attach sanding bands or discs for smoothing surfaces.
- Polering: Use polishing wheels with appropriate compounds for a high-gloss finish.

Figur 6.1: The mini drill being used to create a precise hole in a wooden plank.

Figur 6.2: A close-up of the mini drill performing a drilling operation on a metal surface.

Figur 6.3: The mini drill with a grinding stone attachment, smoothing the edge of a metal piece.

Figur 6.4: An engraving bit attached to the mini drill, used for intricate detailing on a metal lighter.

Figur 6.5: A cutting disc on the mini drill being used to cut a metal bolt secured to a wooden surface.
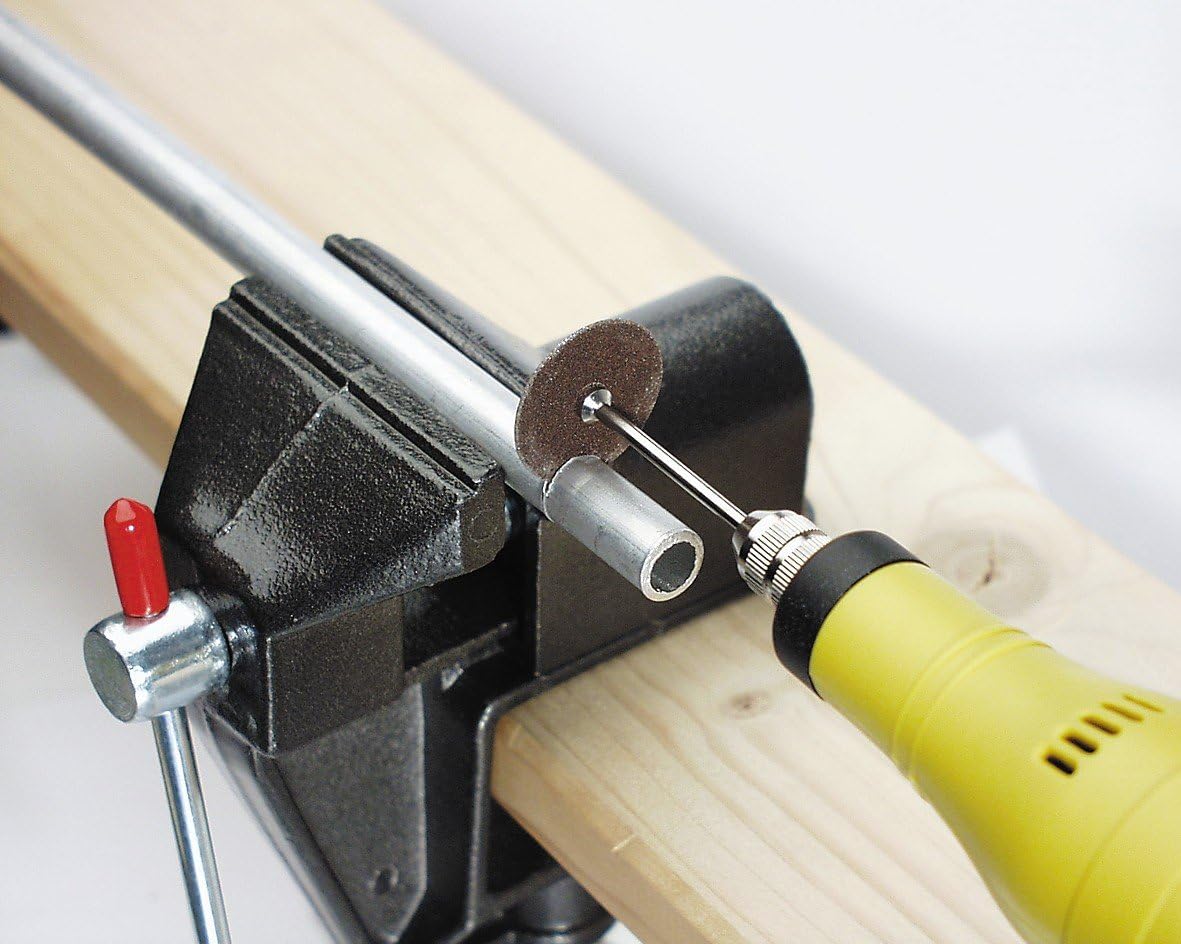
Figur 6.6: The mini drill with a cutting disc, performing a cut on a metal tube held in a vise.

Figur 6.7: A sanding band attachment on the mini drill, used for smoothing a wooden surface.
7. Vedlikehold
Regelmessig vedlikehold sikrer verktøyets levetid og optimale ytelse.
7.1 Rengjøring
- Koble alltid fra verktøyet før rengjøring.
- Wipe the tool housing with a clean, damp klut. Ikke bruk sterke kjemikalier eller skurende rengjøringsmidler.
- Fjern støv og rusk fra ventilasjonsåpningene for å forhindre overoppheting.
- Clean collets and accessory shanks after each use to ensure proper fit and prevent seizing.
7.2 Oppbevaring
- Store the tool and all accessories in the provided storage case.
- Keep the tool in a dry, secure location, out of reach of children.
- Unngå oppbevaring i direkte sollys eller ekstreme temperaturer.
8. Feilsøking
If you encounter issues with your mini drill, refer to the following common problems and solutions:
| Problem | Mulig årsak | Løsning |
|---|---|---|
| Verktøyet starter ikke | Ingen strømforsyning; Defekt bryter | Sjekk strømtilkoblingen og stikkontakten; kontakt kundeservice hvis bryteren er defekt. |
| Overdreven vibrasjon | Accessory not properly seated or balanced; Damaged flexible shaft | Ensure accessory is correctly installed and tightened; Replace damaged accessories or flexible shaft. |
| Verktøyet overopphetes | Blokkert ventilasjon; Overbelastning av verktøyet | Clean ventilation openings; Reduce pressure and allow tool to cool. |
| Redusert ytelse | Worn accessories; Incorrect speed setting | Replace worn accessories; Adjust speed to suit the material and task. |
9. Spesifikasjoner
| Trekk | Detalj |
|---|---|
| Modellnummer | M92571 |
| Strøminngang | 130 watt |
| Voltage | 230 volt |
| Rotasjonshastighet | 8,000 - 30,000 RPM (variable) |
| Strømkilde | Elektrisk med ledning |
| Varevekt | 3.5 pund (ca. 1.59 kg) |
| Produktdimensjoner (L x B x H) | 12.6 x 9.06 x 3.54 tommer (ca. 32 x 23 x 9 cm) |
| Anbefalt bruk | Grinding, Cutting, Sanding, Polishing |
| GTIN | 04003315709299 |
10. Garanti og støtte
For warranty information and customer support, please refer to the documentation included with your purchase or contact Brüder Mannesmann directly. Spare part availability duration is typically 1 year from the date of purchase.