1. Introduksjon
This manual provides detailed instructions for the installation, operation, and maintenance of your Soundstream VL-11A Single DIN Digital Media Receiver. Please read this manual thoroughly before using the product to ensure proper operation and to prevent damage.
The Soundstream VL-11A is designed to provide high-quality audio playback from various digital sources, including USB drives, SD cards, and auxiliary input devices. It features a compact single DIN chassis for easy integration into most vehicle dashboards.
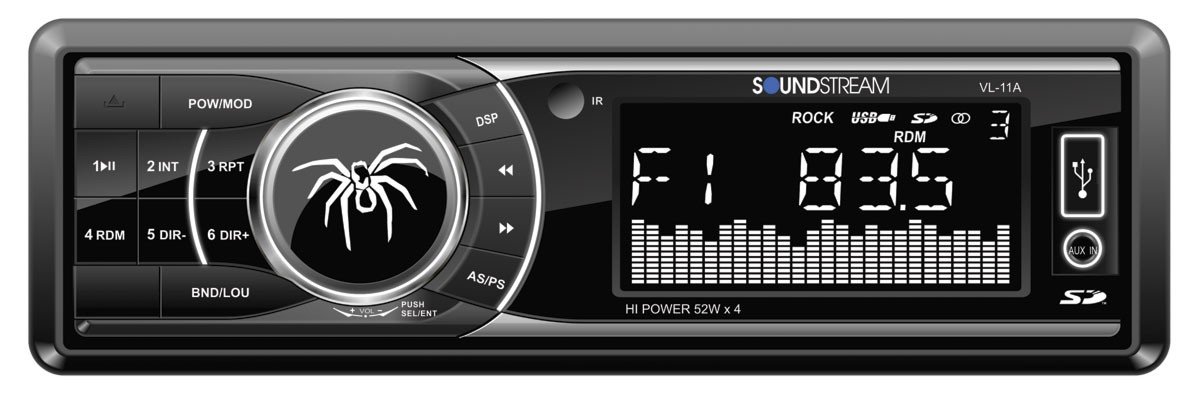
Figur 1.1: Front view of the Soundstream VL-11A Digital Media Receiver. This image displays the main unit with its control buttons and display panel.
2. Sikkerhetsinformasjon
Følg følgende sikkerhetsregler for å forhindre skade eller skade på enheten:
- Ikke bruk enheten på en måte som distraherer deg fra kjøringen. Prioriter alltid trafikksikkerhet.
- Sørg for riktig ledningstilkobling. Feil ledningstilkobling kan forårsake brann eller skade på kjøretøyets elektriske system.
- Unngå å utsette enheten for fuktighet eller ekstreme temperaturer.
- Ikke forsøk å demontere eller modifisere enheten. Overlat all service til kvalifisert personell.
- Hold volumet på et nivå som gjør at du kan høre trafikklyder utenfra.
3. Pakkens innhold
Bekreft at alle varene er til stede i pakken:
- Soundstream VL-11A Digital Media Receiver
- Ledningsnett
- Monteringsutstyr (skruer, monteringshylse)
- Fjernkontroll
- Brukerhåndbok (dette dokumentet)
4. Produktet er overview
4.1 Kontroller på frontpanelet
Frontpanelet gir tilgang til hovedfunksjoner og medieinnganger.
Figur 4.1: Illustrative diagram of the VL-11A front panel. This image highlights the display, volume knob, mode button, track controls, USB port, SD card slot, and auxiliary input.
- Strøm / modus-knapp: Press to turn on/off. Short press to cycle through audio sources (Radio, USB, SD, AUX).
- Volumknapp: Drei for å justere volumet. Trykk for å få tilgang til lydinnstillinger (bass, diskant, balanse, fader, EQ).
- Utstilling: Viser gjeldende status, sporinformasjon og innstillinger.
- USB-port: Koble til USB-lagringsenheter for medieavspilling.
- SD-kortspor: Insert SD cards for media playback.
- AUX-inngang: Koble til eksterne lydenheter via en 3.5 mm-kontakt.
- Track/Tune Buttons: Naviger i spor eller still inn radiofrekvenser.
4.2 Bakre tilkoblinger
The rear of the unit contains the main wiring harness and preamp utganger.
Figur 4.2: Illustrative diagram of the VL-11A rear connections. This image shows the main wiring harness connector and the RCA preamp utganger.
- Main Wiring Harness: Connects to vehicle power, ground, accessory, and speaker wires.
- RCA Preamp Utganger: Two sets of 2V outputs for connecting external amplivsstil.
5. Oppsett
5.1 Installasjon
Professional installation is recommended. If installing yourself, ensure the vehicle's battery is disconnected before beginning.
- Montering: Insert the metal mounting sleeve into the vehicle's dashboard opening. Bend the tabs to secure it.
- Kabling: Connect the supplied wiring harness to the vehicle's wiring. Match wire colors and functions carefully.
- Høyttalertilkoblinger: Connect the speaker wires from the harness to your vehicle's speakers. Ensure correct polarity.
- Strømtilkoblinger: Connect the yellow wire (constant 12V), red wire (switched 12V), and black wire (ground) to the appropriate vehicle circuits.
- Antenne: Connect the vehicle's antenna cable to the unit's antenna input.
- Sikker enhet: Slide the VL-11A into the mounting sleeve until it clicks into place.
Warning: Incorrect wiring can cause severe damage to the unit or vehicle. Consult a professional if unsure.
5.2 Første gangs oppstart
After installation, reconnect the vehicle's battery. Press the power button on the unit or remote control to turn it on. The display should illuminate.
6. Bruksanvisning
6.1 Grunnleggende kontroller
- Slå på/av: Trykk på PWR/MODE knapp.
- Volumjustering: Roter VOLUM knott.
- Kildevalg: Trykk kort på PWR/MODE button to cycle through Radio, USB, SD, and AUX.
6.2 Lydinnstillinger
Trykk på VOLUM knob to enter the audio menu. Rotate the knob to navigate options and press to select.
- BASS/DISHANT: Juster bass- og diskantnivåene.
- BALANSERE: Juster lydbalansen mellom venstre og høyre høyttaler.
- FADER: Adjust audio balance between front and rear speakers.
- EQ (Equalizer): Select from preset EQ curves (e.g., Pop, Rock, Classic) or a custom setting.
6.3 USB/SD-avspilling
Insert a USB drive into the USB port or an SD card into the SD card slot. The unit will automatically switch to the respective source and begin playback.
- Spill av/pause: Trykk på SPILL/PAUSE knapp.
- Neste / forrige spor: Trykk på NESTE / FØR knapper.
- Mappenavigasjon: Bruk MAPPE OPP/NED buttons (if available on remote or unit).
6.4 Ekstra inngang (AUX)
Connect an external audio device (e.g., smartphone, MP3 player) to the 3.5mm AUX input on the front panel using an audio cable. Select AUX as the source using the MODUS knapp.
6.5 Radio Tuner
Select Radio as the source. The unit supports AM/FM bands.
- Bandvalg: Trykk på BÅND button to switch between FM1, FM2, FM3, and AM.
- Manuell innstilling: Trykk kort på STILL OPP/NED buttons to adjust frequency step-by-step.
- Søk etter innstilling: Trykk lenge på STILL OPP/NED knappene for å automatisk søke etter neste stasjon med sterkt signal.
- Forhåndsinnstilte stasjoner: Press and hold a numbered preset button (1-6) to save the current station. Short press to recall a saved station.
6.6 Fjernkontroll
The included remote control provides convenient access to most functions. Point the remote control towards the unit's front panel sensor.
Figur 6.1: Illustrative diagram of the VL-11A remote control. This image shows the various buttons for power, mode, volume, track control, and numeric presets.
7. Vedlikehold
7.1 Rengjøring av enheten
- Bruk en myk, tørr klut til å tørke av frontpanelet og skjermen.
- Ikke bruk slipende rengjøringsmidler, voks eller løsemidler.
- Unngå å spraye rengjøringsmidler direkte på enheten.
7.2 Generell pleie
- Sørg for god ventilasjon rundt enheten for å unngå overoppheting.
- Unngå å plassere tunge gjenstander på enheten.
- If the unit is exposed to extreme cold, allow it to warm up before operation to prevent condensation.
8. Feilsøking
If you encounter issues, refer to the following table before contacting support:
| Problem | Mulig årsak | Løsning |
|---|---|---|
| Ingen strøm | Blown fuse; Incorrect wiring; Disconnected battery. | Check vehicle fuses and unit fuse. Verify wiring connections. Ensure battery is connected. |
| Ingen lyd | Volumet er for lavt; Demping aktivert; Feil høyttalerkabling; Kilde ikke valgt. | Increase volume. Deactivate mute. Check speaker connections and polarity. Select correct audio source. |
| USB/SD spiller ikke av | Støttes ikke file format; Corrupt media; Incorrectly inserted device. | Ensure media contains supported audio files (e.g., WMA). Try a different USB/SD. Reinsert device. |
| Dårlig radiomottak | Antenne ikke tilkoblet; Område med svakt signal. | Sjekk antennetilkoblingen. Prøv å stille inn på en sterkere stasjon. |
| Fjernkontrollen virker ikke | Dead battery; Obstruction; Not pointing at sensor. | Replace remote battery. Remove obstructions. Ensure direct line of sight to unit's IR sensor. |
9. Spesifikasjoner
Technical specifications for the Soundstream VL-11A Digital Media Receiver:
- Modell: VL-11A
- Merke: Lydstrøm
- Produsent: Lydstrøm
- Produktdimensjoner: 22.35 x 20.32 x 9.65 cm
- Varevekt: 771.11 g (1.7 pund)
- Lyd Wattage: 52 watt (maks.)
- Antall kanaler: 4
- Preamp Utganger: 2 Sets of 2V
- Medieformat: WMA (and other common digital audio formats)
- Spesielle funksjoner: SD Card Input, USB Input, Auxiliary Input
- Koblingstype: Auxiliary, USB, 3.5mm Jack
- Kompatible enheter: Høyttaler
- Kontrollmetode: Fjernkontroll
10. Garanti og støtte
Soundstream products are designed and manufactured to the highest quality standards. For specific warranty information, please refer to the warranty card included with your product or visit the official Soundstream webnettstedet.
For technical support or service inquiries, please contact Soundstream customer service through their official channels. Keep your purchase receipt and product model number (VL-11A) handy when contacting support.