1. Viktige sikkerhetsinstruksjoner
Always observe basic safety precautions when using electrical appliances to reduce the risk of fire, electric shock, and personal injury. Read all instructions before operating this tool.
- Sikkerhet på arbeidsområdet: Hold arbeidsområdet rent og godt opplyst. Rotete eller mørke områder innbyr til ulykker. Ikke bruk elektroverktøy i eksplosive atmosfærer, for eksempel i nærheten av brennbare væsker, gasser eller støv.
- Elektrisk sikkerhet: Avoid body contact with earthed or grounded surfaces. Do not expose power tools to rain or wet conditions. Do not abuse the cord. Never use the cord for carrying, pulling, or unplugging the power tool.
- Personlig sikkerhet: Stay alert, watch what you are doing, and use common sense when operating a power tool. Do not use a power tool while you are tired or under the influence of drugs, alcohol, or medication. Always wear eye protection and hearing protection.
- Bruk og stell av verktøy: Ikke bruk makt på elektroverktøyet. Bruk riktig elektroverktøy til ditt bruk. Trekk ut støpselet fra strømkilden før du foretar justeringer, bytter tilbehør eller oppbevarer elektroverktøy.
2. Produktet er overview
The Makita UB1103 Blower is a versatile tool designed for both blowing and vacuuming applications. It features a powerful motor, variable speed control, and an ergonomic design for comfortable use.
Komponenter
- Blåserenhet
- Dyse
- Dust Bag (for vacuum mode)

Figure 2.1: Makita UB1103 Blower in its standard blowing configuration.

Figure 2.2: The Makita UB1103 Blower shown with its included dust bag, used for vacuum operations.
3. Oppsett
3.1 Attaching the Nozzle (Blower Mode)
- Align the nozzle with the blower outlet port.
- Push the nozzle firmly onto the port and twist clockwise until it locks securely in place.

Figure 3.1: Illustration of attaching the nozzle to the blower unit for blowing functionality.
3.2 Converting to Vacuum Mode
To use the tool as a vacuum, the nozzle and dust bag must be repositioned.
- Remove the nozzle from the blower outlet port.
- Attach the dust bag to the blower outlet port by aligning and twisting until secure.
- Attach the nozzle to the intake port (where air is normally drawn in for blowing) by aligning and twisting until secure.

Figure 3.2: Attaching the dust bag to the blower's exhaust port for vacuum operation.
4. Bruksanvisning
4.1 Strømtilkobling
Ensure the power switch is in the OFF position before plugging the tool into a suitable power outlet (100 Volts AC).
4.2 Variabel hastighetskontroll
The blower features a variable speed control dial and trigger for adjusting airflow. The dial sets the maximum speed, and the trigger allows for fine-tuning within that range.
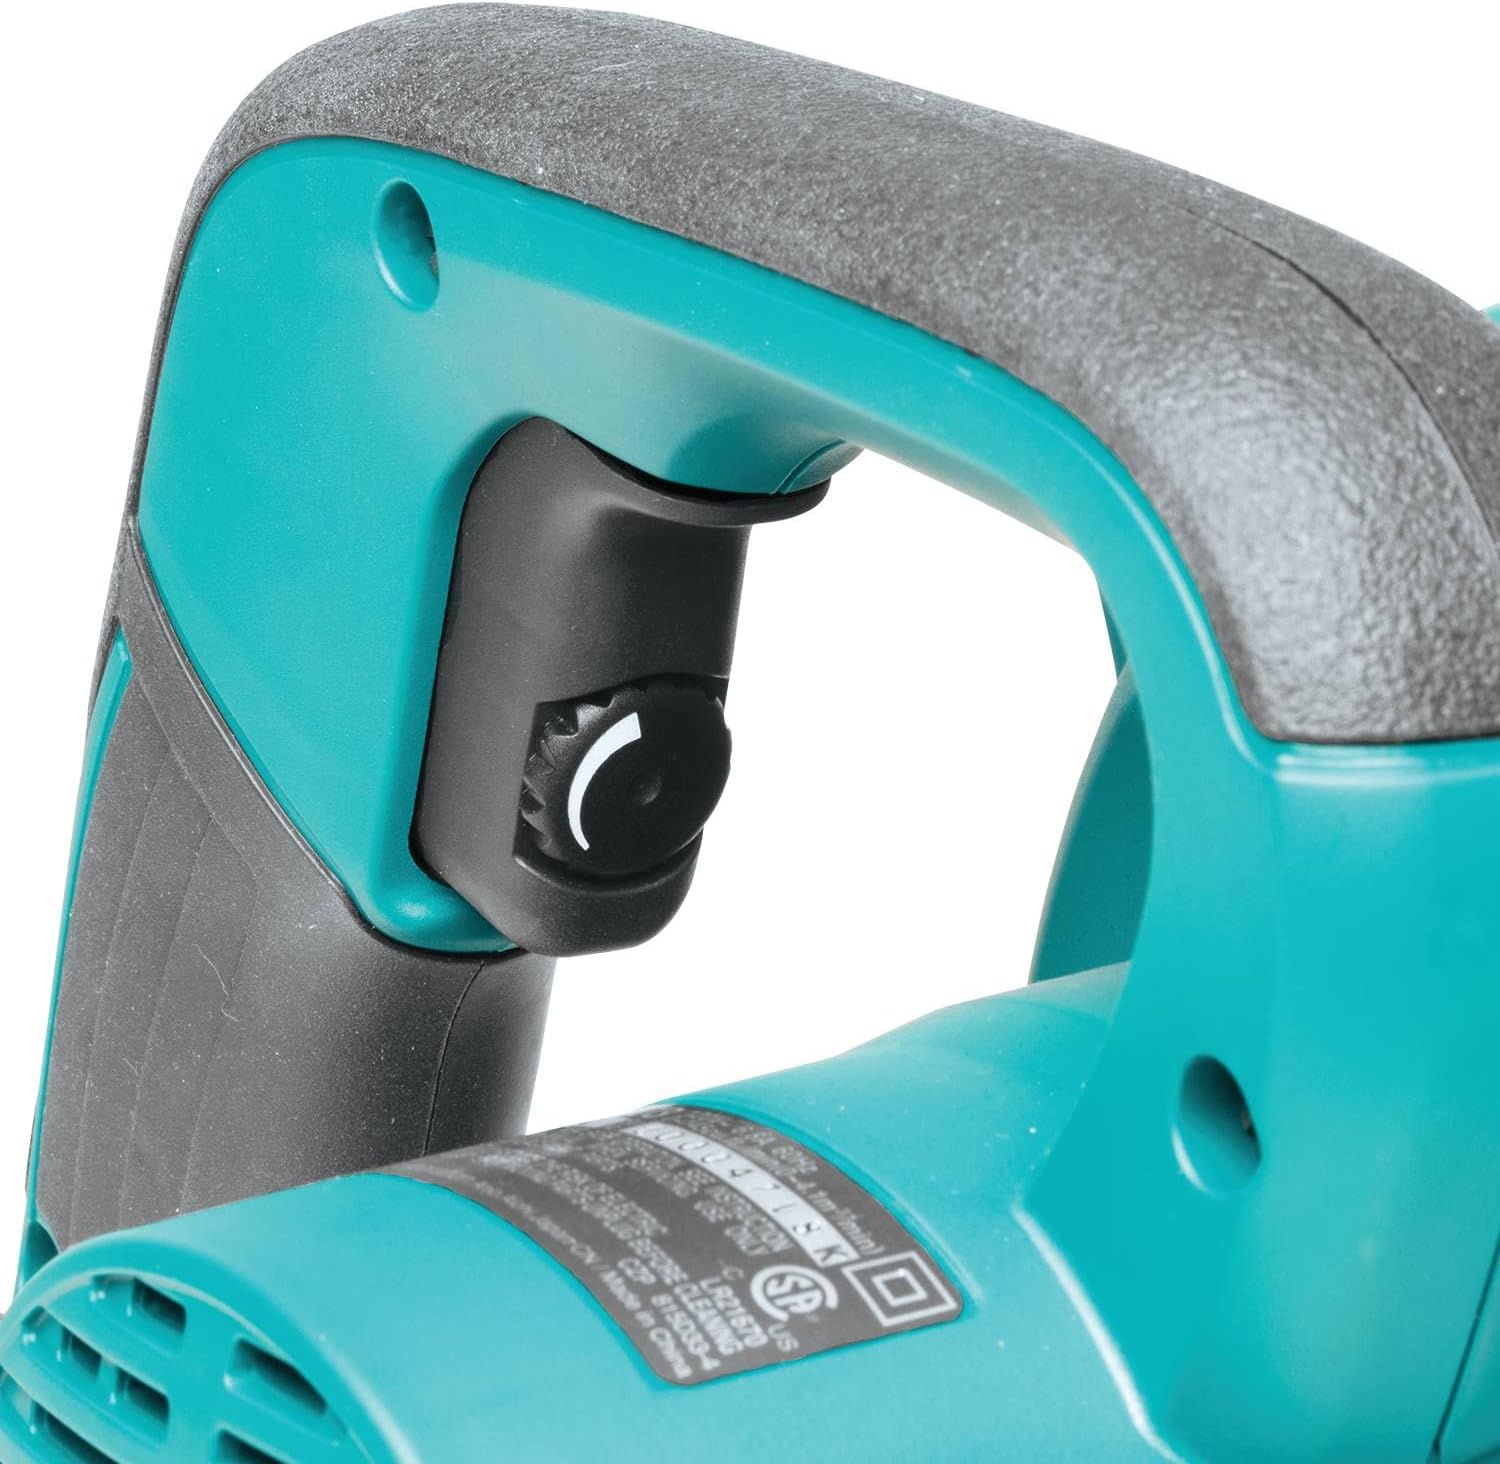
Figure 4.1: Location of the variable speed control dial for adjusting airflow.
4.3 Trigger and Lock-on Button
Press the trigger to start the tool. For continuous operation, press the lock-on button while the trigger is depressed. To release, press the trigger again.
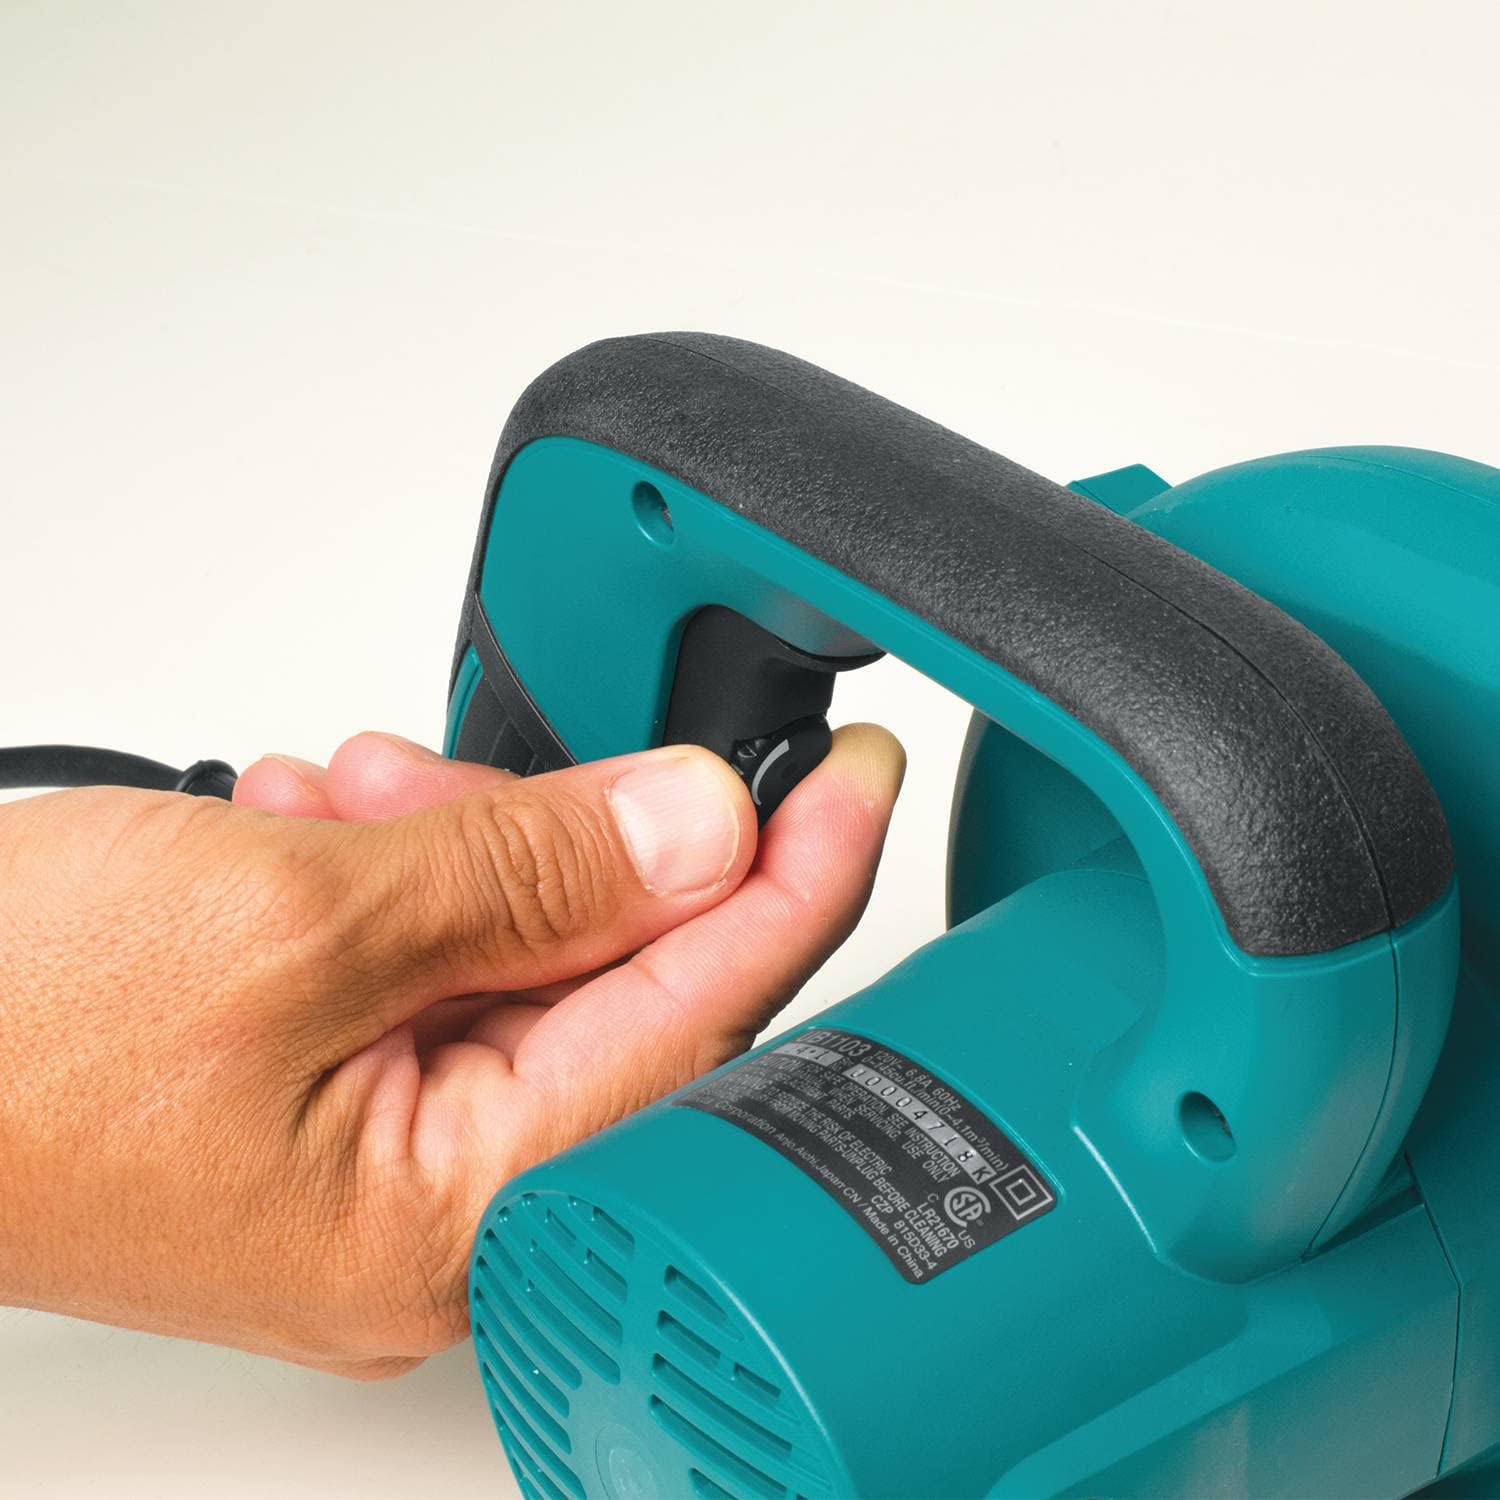
Figure 4.2: The trigger and conveniently located lock-on button for continuous operation.
4.4 Blowing Operation
Direct the nozzle towards the debris you wish to clear. Adjust the speed as needed for the task. The maximum air speed is 203 MPH.

Figure 4.3: Demonstrating the blower in use to clear debris from a floor.
4.5 Vakuumdrift
With the tool configured for vacuuming, position the nozzle over the debris. The tool will draw in debris into the dust bag. Empty the dust bag regularly for optimal performance.

Figure 4.4: The tool being used in vacuum mode to collect wood chips.
5. Vedlikehold
5.1 Rengjøring
Rengjør verktøyets utside regelmessig med en myk, tørr klutamp cloth. Do not use strong detergents or solvents. Ensure air vents are clear of obstructions to prevent overheating.
5.2 Tømming av støvpose
When operating in vacuum mode, regularly check and empty the dust bag. A full dust bag will reduce vacuum efficiency. The dust bag typically has a slider at the bottom for easy emptying.
5.3 Utskifting av karbonbørste
The motor's carbon brushes are consumable parts. When they wear down, the motor may lose power or stop functioning. The brushes are accessible from the outside of the tool, allowing for replacement without full disassembly. Refer to the detailed diagram in the full manual for specific instructions on locating and replacing the brushes.
5.4 Oppbevaring
Store the tool in a clean, dry place, out of reach of children. The unique design allows for self-standing storage.

Figure 5.1: The blower's design allows it to stand upright for convenient storage.
6. Feilsøking
If you encounter issues with your Makita UB1103 Blower, refer to the following common troubleshooting steps:
- Verktøyet starter ikke:
- Sjekk om strømledningen er ordentlig koblet til en stikkontakt som fungerer.
- Ensure the trigger is fully depressed or the lock-on button is engaged correctly.
- Inspiser strømledningen for skader.
- Reduced airflow/suction:
- For blower mode, ensure the nozzle is securely attached and not obstructed.
- For vacuum mode, check if the dust bag is full and needs emptying.
- Verify that the nozzle and dust bag are correctly installed for vacuum operation and that the intake port is clear.
- Check for any blockages in the nozzle or internal passages.
- Overdreven støy eller vibrasjoner:
- Turn off the tool immediately and inspect for any loose parts or foreign objects.
- Hvis problemet vedvarer, avbryt bruken og kontakt kundestøtte.
For problems not listed here, or if troubleshooting steps do not resolve the issue, contact Makita customer service or an authorized service center.
7. Spesifikasjoner
| Trekk | Spesifikasjon |
|---|---|
| Merke | Makita |
| Modellnummer | UB1103 |
| Strømkilde | Elektrisk med ledning |
| Voltage | 100 volt |
| Varevekt | 4.3 pund |
| Maksimal lufthastighet | 203 miles per time |
| Maksimalt luftvolum | 145 kubikkfot per minutt (CFM) |
| Fart | 15 000–18 000 o/min (variabel) |
| Formfaktor | Håndholdt |
| Spesialfunksjon | Justerbar hastighet |
| Inkluderte komponenter | Extension Nozzle, Dust Bag |
| Materiale | Rubber (Nozzle) |
| Varedimensjoner (L x B x H) | 15 cm L x 8 cm B x 9 cm H |
8. Garanti
The Makita UB1103 Blower comes with a 1 års begrenset garanti from the date of purchase. This warranty covers defects in materials and workmanship under normal use. Please retain your proof of purchase for warranty claims. For full warranty terms and conditions, refer to the official Makita warranty documentation or contact Makita customer support.
9. Støtte
For technical assistance, service, or to inquire about replacement parts, please contact Makita customer support. You can typically find contact information on the official Makita website or in the packaging materials that came with your product.
Nettressurser: Besøk den offisielle Makita website for product information, FAQs, and service center locators.
Autoriserte servicesentre: For repairs or professional assistance, locate an authorized Makita service center near you.