1. Introduksjon
The Timex T231W2 is an AM/FM dual alarm clock radio designed for convenience and reliability. It features a large 1.2-inch green LED display for clear visibility, dual alarms that can be set independently, and a programmable sleep timer. An auxiliary input allows connection of external audio devices. A battery backup system maintains time and alarm settings during power interruptions.
2. Nøkkelfunksjoner
- Wake to AM/FM radio or buzzer
- 20 Station preset memory (10 AM, 10 FM)
- Large, easy-to-read 1.2-inch green LED display
- Line-in jack to connect auxiliary audio sources
- 2-inch dynamic speaker for clear sound
- Programmable 90-minute Sleep Timer
- Battery backup for time and alarm settings
3. Pakkens innhold
- Timex T231W2 AM/FM Dual Alarm Clock Radio (White)
4. Kontroller og indikatorer
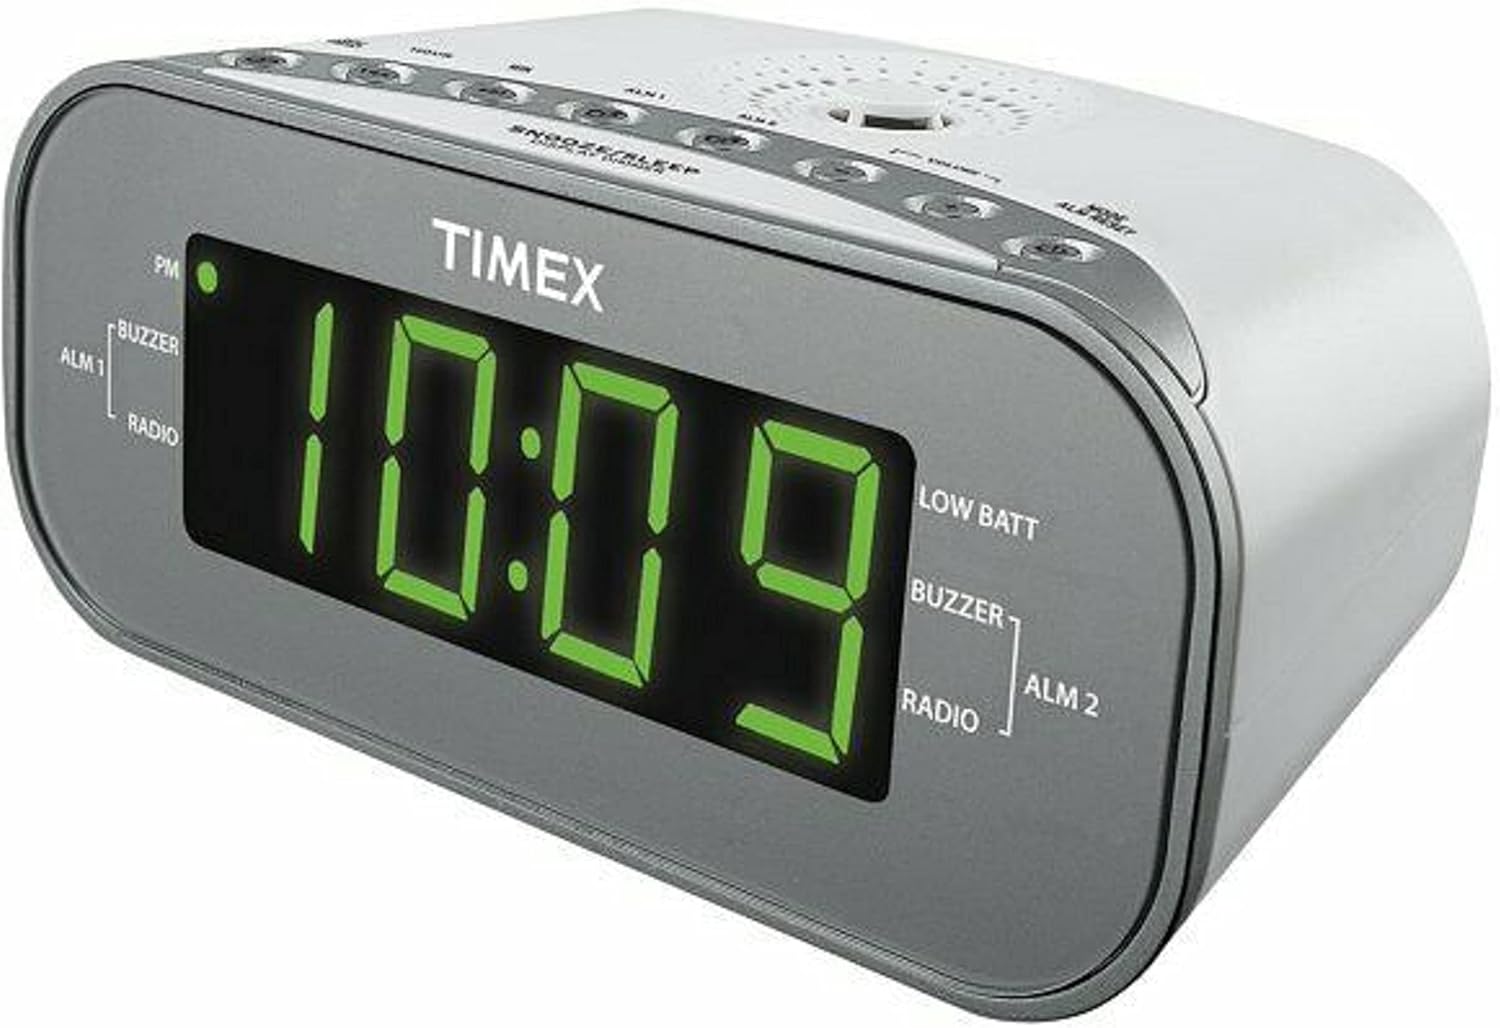
Figur 1: Foran View of the Timex T231W2. This image displays the clock radio from a slight angle, highlighting the large green LED display showing the time '10:09'. Indicators for PM, ALM1 (Buzzer/Radio), ALM2 (Buzzer/Radio), and LOW BATT are visible on the display. The top panel shows several control buttons.

Figur 2: Øverst View of the Timex T231W2 Controls. Dette bildet gir en tydelig view of the control buttons located on the top panel of the clock radio. Buttons include HOUR, MIN, ALM1, ALM2, VOLUME, MODE, ALM RESET, SNOOZE/SLEEP/DISPLAY DIMMER, PRESET, and TUNING controls.
4.1. Vis indikatorer
- Tidsvisning: Large green LED digits show current time.
- PM-indikator: Lyser når klokken er i PM-timene.
- ALM 1 / ALM 2: Indicates which alarm is active.
- BUZZER / RADIO: Indicates if the active alarm is set to buzzer or radio.
- LAV BATT: Lights up when backup batteries are low and need replacement.
4.2. Control Buttons (Top Panel)
- HOUR / MIN: Used to set time and alarm hours/minutes.
- ALM 1 / ALM 2: Used to set and activate Alarm 1 and Alarm 2.
- VOLUM +/-: Adjusts the radio volume.
- MODE / ALM RESET: Switches between functions (e.g., radio, AUX) and resets active alarms.
- SNOOZE / SLEEP / DISPLAY DIMMER: Aktiverer snooze, stiller inn sovetimer eller justerer lysstyrken på skjermen.
- PRESET / TUNING: Used for saving and recalling radio presets, and manually tuning radio frequencies.
5. Oppsett
5.1. Strømtilkobling
- Koble strømledningen til et vanlig stikkontakt.
- The display will flash, indicating the unit is powered on but the time is not yet set.
5.2. Installasjon av batteribackup
The unit requires 2 AAA batteries (not included) for backup power. These batteries maintain time and alarm settings during a power outage.
- Åpne dekselet til batterirommet på undersiden av enheten.
- Insert 2 new AAA batteries, observing the correct polarity (+ and -) as indicated inside the compartment.
- Lukk batteridekselet godt.
- If the 'LOW BATT' indicator lights up, replace the batteries.
5.3. Stille inn gjeldende tid
- Trykk og hold inne MODUS knappen til tidsdisplayet begynner å blinke.
- Trykk på TIME button repeatedly to set the hour. Observe the PM indicator for correct AM/PM setting.
- Trykk på MIN button repeatedly to set the minutes.
- Trykk på MODUS knappen igjen for å bekrefte og avslutte tidsinnstillingsmodus.
6. Bruksanvisning
6.1. Radiodrift (AM/FM)
- Trykk på MODUS -knappen gjentatte ganger til «FM» eller «AM» vises på displayet.
- Trykk på TUNING buttons (up/down arrows) to manually tune to a desired station. Press and hold to auto-scan for the next available station.
- Juster volumet med VOLUM +/- knapper.
6.1.1. Setting and Recalling Radio Presets
The unit can store up to 20 radio stations (10 AM, 10 FM).
- Still inn på ønsket radiostasjon.
- Trykk og hold inne FORHÅNDSINNSTILLING -knappen til det forhåndsinnstilte nummeret blinker på displayet.
- Bruk TUNING buttons to select the desired preset number (P01-P10 for AM/FM).
- Trykk på FORHÅNDSINNSTILLING button again to save the station.
- For å hente frem en forhåndsinnstilling, trykk på FORHÅNDSINNSTILLING -knappen gjentatte ganger for å bla gjennom lagrede stasjoner.
6.2. Setting and Using Alarms (Alarm 1 & Alarm 2)
The clock radio features two independent alarms.
- Trykk og hold inne ALM 1 or ALM 2 knappen til alarmtiden blinker.
- Trykk på TIME og MIN knappene for å stille inn ønsket alarmtid.
- Trykk på ALM 1 or ALM 2 button again to select the wake source: SUMMER or RADIODen tilhørende indikatoren vil lyse.
- Trykk på ALM 1 or ALM 2 button a third time to confirm and activate the alarm. The alarm indicator (ALM 1 or ALM 2) will remain lit.
- For å slå av en alarm som ringer, trykk på ALM-TILBAKESTILLING knappen. Alarmen vil bli nullstilt for neste dag.
- To deactivate an alarm completely, press the corresponding ALM 1 or ALM 2 button until its indicator light turns off.
6.3. Snooze-funksjon
Når en alarm lyder, trykk på SNOOZE/SLEEP/DISPLAY DIMMER knappen for å midlertidig slå av alarmen i omtrent 9 minutter. Alarmen vil lyde igjen etter slumreperioden.
6.4. Sleep Timer
The sleep timer allows you to fall asleep to the radio, which will automatically turn off after a set period (up to 90 minutes).
- Mens radioen spiller, trykk på SNOOZE/SLEEP/DISPLAY DIMMER button repeatedly to cycle through sleep timer options (e.g., 90, 60, 30, 15 minutes, OFF).
- Radioen vil spille i den valgte varigheten og deretter slå seg av automatisk.
6.5. Skjermdimmer
To adjust the brightness of the display, press and hold the SNOOZE/SLEEP/DISPLAY DIMMER button. The display brightness will cycle through different levels. Release the button when the desired brightness is reached.
6.6. Using the Line-in Jack (AUX)
Connect an external audio device (e.g., smartphone, MP3 player) to the unit using a 3.5mm audio cable (not included).
- Plug one end of the 3.5mm audio cable into the Line-in jack on the back of the clock radio.
- Plug the other end into the headphone jack or audio output of your external device.
- Trykk på MODUS -knappen gjentatte ganger til «AUX» vises på displayet.
- Start avspilling på din eksterne enhet.
- Juster volumet med VOLUM +/- buttons on the clock radio and/or your external device.
7. Vedlikehold
7.1. Rengjøring
- Koble enheten fra strømuttaket før rengjøring.
- Bruk en myk, tørr klut til å tørke av de utvendige overflatene.
- Do not use liquid cleaners, abrasive cleaners, or sprays, as these may damage the finish.
7.2. Generell omsorg
- Avoid placing the unit in direct sunlight, near heat sources, or in areas with high humidity or dust.
- Ikke blokker ventilasjonsåpningene.
- Hvis enheten ikke skal brukes over lengre tid, fjern backupbatteriene for å forhindre lekkasje.
8. Feilsøking
| Problem | Mulig årsak | Løsning |
|---|---|---|
| Enheten slås ikke på. | Strømledningen er ikke ordentlig tilkoblet. | Ensure the AC power cord is firmly connected to both the unit and a working wall outlet. |
| Skjermen er svak eller av. | Display dimmer setting is too low. | Trykk og hold inne SNOOZE/SLEEP/DISPLAY DIMMER knappen for å justere lysstyrken. |
| Alarmen lyder ikke. | Alarmen er ikke aktivert eller feil innstilt. | Ensure the ALM 1/ALM 2 indicator is lit and the alarm time/source is correctly set. |
| Dårlig radiomottak. | Antenna not extended or unit's position. | Extend the FM wire antenna fully. For AM, rotate the unit for best reception. Avoid placing near electronic devices that may cause interference. |
| Ingen lyd fra AUX-inngangen. | Incorrect mode or volume settings. | Ensure the unit is in AUX mode. Check volume levels on both the clock radio and the external device. Verify cable connection. |
| 'LOW BATT' indicator is on. | Backup batteries are low. | Replace the 2 AAA backup batteries. |
9. Spesifikasjoner
| Trekk | Spesifikasjon |
|---|---|
| Merke | Timex |
| Modellnummer | T231WY2 |
| Farge | Hvit |
| Visningstype | LED (grønn) |
| Spesielle funksjoner | Alarm, Auto Dimmable, Programmable Sleep Timer, Radio |
| Produktdimensjoner | 6.9 cm B x 2.96 cm H |
| Strømkilde | AC Power, Battery Powered (Backup) |
| Backup-batterier | 2 AAA-batterier kreves (ikke inkludert) |
| Varevekt | 1.4 pund |
| Tilkobling | Line-in Jack (AUX) |
| Radioband | AM/FM |
| Forhåndsinnstillinger | 20 (05:00, 22:00) |
10. Garanti og støtte
For garantiinformasjon eller teknisk støtte, se dokumentasjonen som fulgte med kjøpet, eller kontakt produsenten direkte. Ta vare på kjøpsbeviset for garantikrav.
11. Sikkerhetsinformasjon
ADVARSEL: Dette produktet kan utsette deg for kjemikalier, inkludert bly, som er kjent for staten California for å forårsake kreft og fødselsskader eller andre reproduktive skader. For mer informasjon gå til www.P65Warnings.ca.gov.
Følg alltid grunnleggende sikkerhetsregler når du bruker elektriske apparater for å redusere risikoen for brann, elektrisk støt og personskade.