1. Introduksjon
This instruction manual provides detailed guidance for assembling the Tamiya 1/72 F-16CJ Fighting Falcon Block 50 model kit. This kit allows for the construction of a highly detailed replica of the F-16CJ, a multirole fighter aircraft. Please read all instructions carefully before beginning assembly.
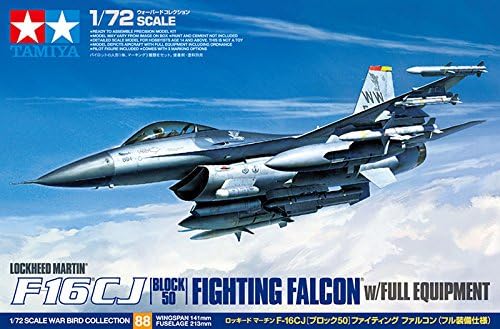
Figure 1: Tamiya 1/72 F-16CJ Fighting Falcon Block 50 Model Kit Box Art. This image displays the packaging for the model kit, featuring an illustration of the completed aircraft with full equipment.
2. Sikkerhetsinformasjon
Please observe the following safety precautions during assembly:
- Små deler: This kit contains small parts that may pose a choking hazard. Keep out of reach of small children.
- Skarpe verktøy: Assembly requires the use of sharp tools such as hobby knives and nippers. Handle with care to prevent injury.
- Lim og maling: Use adhesives and paints in a well-ventilated area. Avoid prolonged skin contact and inhalation of fumes. Refer to the specific product's safety data sheet for detailed information.
- Øyebeskyttelse: Consider wearing eye protection when cutting or sanding parts to prevent debris from entering the eyes.
3. Innhold i settet
The Tamiya 1/72 F-16CJ Fighting Falcon Block 50 model kit includes all necessary plastic parts for assembly, decals, and an instruction booklet. The kit is designed to build a detailed 1/72 scale replica of the F-16CJ with various ordnance options.
- Plastic sprues containing aircraft components, weapons, and pilot figure.
- Clear parts for canopy.
- Decal sheet for markings and stencils.
- Instruction manual (physical booklet).
4. Nødvendig verktøy og materialer
The following tools and materials are recommended for assembly and finishing:

Figure 2: Recommended Tools and Cements. This image illustrates various tools such as tweezers, cutter knife, side cutters, paint brushes, masking tape, and different types of plastic cement and decal solutions.
- Grunnleggende verktøy: Hobby knife, plastic nippers/side cutters, tweezers, sanding sticks/paper.
- Lim: Plastic cement (e.g., Tamiya Cement), super glue (for small or clear parts if specified).
- Maling: Acrylic or enamel paints as specified in the painting guide. Primer and clear coats may also be required.
- Pensler/Airbrush: For painting.
- Decal Solutions: Decal softener and setter for optimal decal application.
- Maskeringstape: For precise painting.
5. Monteringsinstruksjoner
Follow the step-by-step diagrams provided in the physical instruction booklet included with your kit. General assembly steps include:
- Delforberedelse: Carefully remove parts from the sprues using nippers. Clean any mold lines or excess plastic with a hobby knife or sanding stick.
- Underenheter: Assemble smaller components first, such as the cockpit, landing gear, and weapon pylons.
- Main Fuselage: Join the fuselage halves, ensuring proper alignment. Use plastic cement sparingly.
- Wings and Tail: Attach wings and tail sections. Allow sufficient drying time for all glued joints.
- Clear Parts: Attach the canopy and other clear parts using appropriate clear-part adhesive to avoid fogging.
- Ordnance: Assemble and attach the desired weapons and external fuel tanks.
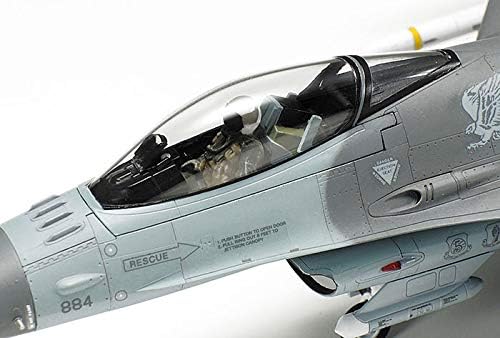
Figur 3: Detaljert view of the F-16CJ cockpit. This image highlights the intricate details of the pilot's seat and instrument panel, which require careful assembly and painting.

Figure 4: Completed Tamiya 1/72 F-16CJ Fighting Falcon model, side view. This image shows the assembled aircraft from a side perspective, demonstrating the overall shape and proportions.

Figure 5: Completed Tamiya 1/72 F-16CJ Fighting Falcon model, underside view with ordnance. This image displays the underside of the aircraft, showcasing the attached weapons and landing gear.
6. Painting Guide
Refer to the color guide in the instruction booklet for specific paint schemes. Tamiya recommends using their XF (flat/matte acrylic), X (gloss acrylic), AS (spray for aircraft models), and TS (spray for plastics) series paints. Ensure surfaces are clean and dry before painting.

Figure 6: Tamiya XF and AS Paints Required (Matte/Flat). This chart lists the specific Tamiya XF (flat acrylic) and AS (spray) paints recommended for the F-16CJ model, along with their article numbers and descriptions.

Figure 7: Tamiya X Paints Required (Gloss). This chart lists the specific Tamiya X (gloss acrylic) paints recommended for details on the F-16CJ model, along with their article numbers and descriptions.
General Painting Tips:
- Apply thin, even coats of paint to avoid obscuring details.
- Allow each coat to dry completely before applying the next.
- Use masking tape for sharp color separation lines.
- A clear gloss coat is recommended before decal application to prevent silvering.
- A final matte or semi-gloss clear coat can be applied after decals for protection and a uniform finish.
7. Dekalapplikasjon
The kit includes a decal sheet for aircraft markings and stencils. Follow the placement guide in the instruction booklet.
Fremgangsmåte for påføring av klistremerke:
- Ensure the painted surface is smooth and glossy. Apply a gloss clear coat if necessary.
- Cut out each decal carefully, as close to the edge of the design as possible.
- Dypp dekalen i lunkent vann i 10–20 sekunder til den glir fritt på bakpapiret.
- Slide the decal onto the model surface using tweezers or a soft brush.
- Position the decal correctly. Use a damp cotton swab to gently press out any air bubbles or excess water.
- Apply decal softener to help the decal conform to panel lines and irregular surfaces.
- Allow decals to dry completely before applying a final clear coat.
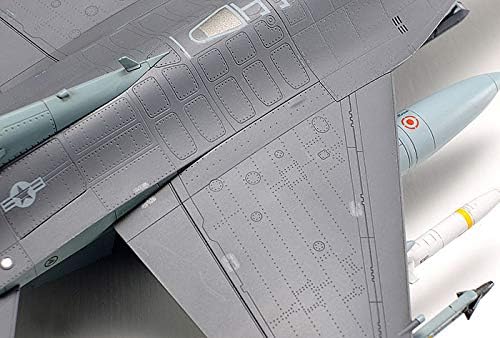
Figur 8: Detaljert view of F-16CJ wing surface. This image shows the intricate panel lines and rivet details on the wing, which are important areas for decal placement and weathering.
8. Spesifikasjoner
| Trekk | Detalj |
|---|---|
| Merke | TAMIYA |
| Modellnavn | F-16CJ Fighting Falcon |
| Modellnummer | TAM60788 |
| Skala | 1/72 |
| Materialtype | Plast |
| Farge | Grey (as depicted on box art) |
| Varedimensjoner (L x B x H) | 11.5 x 7.6 x 2.1 cm (emballasje) |
| Varevekt | 0.56 pund |
| Aldersgruppe (beskrivelse) | Kid (suitable for experienced modelers due to small parts and detail) |
9. Vedlikehold
Once assembled, your model requires minimal maintenance to preserve its appearance:
- Rengjøring: Dust the model regularly with a soft, dry brush or a lint-free cloth. Avoid using harsh chemicals or abrasive cleaners.
- Utstilling: Display the model in a stable location away from direct sunlight, extreme temperatures, and high humidity to prevent fading, warping, or damage to decals.
- Håndtering: Handle the model carefully, especially delicate parts like antennas, landing gear, and ordnance.

Figure 9: Completed Tamiya 1/72 F-16CJ Fighting Falcon model, rear view. This image shows the finished model from the rear, highlighting the exhaust nozzle and tail section, important areas for display and maintenance.
10. Feilsøking av vanlige problemer
Here are solutions to common problems encountered during model assembly:
- Deler som ikke passer:
- Ensure all sprue gates are cleanly removed.
- Check for excess plastic or flash and carefully trim with a hobby knife.
- Dry-fit parts before applying cement to identify and correct fit issues.
- Paint Issues (e.g., uneven coat, brush marks):
- Ensure paint is properly thinned for the application method (brush or airbrush).
- Apply multiple thin coats instead of one thick coat.
- Allow adequate drying time between coats.
- Decal Silvering (air trapped under decal):
- Apply decals over a glossy surface.
- Use decal setting solution to help decals conform to surface details.
- Prick small bubbles with a sharp needle and apply more setting solution.
- Broken Small Parts:
- Use super glue for reattaching small broken plastic parts.
- Consider replacing with stretched sprue or wire if the part is too small or lost.
11. Garanti og støtte
This product is a model kit and is typically sold without a manufacturer's warranty for individual parts once assembly has begun. The product information states "No Warranty".
For questions regarding missing or defective parts upon initial inspection, or for general inquiries about Tamiya products, please contact Tamiya America, Inc. customer support directly. Their contact information can usually be found on the product packaging or their official webnettstedet.
Note: Tamiya America, Inc. is the manufacturer.