1. Overview
The Waveshare High-Precision AD/DA Expansion Board is designed to add advanced analog-to-digital (AD) and digital-to-analog (DA) conversion capabilities to your Raspberry Pi. This board integrates the ADS1256, an 8-channel 24-bit high-precision ADC, and the DAC8552, a 2-channel 16-bit high-precision DAC. It is compatible with Raspberry Pi and provides a robust solution for applications requiring precise analog signal processing.
Figur 1: Overview of the Waveshare High-Precision AD/DA Board connected to a Raspberry Pi.
2. Funksjoner
- Standard Raspberry Pi 40PIN GPIO extension header for direct connection.
- Onboard ADS1256, an 8-channel 24-bit high-precision ADC (4-channel differential input) with a 30ksps samplang hastighet.
- Onboard DAC8552, a 2-channel 16-bit high-precision DAC.
- Input interface via pinheaders for connecting analog signals.
- Compatible with Waveshare sensor interface standard for easy connection to various analog sensor modules.
- Onboard input/output interface via screw terminals for connecting analog/digital signals.
- Features an AD/DA detect circuit for signal demonstration.
3. Board Layout and Interface Definition
This section details the physical layout and pin definitions of the AD/DA Expansion Board.

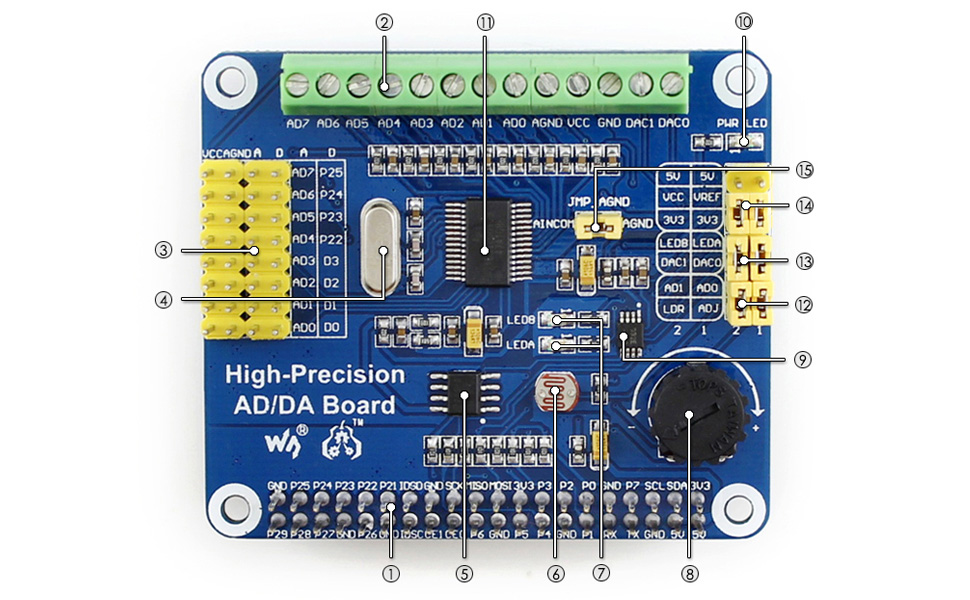
Figure 2: Labeled components of the Waveshare High-Precision AD/DA Board.
- Raspberry Pi GPIO interface: For connecting with the Pi.
- AD/DA input/output: Screw terminals for signal connections.
- AD input: Pinheaders, compatible with Waveshare sensor interface standard.
- 7.68M crystal: Provides timing for the board.
- LM285-2.5: Provides reference voltage for the ADC chip.
- Photo resistor: An example sensor for demonstration.
- LED output indicator: Visual feedback for output.
- 10K potentiometer: An example input for demonstration.
- DAC8552: 16-bit high-precision DAC, 2 channels.
- Power indicator: LED to show power status.
- ADS1256: 24-bit high-precision ADC, 8 channels (4 differential input).
- ADC testing jumper: For configuring ADC test modes.
- DAC testing jumper: For configuring DAC test modes.
- Power selection jumper: To select power source.
- ADC reference ground configuration: When AD single inputted, the AINCOM is reference terminal, can be connected to GND or external reference voltage.
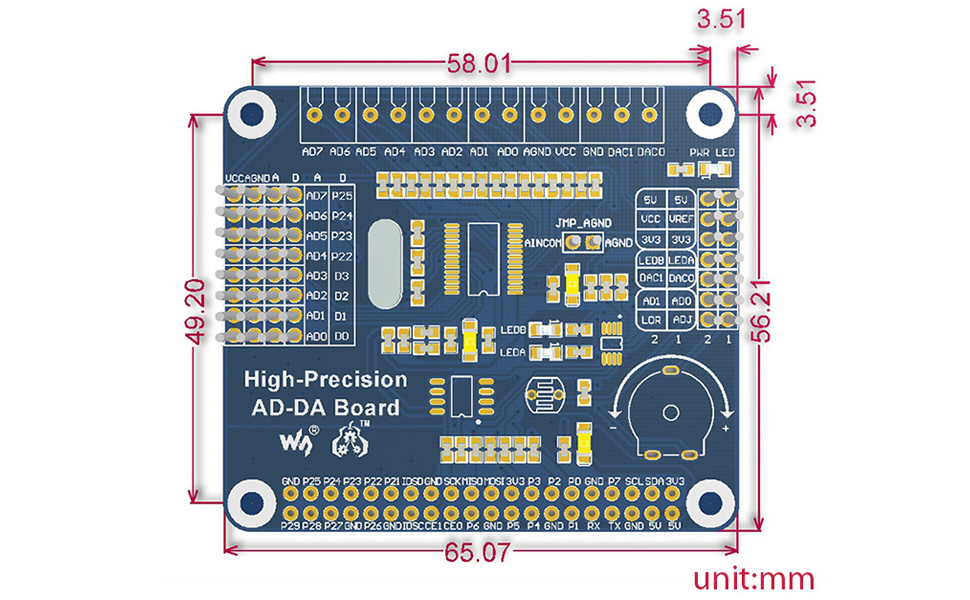
Figure 3: Pin definitions for the Waveshare High-Precision AD/DA Board.
| PIN-kode | SYMBOL | BESKRIVELSE |
|---|---|---|
| 1, 17 | 3.3V | Strømforsyning (3.3V) |
| 2, 4 | 5V | Strømforsyning (5V) |
| 3; 5; | NC | Ikke tilkoblet |
| 6, 9, 14, 20, 25, 30, 34, 39 | GND | Bakke |
| 11 | DRDY | ADS1256 data ready output, low active |
| 12 | TILBAKESTILL | ADS1256 reset input |
| 13 | PDWN | ADS1256 sync/power off input, low active |
| 15 | CS0 | ADS1256 chip select, low active |
| 16 | CS1 | DAC8552 chip select, low active |
| 19 | DIN | SPI-datainngang |
| 21 | Gjør | SPI-datautgang |
| 23 | SCK | SPI klokke |
| 31, 33, 35, 37 | GPIO | Extend to sensor interface |
4. Installasjonsinstruksjoner
Follow these steps to set up your Waveshare High-Precision AD/DA Expansion Board with a Raspberry Pi:
- Fysisk tilkobling: Carefully align the 40-pin GPIO header of the AD/DA board with the corresponding pins on your Raspberry Pi. Press down gently to ensure a secure connection.
- Strømforsyning: Ensure your Raspberry Pi is powered off before connecting the AD/DA board. Once connected, power on the Raspberry Pi. The power indicator LED on the AD/DA board should illuminate.
- Programvareinstallasjon:
- Access the official Waveshare Wiki for the "High-Precision AD/DA Board" to find the latest drivers and exampkoden.
- Download and install the necessary libraries and example programs for the ADS1256 ADC and DAC8552 DAC. This typically involves cloning a Git repository and compiling C or Python code.
- Ensure the Broadcom GPIO library is correctly installed and configured for your Raspberry Pi operating system (e.g., Raspbian).
- Innledende testing: Kjør den oppgitte eksample code to verify basic functionality of both the ADC and DAC. This will help confirm correct hardware connection and software setup.
Note: Refer to the Waveshare Wiki for detailed, up-to-date software installation guides and specific commands for your Raspberry Pi model and operating system.
5. Bruksanvisning
Operating the High-Precision AD/DA Board involves configuring the ADC and DAC chips via SPI communication from the Raspberry Pi.
5.1 Analog-to-Digital Conversion (ADC) with ADS1256
- Inngangstilkobling: Connect analog signals to the AD input pinheaders or screw terminals (AD0-AD7). The ADS1256 supports 8 single-ended channels or 4 differential channels.
- Konfigurasjon: Use the provided software libraries to configure the ADS1256. Key parameters include:
- Kanalvalg: Select the desired input channel(s).
- Gevinstinnstilling: Adjust the programmable gain amplifier (PGA) for optimal signal range.
- Datahastighet: Sett sampling rate (up to 30ksps). Note that higher sample rates may introduce more noise.
- Referanse Voltage: Configure the internal or external reference voltage.
- Datainnsamling: Initiate conversions and read the 24-bit digital data from the ADS1256 via SPI. The DRDY pin indicates when new data is available.
5.2 Digital-to-Analog Conversion (DAC) with DAC8552
- Utgangstilkobling: Connect your output devices to the DAC0 and DAC1 pins on the screw terminals.
- Datautgang: Send 16-bit digital values to the DAC8552 via SPI. The DAC will convert these values into corresponding analog voltages.
- Waveform Generation: By continuously updating the DAC with a sequence of digital values, you can generate various analog waveforms.
Se eksample code and the ADS1256/DAC8552 datasheets for detailed programming information and advanced configurations.
6. Vedlikehold
Proper maintenance ensures the longevity and reliable operation of your AD/DA Expansion Board:
- Håndtering: Always handle the board by its edges to avoid touching components, especially the sensitive ICs. Static electricity can damage electronic components.
- Rengjøring: Rengjør om nødvendig forsiktig brettet med en myk, tørr børste eller trykkluft for å fjerne støv. Unngå bruk av væsker eller slipende materialer.
- Lagring: Oppbevar brettet i en antistatisk pose på et tørt og kjølig sted når det ikke er i bruk.
- Tilkoblinger: Periodically check all connections (GPIO, screw terminals) to ensure they are secure and free from corrosion.
- Firmware/programvareoppdateringer: Regularly check the Waveshare Wiki for any updated drivers, libraries, or firmware that may improve performance or fix issues.
7. Feilsøking
If you encounter issues with your AD/DA Expansion Board, consider the following troubleshooting steps:
- Brettet ikke oppdaget:
- Ensure the board is correctly seated on the Raspberry Pi's GPIO header.
- Verify that the Raspberry Pi is powered on and the AD/DA board's power LED is lit.
- Check SPI interface enablement on your Raspberry Pi (e.g., via
raspi-config).
- Incorrect Readings/Outputs:
- Double-check your wiring for analog inputs/outputs.
- Review your software configuration for the ADS1256 (gain, data rate, channel selection) and DAC8552.
- Ensure the reference voltage innstillingene er riktige.
- Test with known voltage sources for ADC and measure DAC output with a multimeter.
- Noise at higher sample rates for ADC is expected; consider lower rates for higher precision.
- Programvare-/driverproblemer:
- Confirm that you are using the correct and latest software libraries from the Waveshare Wiki.
- Verify that all dependencies (e.g., Broadcom GPIO library) are installed and correctly configured.
- Check for compilation errors if building from source.
- Consult community forums or the Waveshare support page for known issues and solutions.
- Board Not Functioning:
- Disconnect and reconnect the board.
- Try a different Raspberry Pi if available to rule out Pi-specific issues.
- Inspect the board for any visible damage or bent pins.
8. Spesifikasjoner
| Trekk | Detalj |
|---|---|
| Produktnavn | High-Precision AD/DA Board |
| Merke | Waveshare |
| ADC Chip | ADS1256 (24-bit, 8-channel, 4-differential input) |
| ADC Sampling rate | Up to 30ksps |
| DAC-brikke | DAC8552 (16-bit, 2-channel) |
| Grensesnitt | SPI (Serial Peripheral Interface) |
| Kompatibilitet | Raspberry Pi (40PIN GPIO) |
| Operativsystem | Linux |
| Tilkoblingsteknologi | GPIO |
| Produktdimensjoner | 7.09 x 3.94 x 3.54 tommer (ca. 180 x 100 x 90 mm) |
| Varevekt | 0.353 unser (ca. 10 gram) |
| Inkluderte komponenter | High-Precision AD/DA Board, RPi screws pack (2pcs) |

Figure 4: Physical dimensions of the Waveshare High-Precision AD/DA Board in millimeters.
9. Garanti og støtte
For garantiinformasjon, teknisk støtte og ytterligere ressurser, vennligst besøk den offisielle Waveshare-siden website or their product Wiki page. The Wiki often contains detailed documentation, schematics, and example code that can be invaluable for advanced users and troubleshooting.
Waveshare Official Webnettsted: www.waveshare.com
Product Wiki: Søk etter "High-Precision AD/DA Board" on the Waveshare Wiki for specific documentation.