1. Introduksjon
This manual provides essential instructions for the safe and efficient operation of your Automatic Mini Double Station Mug Heat Press Transfer Machine. Please read this manual thoroughly before use to ensure proper setup, operation, and maintenance.
This machine is designed for sublimation printing on various mug sizes, featuring a double station design for increased efficiency.
2. Sikkerhetsinstruksjoner
- Bruk alltid maskinen på en stabil, varmebestandig overflate.
- Keep hands clear of heating elements during operation to prevent burns.
- Sørg for god ventilasjon i arbeidsområdet.
- Ikke utsett maskinen for vann eller overdreven fuktighet.
- Trekk ut støpselet til maskinen når den ikke er i bruk eller før rengjøring/vedlikehold.
- Do not attempt to modify or repair the machine yourself. Contact qualified personnel for service.
- Keep children and pets away from the operating machine.
3. Pakkens innhold
Bekreft at alle varene er til stede i pakken:
- 1x Double Mug Heat Press Machine
- 1x engelsk brukermanual (dette dokumentet)
- 2x 11oz Heating Pads (pre-installed or included separately)
Hvis noen varer mangler eller er skadet, vennligst kontakt kundestøtte.
4. Oppsett
- Utpakking: Carefully remove the heat press machine from its packaging. Retain packaging for future storage or transport.
- Plassering: Place the machine on a flat, stable, and heat-resistant surface. Ensure there is adequate space around the machine for ventilation and safe operation.
- Strømtilkobling: Ensure the machine's power switch is in the OFF position. Plug the machine into a standard 110V AC power outlet.
- Innledende inspeksjon: Before first use, inspect the heating pads and control panel for any visible damage.

Figur 1: Foran view of the Double Mug Heat Press Machine. This image shows the overall design with two mug stations and the central control panel.
5. Bruksanvisning
5.1 Kontrollpanel overview

Figure 2: Close-up of the LCD control panel. The panel features an LCD display for temperature and time, along with buttons for timing, temperature adjustment, and mode selection for left and right stations.
The machine features an LCD control panel for setting temperature and time. It allows for independent control of each mug station.
5.2 Grunnleggende driftstrinn
- Strøm på: Turn on the main power switch. The LCD display will illuminate.
- Still inn temperatur: Use the temperature adjustment buttons (often indicated by '+' and '-' or specific temperature setting buttons) to set the desired transfer temperature. The recommended transfer temperature is 180°C (356°F).
- Still inn tid: Use the timing adjustment buttons to set the desired transfer time. The recommended transfer time is 90 seconds.
- Forvarm: Allow the machine to preheat until it reaches the set temperature. The display will show the current temperature.
- Klargjør krus: Wrap your sublimation print around the mug, securing it with heat-resistant tape. Ensure the print is flat against the mug surface.
- Insert Mug: Carefully place the prepared mug into the heating pad of one or both stations. Ensure the mug is centered and the heating pad fully encompasses the printed area.
- Påfør trykk: Lukk clamp handle to apply even pressure to the mug. The machine is designed to accommodate various mug sizes (6OZ, 9OZ, 11OZ, 12OZ, 17OZ) with appropriate heating pads.
- Start overføring: Press the start button (often labeled 'Timing' or 'Start') for the respective station. The timer will begin counting down.
- Remove Mug: Once the timer reaches zero, carefully open the clamp handle and remove the hot mug using heat-resistant gloves.
- Kjøl ned: Place the mug on a heat-resistant surface to cool. Once cool, carefully remove the sublimation paper.

Figure 3: A mug correctly positioned within the heating element of the heat press machine, ready for the sublimation process.
5.3 Workflow Diagram
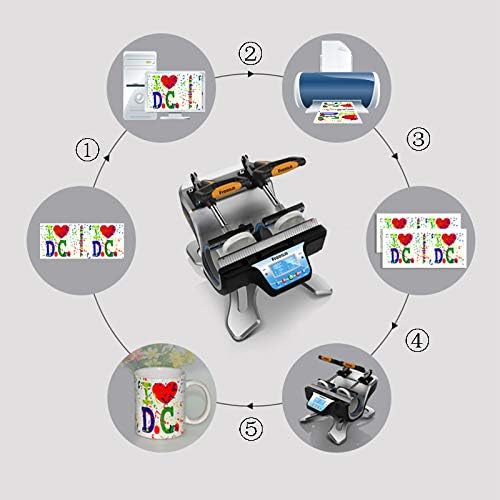
Figure 4: A visual representation of the sublimation printing process, from designing and printing the image to pressing it onto the mug and the final result.
5.4 Replacing Heating Pads
The heating pads are replaceable to accommodate different mug sizes. The machine includes two 11oz heating pads. For other sizes, contact customer support.

Figur 5: En detaljert view of the heating element, showing its construction and how it secures the mug for heat transfer.
- Slå av og koble fra: Ensure the machine is turned off and unplugged from the power source. Allow the heating pads to cool completely.
- Loosen Fasteners: Locate the fasteners securing the heating pad to the machine frame. Loosen or remove them as required.
- Disconnect Pad: Carefully disconnect the electrical connector for the heating pad.
- Fjern gammel pute: Slide out the old heating pad.
- Installer ny pute: Insert the new heating pad, ensuring it is correctly aligned.
- Connect and Secure: Reconnect the electrical connector and secure the heating pad with the fasteners.
- Test: Plug in the machine and perform a test run to ensure the new heating pad functions correctly.
6. Vedlikehold
- Rengjøring: After each use, ensure the machine is cool and unplugged. Wipe down the exterior surfaces with a soft, dry cloth. Do not use abrasive cleaners or solvents.
- Heating Pad Care: Inspect heating pads regularly for wear or damage. Replace if necessary to ensure consistent heat transfer.
- Lagring: Oppbevar maskinen i et tørt, støvfritt miljø når den ikke er i bruk.
7. Feilsøking
| Problem | Mulig årsak | Løsning |
|---|---|---|
| Maskinen slår seg ikke på. | Not plugged in; power switch off; faulty power outlet. | Sjekk strømledningens tilkobling; sørg for at strømbryteren er PÅ; test stikkontakten med en annen enhet. |
| Temperaturen når ikke innstilt verdi. | Feil temperaturinnstilling; defekt varmeelement. | Verify temperature setting; allow more time for preheating; contact support if issue persists. |
| Ujevne overføringsresultater. | Uneven pressure; worn heating pad; incorrect mug placement. | Ensure mug is centered and clamp is fully engaged; inspect heating pad for wear; ensure print is flat on mug. |
| Timer not functioning. | Incorrect operation; control panel issue. | Review operating instructions for timer activation; contact support. |
8. Spesifikasjoner
| Modell | Automatic Mini Double Station Mug Heat Press Transfer Machine |
| Compatible Mug Sizes | 6OZ, 9OZ, 11OZ, 12OZ, 17OZ |
| Voltage | 110V |
| Makt | 280W + 280W (Total 560W) |
| Overføringstemperatur | 180 °C (356 °F) |
| Overføringstid | 90 Seconds (Adjustable) |
| Kontrollmodell | LCD-kontroll |
| Vekt | 14.6 lbs (7.2 kg) |
| Overordnede dimensjoner | 37 x 30.6 x 34 cm (14.5 x 12 x 13.38 tommer) |
| Plugg Type | US Plugg |
9. Garanti og støtte
No specific warranty information is provided with this product. For technical support, replacement parts (such as different sized heating pads), or any operational questions, please refer to the seller or manufacturer's contact information provided at the point of purchase.