Introduksjon
This manual provides detailed instructions for the setup, operation, and maintenance of your Digoo DG-C3 Wireless Weather Station. This device integrates a hygrometer, thermometer, weather forecast station, and alarm clock functions, offering comprehensive environmental monitoring and timekeeping capabilities. Please read this manual thoroughly before using the product to ensure correct operation and to maximize its features.
Pakkeinnhold
- Digoo DG-C3 Wireless Weather Station Unit
- USB strømkabel
- Brukerhåndbok (dette dokumentet)
Merk: Batterier (3x AAA) er ikke inkludert og må kjøpes separat.
Produkt overview
Familiarize yourself with the various components of your Digoo DG-C3 weather station.
Display foran
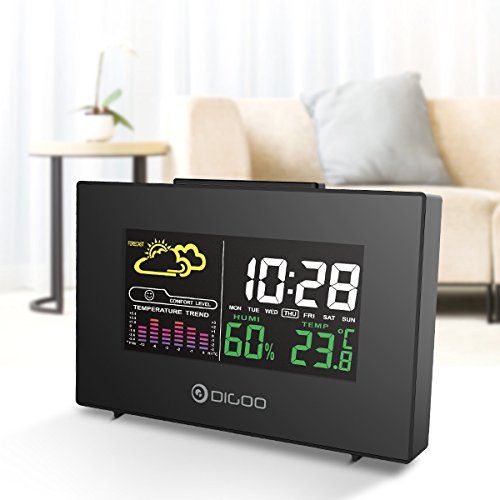
The front display features a color backlit screen showing the current time, day of the week, indoor humidity, indoor temperature, and a weather forecast icon. It also includes a comfort level indicator and a temperature trend graph.
- Tid og dato: Digital display of current time and day.
- Værmelding: Icons indicating predicted weather conditions (e.g., sunny, cloudy, rainy).
- Komfortnivå: Indikerer innekomfort basert på temperatur og fuktighet.
- Temperature Trend: Bar graph showing recent temperature changes.
- Fuktighet: Prosenttage display of indoor humidity.
- Temperatur: Digital display of indoor temperature (Celsius or Fahrenheit).
tilbake Panel
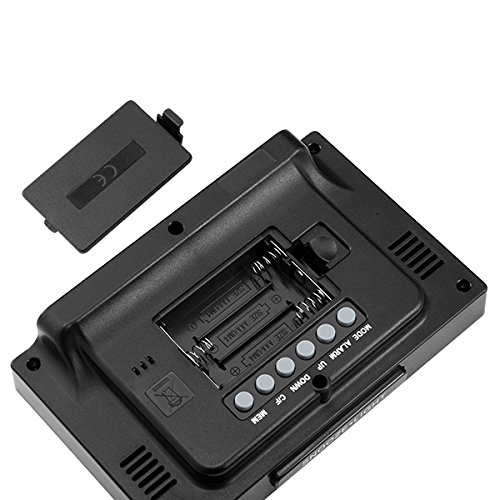
The back of the unit houses the battery compartment and various control buttons for setting the device.
- Batterirom: Holds 3x AAA batteries for power backup.
- MODUS-knapp: Used to switch between display modes and enter setting mode.
- ALARM-knapp: Used to set and activate/deactivate the alarm.
- OPP -knapp: Used to increase values during settings or view maximum records.
- NED -knapp: Used to decrease values during settings or view minimum records.
- °C/°F-knapp: Veksler mellom temperaturenhetene Celsius og Fahrenheit.
- MEM-knapp: Vant til view memory records for temperature and humidity.
Topppanel
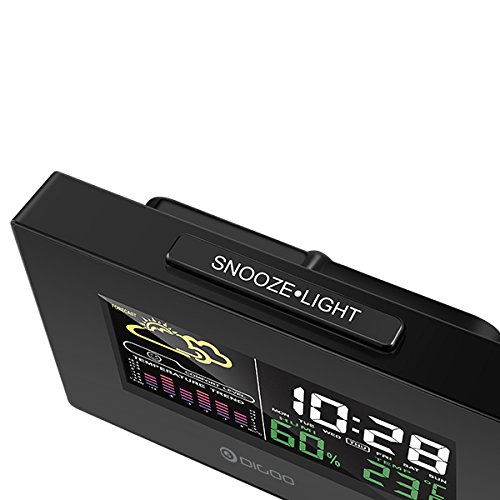
The top of the unit features a single button for snooze and backlight functions.
- SNOOZE·LIGHT Button: Press to activate the backlight or snooze the alarm.
Oppsett
1. Slå på
- Batteriinstallasjon: Open the battery compartment cover on the back of the unit. Insert 3x AAA batteries, ensuring correct polarity (+/-). Close the cover. Batteries provide backup power and allow for portability.
- USB Power Connection: For continuous power and backlight, connect the provided USB cable to the USB port on the unit and to a compatible USB power adapter (not included) or a computer USB port.
- The display will light up and show default settings.
2. Initial Settings (Time, Date, Unit)
- Tidsinnstilling:
- Trykk og hold inne MODUS -knappen i omtrent 3 sekunder for å gå inn i tidsinnstillingsmodus. Timetallet vil blinke.
- Bruk UP or NED knapper for å justere timen.
- Pressen MODUS again to confirm the hour and move to minute setting. The minute digit will flash.
- Bruk UP or NED knapper for å justere minuttet.
- Pressen MODUS again to confirm and move to 12/24 hour format selection.
- Bruk UP or NED buttons to select 12-hour or 24-hour format.
- Pressen MODUS for å bekrefte og avslutte tidsinnstillingen.
- Datoinnstilling:
- Etter å ha stilt inn tiden, trykk MODUS again to enter date setting mode. The year will flash.
- Bruk UP or NED knapper for å justere året.
- Pressen MODUS to confirm and move to month setting.
- Bruk UP or NED knapper for å justere måneden.
- Pressen MODUS to confirm and move to day setting.
- Bruk UP or NED knapper for å justere dagen.
- Pressen MODUS to confirm and exit date setting.
- Valg av temperaturenhet:
- Trykk på ° C / ° F button on the back of the unit to switch between Celsius (°C) and Fahrenheit (°F) temperature display.
Bruksanvisning
1. Vekkerklokkefunksjon
- Stille inn alarmen:
- Trykk på ALARM knappen én gang for å vise gjeldende alarmtidspunkt.
- Trykk og hold inne ALARM button for approximately 3 seconds. The hour digit will flash.
- Bruk UP or NED knapper for å justere alarmtiden.
- Pressen ALARM again to confirm the hour and move to minute setting. The minute digit will flash.
- Bruk UP or NED knapper for å justere alarmminuttet.
- Pressen ALARM for å bekrefte og avslutte alarminnstillingen.
- Aktivere/deaktivere alarmen:
- Mens du er i normal tidsvisningsmodus, trykker du på ALARM button repeatedly to toggle the alarm ON or OFF. An alarm icon will appear on the display when the alarm is active.
- Snooze-funksjon:
- Når alarmen går, trykker du på SNOOZE·LYS button on the top of the unit to activate the snooze function. The alarm will temporarily stop and sound again after a few minutes (typically 5-10 minutes).
- To stop the alarm completely, press any other button on the back panel.
2. Værmelding
The weather station provides a weather forecast based on internal atmospheric pressure changes. The forecast icons (e.g., sunny, cloudy, rainy) are predictions for the next 12-24 hours and may not always match local weather services, which use more comprehensive data.
- The forecast icon is displayed on the upper left of the screen.
- The device requires a period of stable operation (typically 24 hours) to calibrate and provide accurate forecasts.
3. Temperatur- og fuktighetsvisning
- The current indoor temperature and humidity are continuously displayed on the screen.
- Viewing Min/Max Records:
- Trykk på MEM én gang for å vise maksimal registrert temperatur og fuktighet.
- Pressen MEM again to display the minimum recorded temperature and humidity.
- Pressen MEM a third time to return to current readings.
- To clear the min/max records, press and hold the MEM knappen i 3 sekunder mens viewi postene.
4. Bakgrunnsbelysningskontroll
- When powered by USB, the backlight will remain on.
- When powered by batteries only, press the SNOOZE·LYS button to temporarily activate the backlight for a few seconds.
Vedlikehold
- Rengjøring: Wipe the unit with a soft, dry cloth. Do not use abrasive cleaners or solvents. Avoid getting moisture into the unit.
- Batteribytte: When the display becomes dim or functions irregularly, replace the 3x AAA batteries in the back compartment. Ensure correct polarity.
- Lagring: If not using the device for an extended period, remove the batteries to prevent leakage. Store in a cool, dry place.
Feilsøking
| Problem | Mulig årsak | Løsning |
|---|---|---|
| Skjermen er tom eller svak. | Lave batterier eller ingen strømtilkobling. | Replace batteries or connect the USB power cable. |
| Feil tid/dato. | Time/date not set correctly after power loss or initial setup. | Follow the "Initial Settings" section to reset time and date. |
| Værmeldingen virker unøyaktig. | Device needs calibration time; local conditions may differ from pressure-based forecast. | Allow 24 hours for calibration. Understand that the forecast is based on internal pressure changes. |
| Alarmen lyder ikke. | Alarmen er ikke aktivert, eller volumet er for lavt (hvis justerbart). | Ensure the alarm icon is displayed. Check alarm settings. |
Spesifikasjoner
| Modell: | DG-C3 |
| Tilkobling: | USB (for strøm) |
| Strømkilde: | 3x AAA Batteries (not included) or USB Power |
| Spesielle funksjoner: | Hygrometer, Thermometer, Weather Forecast, Alarm Clock, Color Backlight, Portable |
| Utstilling: | Color Backlit LCD |
| Temperaturenhet: | °C / °F selectable |
Garanti og støtte
For garantiinformasjon eller teknisk støtte, se dokumentasjonen som fulgte med ved kjøpstidspunktet eller kontakt forhandleren din. Ta vare på kjøpskvitteringen som kjøpsbevis.