1. Introduksjon
Thank you for choosing the Electriq 6 Place Freestanding or Integrated Table Top Dishwasher. This manual provides essential information for the safe and efficient operation, installation, and maintenance of your appliance. Please read it thoroughly before first use and keep it for future reference.
This compact dishwasher is designed for small kitchens or households, offering convenience and efficiency for up to 6 place settings.
2. Sikkerhetsinformasjon
Følg alltid følgende sikkerhetsregler for å redusere risikoen for brann, elektrisk støt, personskade eller skade på apparatet.
- Sørg for at oppvaskmaskinen er riktig jordet.
- Ikke bruk oppvaskmaskinen hvis strømledningen eller støpselet er skadet.
- Hold barn unna oppvaskmaskinen, spesielt når den er i gang eller når døren er åpen.
- Bruk kun vaskemidler og skyllemidler som er spesielt utviklet for oppvaskmaskiner.
- Ikke åpne døren under drift, da det kan sprute ut varmt vann.
- Skarpe gjenstander bør lastes med spissene ned for å unngå skader.
- Koble apparatet fra strømforsyningen før rengjøring eller vedlikehold.
3. Produktet er overview
The Electriq 6 Place Table Top Dishwasher is a compact and efficient appliance designed to fit conveniently on your countertop or integrate into your kitchen space.

Figur 3.1: Foran view of the Electriq 6 Place Table Top Dishwasher.

Figure 3.2: The compact dishwasher integrated into a kitchen countertop, next to a microwave.
Nøkkelfunksjoner:
- Kapasitet for 6 kuverter: Ideal for small households, accommodating up to 66 pieces of crockery and cutlery.
- Kompakt design: Freestanding or integrated, perfect for countertops or limited spaces.
- 6 vaskeprogrammer: Including Normal, Intensive, Eco, Glass, 90 Min, and Rapid cycles.
- Forsinkelsestimer: Allows you to set the wash to start 2, 4, 6, or 8 hours later.
- Energieffektiv: Rated F for energy efficiency.
- Anti-flood and Anti-leak Protection: Enhanced safety features for your kitchen.
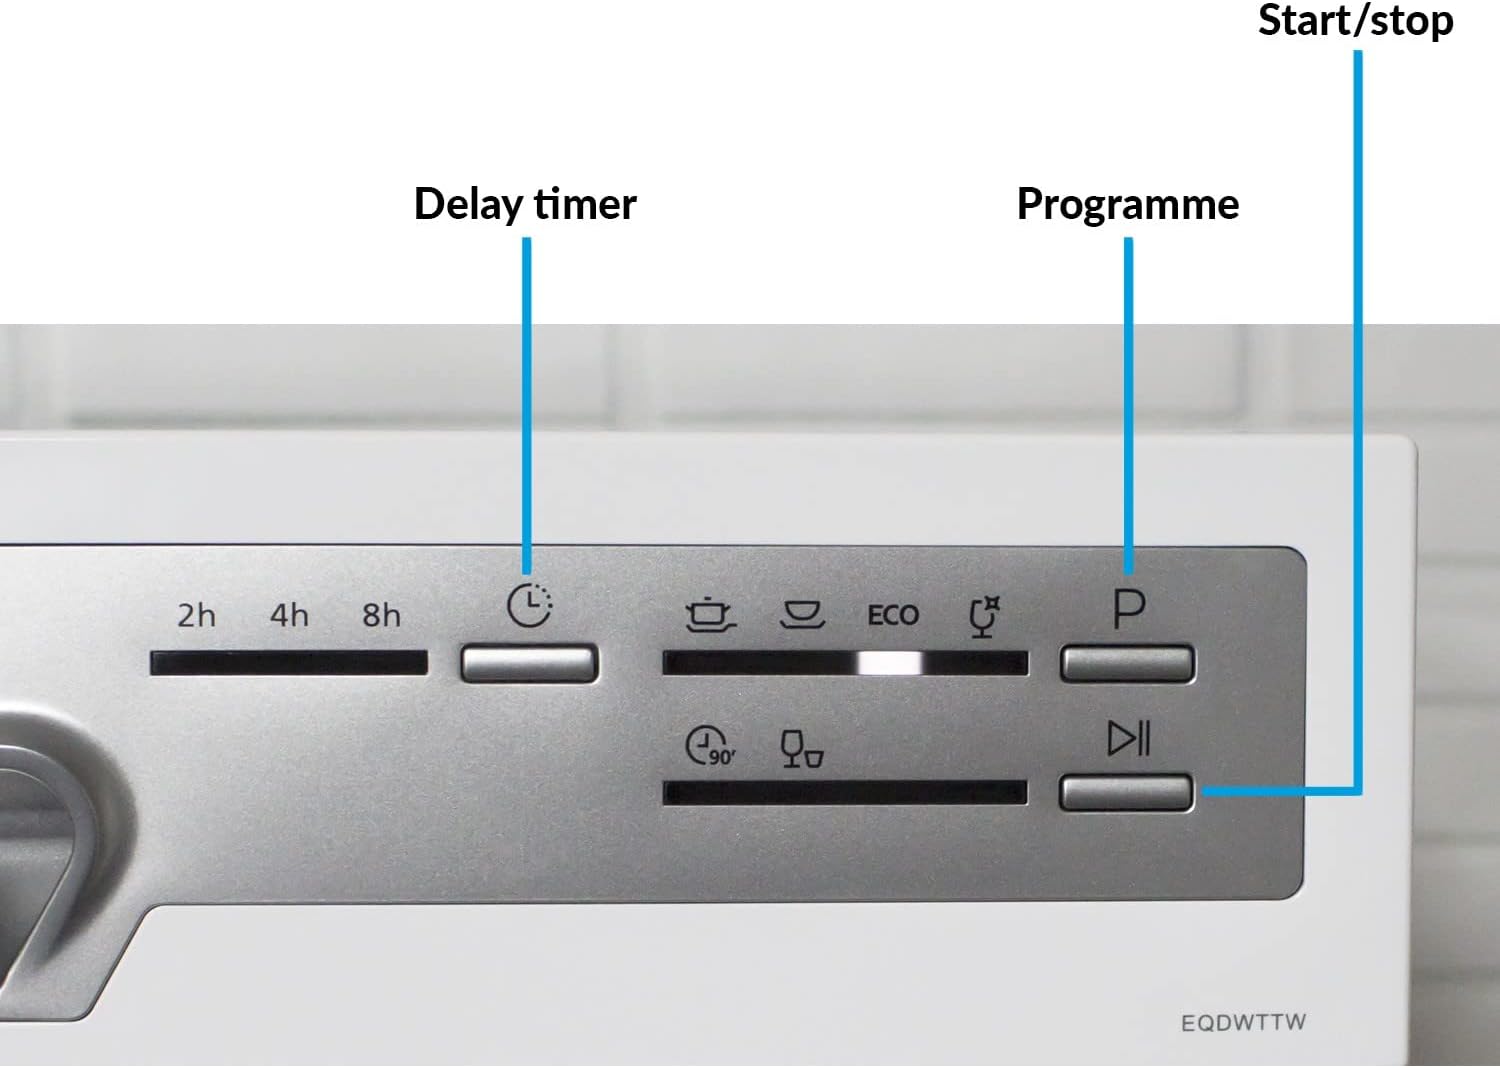
Figur 3.3: Detaljert view of the control panel, showing buttons for Delay Timer, Programme selection, and Start/Stop.
4. Installasjon og oppsett
4.1 Utpakking
Carefully remove all packaging materials. Inspect the dishwasher for any damage. Report any damage to your retailer immediately.
4.2 Posisjonering
The dishwasher can be placed freestanding on a stable, level surface or integrated into a suitable cabinet. Ensure there is adequate space for ventilation and door opening.

Figure 4.1: Dimensions of the dishwasher: Height 43.8cm, Width 55cm, Depth 50cm.
4.3 Vanntilkobling
Connect the water inlet hose to a cold water supply tap. Ensure all connections are tight to prevent leaks. The dishwasher features a cold water fill system.
4.4 Avløpstilkobling
Connect the drain hose to a suitable drain pipe or sink. Ensure the hose is not kinked or blocked.
4.5 Elektrisk tilkobling
Koble oppvaskmaskinen til en jordet stikkontakt. Forsikre deg om at volumettage and frequency match the appliance's requirements (230 Volts).
4.6 Førstegangsoppsett (salt og skyllemiddel)
Before first use, fill the salt dispenser with dishwasher salt and the rinse aid dispenser with rinse aid. Refer to the specific sections in this manual for detailed instructions on filling these compartments. The dishwasher has salt and rinse aid warning indicators.
5. Bruksanvisning
5.1 Fylling av oppvaskmaskinen
Load dishes carefully to ensure proper water circulation and cleaning. The dishwasher includes a cutlery basket for organized washing.

Figur 5.1: Interiør view demonstrating the capacity for larger items like pots and pans.

Figure 5.2: The dishwasher can accommodate plates up to 10.15 inches (25.8cm) in diameter.

Figure 5.3: The glass stand provides stable support for delicate glassware during the wash cycle.
5.2 Tilsetting av vaskemiddel
Tilsett riktig mengde oppvaskmiddel i dispenseren. Se doseringsanvisningen fra vaskemiddelprodusenten.
5.3 Velge et program
Press the 'Programme' button to cycle through the available wash programmes. Indicator lights will show the selected programme.
- Normal: Standard daily wash for normally soiled dishes.
- Intensiv: For heavily soiled dishes with tough, baked-on food.
- Eco: Energy-saving programme for normally soiled dishes.
- Glass: Skånsom vask for delikat glass.
- 90 minutt: For lightly soiled dishes requiring a quicker wash.
- Rask: A quick 30-minute wash for lightly soiled items without drying.
Figure 5.4: The Quick Wash feature provides fast and efficient cleaning.
5.4 Setting the Delay Timer
Press the 'Delay Timer' button to set a delayed start time of 2, 4, 6, or 8 hours. This allows you to run the dishwasher at a time that suits you, such as during off-peak energy hours.
5.5 Starte en syklus
Close the dishwasher door firmly. Press the 'Start/Stop' button to begin the selected wash cycle. The indicator light will illuminate.
6. Vedlikehold og stell
6.1 Rengjøring av filtersystemet
Regularly clean the filter system to ensure optimal washing performance. The dishwasher features an easy-clean filter system. Remove the filter, rinse it under running water, and remove any food debris. Reassemble correctly.
6.2 Etterfylling av salt og skyllemiddel
Monitor the salt and rinse aid warning indicators. Refill these compartments as needed to ensure effective cleaning and drying results.
6.3 Utvendig og innvendig rengjøring
Tørk av utsiden av oppvaskmaskinen med adamp cloth. Clean the interior periodically with a dishwasher cleaner or a mixture of vinegar and water to prevent odors and build-up.
7. Feilsøking
If your dishwasher is not functioning correctly, please consult the following table before contacting customer service.
| Problem | Mulig årsak | Løsning |
|---|---|---|
| Oppvaskmaskinen starter ikke | Strømledningen er ikke koblet til; Døren er ikke ordentlig lukket; Sikringen er gått. | Sjekk strømtilkoblingen; Sørg for at døren er låst; Sjekk sikringen/sikringsbryteren i huset. |
| Retter ikke rene | Improper loading; Insufficient detergent; Clogged spray arms/filter; Incorrect program. | Reload dishes correctly; Add more detergent; Clean spray arms and filter; Select appropriate program. |
| Vann renner ikke ut | Avløpsslangen er bøyd eller blokkert; Filteret er tett. | Sjekk og rengjør avløpsslangen; rengjør filtersystemet. |
| Overdreven støy | Tallerkenen rasler; Fremmedlegemer i pumpen; Apparatet er ikke i vater. | Rearrange dishes; Check for foreign objects; Level the appliance. |
| Hvite flekker på servise | Mangel på skyllemiddel; Hardt vann. | Refill rinse aid dispenser; Adjust water softener setting if applicable. |
8. Spesifikasjoner
| Trekk | Spesifikasjon |
|---|---|
| Modellnavn | EQDWTTW |
| Kapasitet | 6 Stedsinnstillinger |
| Dimensjoner (H x B x D) | 43.8 x 55 x 50 cm |
| Vekt | 21 kg |
| Programmer | Normal, Intensive, Eco, Glass, 90 Min, Rapid |
| Temperaturer | 40, 45, 60, 65, 70°C |
| Forsink timeren | 2, 4, 6 eller 8 timer |
| Energivurdering | F |
| Vannforbruk (per syklus) | 6.5 liter |
| Støynivå | 49 dB |
| Installasjonstype | Frittstående |
| Voltage | 230 volt |
| Inkluderte komponenter | Bestikkkurv |
9. Garanti og støtte
This Electriq dishwasher comes with a 1 års garanti fra kjøpsdatoen. Vennligst ta vare på kjøpsbeviset for garantikrav.
For technical support, spare parts, or warranty inquiries, please contact Electriq customer service. Contact details can typically be found on the manufacturer's webnettstedet eller kjøpsdokumentasjonen din.
Please have your model number (EQDWTTW) and serial number ready when contacting support.