1. Produktet er overview
The Rollerhouse 14 Channel RF Remote Control is designed to operate Rollerhouse motorized window shades and blinds. This remote allows for individual control of up to 14 channels (blinds) and a master 'UL' channel to control all paired blinds simultaneously. It features push-button controls, an LED display, and a wall mount holder for convenient access.

Bilde: Foran view of the Rollerhouse 14 Channel Remote Control, showing the LED display and control buttons.
2. Kompatibilitet
This remote control is specifically designed for Rollerhouse RF blinds and shade motors. It is not a universal remote control and will not sync with other brands or models of motorized shades. Please verify compatibility before use.
2.1. How to Check Compatibility
To ensure compatibility, please check your existing Rollerhouse motor or original remote for the following:
- Hyppighet: Only supports 433.92MHz RF devices. (Not compatible with 315MHz, Infrared (IR), or WiFi devices.)
- Modell: Only replaces the original BF-315 remote.
- Brand & Motors: Only compatible with Rollerhouse specific motors (ERB22, ERB25, EY1612, EY2512).

Image: The back of the remote control with the battery cover removed, showing the battery and a small button. Text on the image highlights compatibility requirements.
3. Pakkens innhold
Når du åpner pakken, bør du finne følgende elementer:
- 1 x Rollerhouse 14 Channel Remote Control
- 1 x veggmonteringsholder
- Festeskruer
- 1 x 3V-CR2450 Battery (pre-installed or included)
4. Spesifikasjoner
| Trekk | Beskrivelse |
|---|---|
| Merke | Rollerhouse |
| Modellnavn | 8541876326 |
| Farge | Hvit |
| Tilkoblingsteknologi | Radiofrekvens (RF) |
| Hyppighet | 433.92 MHz |
| Maks antall støttede enheter | 15 (14 individual channels + 1 master 'UL' channel) |
| Kontrollertype | Knappkontroll |
| Maksimal rekkevidde | 200 Meters (approx. 65 feet in open space) |
| Batteritype | 1 x CR2430 (3V) |
| Spesialfunksjon | LED Display, Wall Mount Holder, Hide unused channels function |
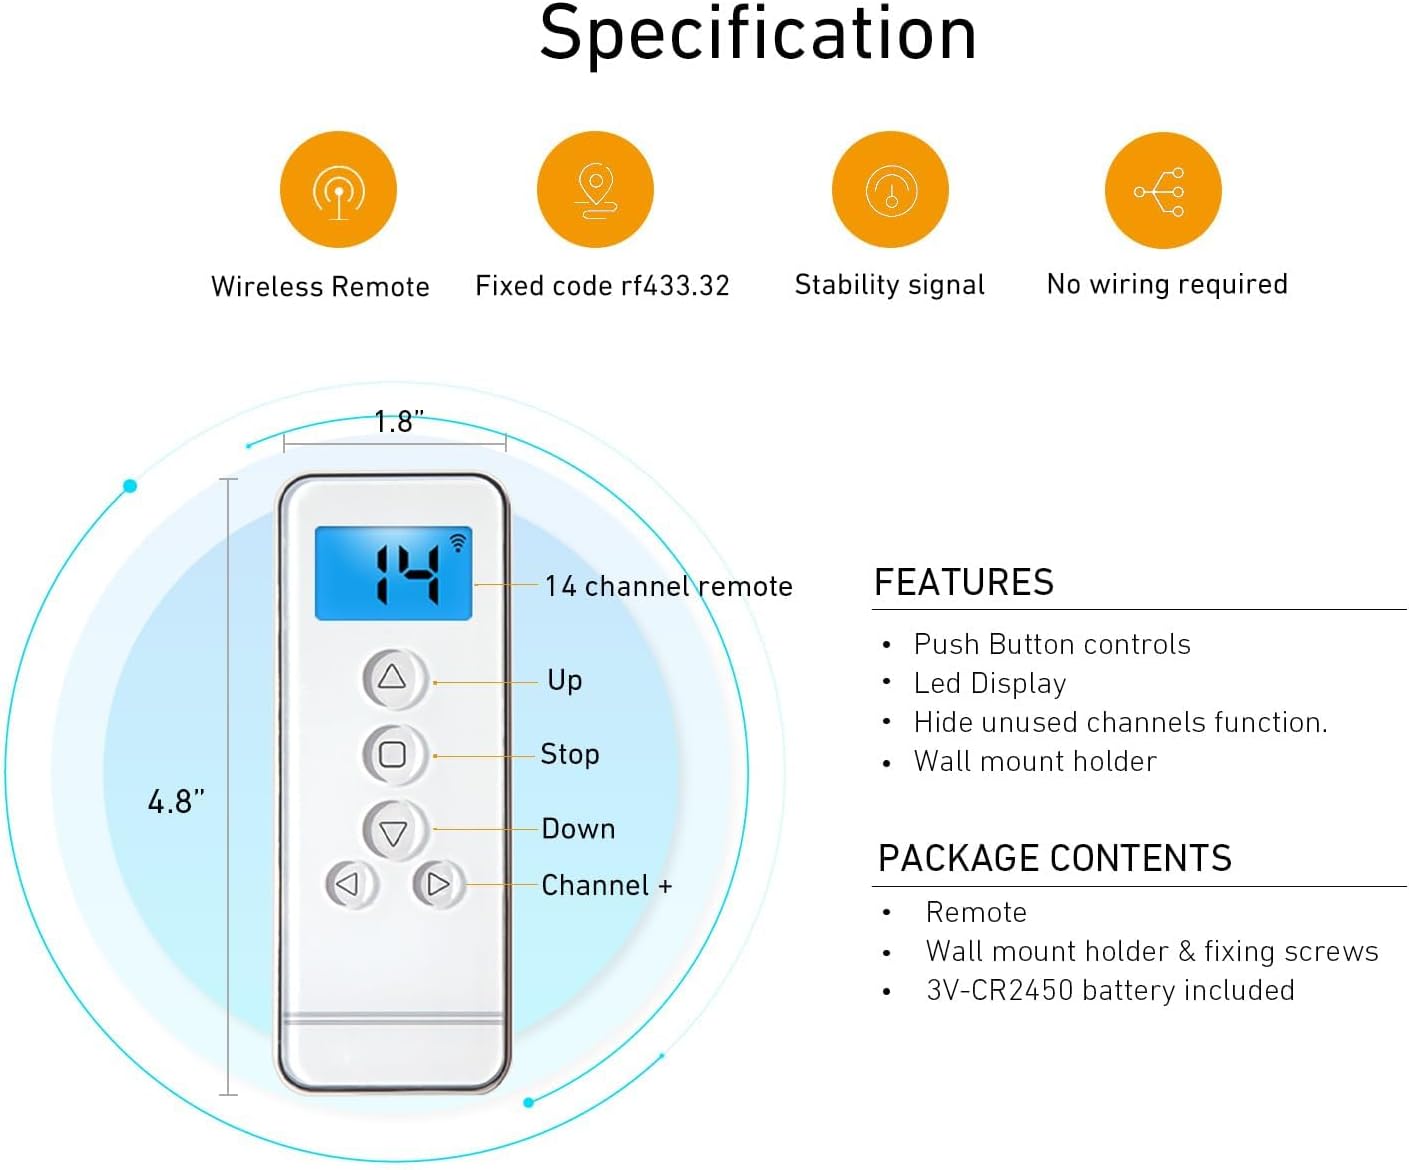
Image: Diagram illustrating the dimensions (4.8" x 1.8") and key features of the remote control, including Up, Stop, Down, Channel +, and LED display.

Image: A hand holding the remote control, operating motorized blinds in a living room setting. An overlay displays technical specifications like Voltage (3V), Frequency (433.92 MHz), Transmitting Power (30 milliwatt), Ambient Operating Temperature (-10°C to 50°C), Transmission Distance (approx. 65 feet in open space), and Battery (3V-CR2450).
5. Oppsett og installasjon
5.1. Installasjon av batteri
The remote control uses one 3V CR2450 battery. To install or replace the battery:
- Carefully slide open the battery compartment cover on the back of the remote.
- Sett inn CR2450-batteriet med den positive (+) siden opp.
- Lukk batteridekselet godt.
5.2. Pairing the Remote with Your Motorized Blind
Before pairing, ensure your remote has a working battery and your motorized blind is powered on. Select an unused channel on your remote (channels 01-14). The 'UL' channel is reserved for controlling all blinds simultaneously and cannot be used for initial pairing or programming.
- Factory Reset (Optional but Recommended): To avoid conflicts with previous settings, it is recommended to perform a factory reset on the motor. Press the 'C' button on the back of the remote (under the battery cover) three times. The motor should jog twice, indicating the limits are deleted.
- Initiate Pairing on Motor: Using a small screwdriver or pointed object, press the setting button on the motor head. Release it when the blind jogs once.
- Confirm Pairing on Remote: Press the 'C' button on the back of the remote. Release it when the blind jogs once.
- Testparing: Press any button (Up, Down, Stop) on the remote. If the blind moves, the remote is successfully paired with the motor on the selected channel.
Video: This video demonstrates how to pair a Rollerhouse 15-channel remote control with a motorized blind, including selecting a channel, performing a factory reset, and confirming the pairing process.
5.3. Setting Upper and Lower Positions (Limits)
After successful pairing, set the desired upper and lower travel limits for your blind:
- Angi øvre grense: Press and hold the 'L' (Limit) button on the back of the remote until the blind jogs. Then, use the Up/Down buttons to move the blind to your desired upper position. Press the 'Stop' button. Finally, press the 'C' button on the back of the remote. The motor will jog, confirming the upper limit is set.
- Angi nedre grense: Press the 'Down' button to move the blind to your desired lower position. Press the 'Stop' button. Finally, press the 'C' button on the back of the remote. The motor will jog, confirming the lower limit is set.
5.4. Checking and Changing Blind Direction
If the blind moves in the opposite direction to the Up/Down buttons, you need to reverse the direction:
- Check Direction: Press the 'Up' button. If the blind goes down, the direction needs to be changed.
- Endre retning: Press and hold both the 'L' (Limit) button and the 'Stop' button on the remote simultaneously. Hold them until the blind jogs once. The rolling direction has now been changed.
- Verifisere: Press the 'Up' button again to confirm the blind now moves upwards.
5.5. Adding a New Remote to an Existing Motor
To add a new remote (Remote B) to a motor already programmed with an existing remote (Remote A):
- On Remote A (the already programmed remote), press and hold the 'L' (Limit) button. While holding 'L', press the 'C' button at the same time. Release both buttons when the motor jogs.
- On Fjernkontroll B (the new remote), press the 'C' button on the back. The motor will jog again, indicating that Remote B has been successfully programmed with the motor.

Image: A visual guide demonstrating the two-step process of adding a secondary remote control to a motorized shade using an already programmed primary remote.
6. Bruksanvisning
Once your remote is paired and limits are set, operating your motorized blinds is straightforward:
- Kanalvalg: Use the 'Channel +' and 'Channel -' buttons to select the desired channel (1-14) for individual blind control. Select 'UL' for simultaneous control of all paired blinds.
- Opp-knapp (▲): Trykk for å heve persiennen.
- Ned-knapp (▼): Trykk for å senke persiennen.
- Stoppknapp (■): Trykk for å stoppe persiennen i en hvilken som helst ønsket posisjon.

Image: A hand holding the Rollerhouse remote control, demonstrating its use to operate motorized blinds in a modern living room setting.
7. Vedlikehold
For å sikre fjernkontrollens levetid og optimale ytelse:
- Batteribytte: Replace the CR2450 battery when the LED display dims or the remote's range decreases.
- Rengjøring: Tørk av fjernkontrollen med en myk, tørr klut. Unngå å bruke sterke kjemikalier eller slipende rengjøringsmidler.
- Lagring: Oppbevar fjernkontrollen på et tørt sted, unna direkte sollys og ekstreme temperaturer.
8. Feilsøking
If you encounter issues with your remote control, try the following:
- Fjernkontrollen svarer ikke: Sjekk batteriet. Bytt det ut om nødvendig.
- Begrenset rekkevidde: Ensure there are no obstructions between the remote and the motor. Replace the battery if the range remains poor.
- Blind Not Moving: Verify the remote is on the correct channel for the desired blind. Ensure the motor is powered.
- Incorrect Direction: Follow the steps in Section 5.4 to change the blind's rolling direction.
- Limits Not Set Correctly: Re-follow the steps in Section 5.3 to reset the upper and lower limits.
- Interferens: Keep the remote away from strong electromagnetic fields.
9. Garanti og støtte
For warranty information or further assistance, please refer to the product packaging or contact Rollerhouse customer service. Keep your purchase receipt for any warranty claims.
You can also visit the official Rollerhouse webnettsted for ytterligere ressurser og støtte.
Visit the Rollerhouse Store on Amazon