1. Introduksjon og sikkerhetsinformasjon
Thank you for choosing the ANENG V8 Digital Multimeter. This device is designed for safe and accurate measurement of AC/DC voltage, AC/DC current, resistance, capacitance, frequency, temperature, diode, continuity, and battery testing. Please read this manual thoroughly before use to ensure proper operation and to prevent potential hazards.
1.1 Sikkerhetsregler
- Sørg alltid for at multimeteret er i god stand før bruk. Kontroller testledningene for skader.
- Ikke bruk voltage or current that exceeds the maximum rated values for the multimeter.
- Utvis ekstrem forsiktighet når du arbeider med voltagover 36 V DC eller 25 V AC RMS, da disse kan utgjøre en fare for støt.
- Koble alltid fra strømmen til kretsen og utlad all høyvoltsladning.tage-kondensatorer før måling av motstand, kontinuitet, dioder eller kapasitans.
- Sørg for at dreiebryteren er i riktig posisjon for ønsket måling før du kobler testledningene til kretsen.
- Ikke bruk multimeteret i eksplosive gass-, damp- eller støvete omgivelser.
- Skift batteriene umiddelbart når indikatoren for lavt batteri vises for å sikre nøyaktige avlesninger.
2. Produktet er overview
2.1 Pakkeinnhold
The ANENG V8 Digital Multimeter package typically includes the following items:
- ANENG V8 Digital Multimeter
- Testledninger (rød og svart)
- Temperatursonde
- Bæreveske
- Brukerhåndbok

Image: ANENG V8 Digital Multimeter with its standard accessories, including test leads, a temperature probe, and a protective carrying case.
2.2 Kontroller og skjerm
The multimeter features an 8000-count LCD backlight display for clear readings in various lighting conditions. Key controls include a rotary switch for function selection and buttons for range, data hold, and other features.

Bilde: Detaljert view of the multimeter's front panel, highlighting the LCD screen, the central rotary selector, and various control buttons.
3. Oppsett
3.1 Installasjon av batteri
The ANENG V8 Digital Multimeter is powered by batteries. To install or replace batteries:
- Sørg for at multimeteret er slått av og koble fra alle testledningene.
- Finn batteridekselet på baksiden av enheten.
- Bruk en skrutrekker til å løsne skruen(e) som fester batteridekselet.
- Fjern dekselet.
- Insert new batteries, observing the correct polarity (+ and -) as indicated inside the compartment. The device typically uses AA batteries.
- Sett batteridekselet på igjen og fest det med skruen(e).
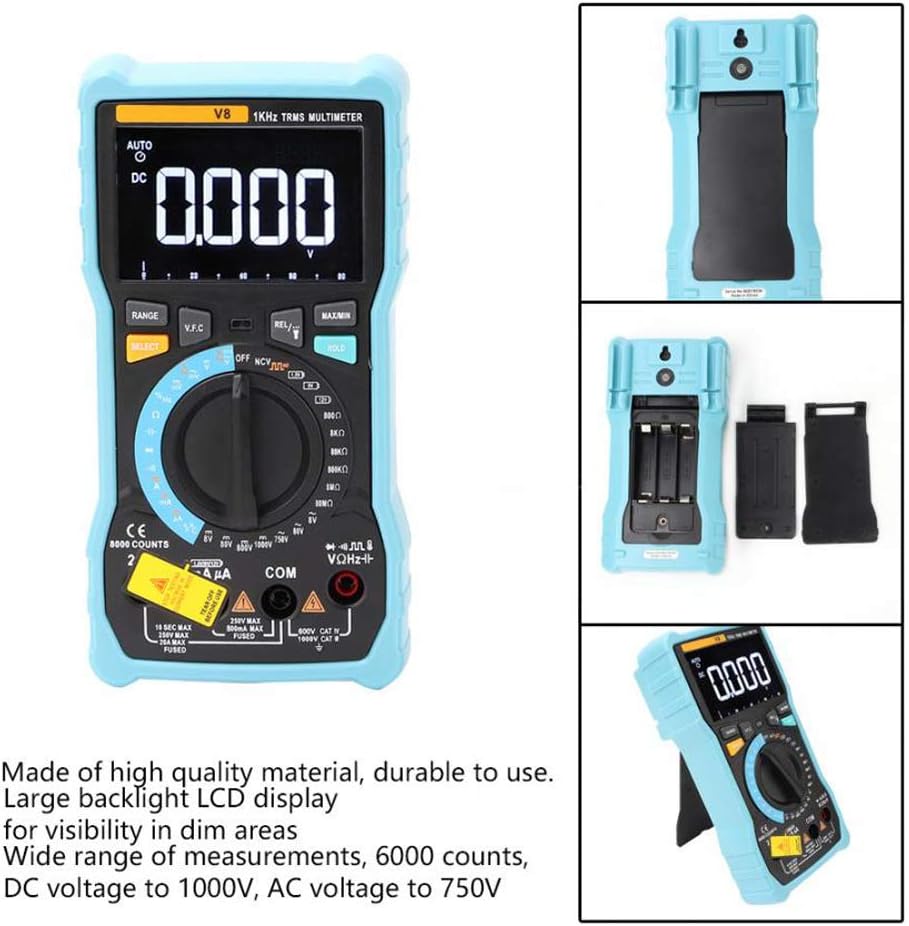
Bilde: Baksiden view of the multimeter with the battery compartment open, illustrating the correct placement for three AA batteries.
4. Bruksanvisning
Before any measurement, ensure the test leads are correctly inserted into the input jacks and the rotary switch is set to the appropriate function.
4.1 Measuring DC/AC Voltage
- Set the rotary switch to the 'V–' (DC Voltage) or 'V~' (AC Voltage) stilling.
- Koble den røde testledningen til 'VΩmA'-kontakten og den svarte testledningen til 'COM'-kontakten.
- Koble testledningene parallelt til kretsen eller komponenten du ønsker å måle.
- Les voltage -verdien på displayet.
4.2 Måling av likestrøm/vekselstrøm
- Set the rotary switch to the 'A–' (DC Current) or 'A~' (AC Current) position. For milliampere (mA) eller mikroampere (µA) measurements, select the corresponding range.
- For current up to 800mA, connect the red test lead to the 'VΩmA' jack. For current up to 20A, connect the red test lead to the '20A' jack. Connect the black test lead to the 'COM' jack.
- Disconnect power to the circuit. Open the circuit where you want to measure current. Connect the multimeter in series with the circuit.
- Sett strøm på kretsen og les av strømverdien på displayet.
4.3 Måling av motstand
- Set the rotary switch to the 'Ω' (Resistance) position.
- Koble den røde testledningen til 'VΩmA'-kontakten og den svarte testledningen til 'COM'-kontakten.
- Ensure the circuit is de-energized and all capacitors are discharged. Connect the test leads across the component to be measured.
- Les motstandsverdien på skjermen.
4.4 NCV (kontaktfri volum)tage) Deteksjon
- Sett dreiebryteren til «NCV»-posisjonen.
- Flytt den øverste enden av multimeteret nær lederen eller stikkontakten.
- The multimeter will emit an audible beep and the NCV indicator light will flash if AC voltage oppdages, noe som indikerer tilstedeværelsen av levende volumtage uten fysisk kontakt.
4.5 Temperaturmåling
- Set the rotary switch to the '°C/°F' (Temperature) position.
- Connect the temperature probe to the 'VΩmA' and 'COM' jacks, observing polarity if applicable.
- Plasser spissen av temperaturproben på eller i nærheten av objektet du ønsker å måle temperaturen på.
- Les av temperaturverdien på displayet.
4.6 Andre funksjoner
- Kapasitans: Set the rotary switch to the 'F' position. Connect leads across the discharged capacitor.
- Frequency/Duty Cycle: Set the rotary switch to the 'Hz/%' position. Connect leads to the signal source.
- Diodetest: Set the rotary switch to the 'Diode' position. Connect leads across the diode.
- Kontinuitetstest: Set the rotary switch to the 'Continuity' position. Connect leads across the circuit. An audible beep indicates continuity.
- Batteritest: Set the rotary switch to the 'Battery' position. Connect leads to the battery terminals (1.5V, 9V, or 12V).
- Data Hold: Trykk på «HOLD»-knappen for å fryse den gjeldende avlesningen på skjermen. Trykk igjen for å slippe.
- Baklys/lommelykt: Press the backlight button to turn on/off the display backlight or flashlight.
- Automatisk avslåing: Multimeteret slår seg automatisk av etter en periode med inaktivitet for å spare batterilevetid.
5. Vedlikehold
5.1 Rengjøring
Tørk av saken med annonseamp klut og mildt vaskemiddel. Ikke bruk slipemidler eller løsemidler. Hold inngangsterminalene fri for smuss og fuktighet.
5.2 Bytte av sikring
Hvis strømmålingsfunksjonen svikter, kan det hende at sikringen må byttes. Se spesifikasjonene for riktig sikringstype og -klassifisering. Sikringsskifte skal kun utføres av kvalifisert personell.
5.3 Oppbevaring
When not in use for extended periods, remove the batteries to prevent leakage and store the multimeter in a dry, cool place.
6. Feilsøking
- Ingen visning: Sjekk batteriinstallasjonen og lad den. Skift batterier om nødvendig.
- Feil avlesning: Ensure the rotary switch is set to the correct function and range. Check test lead connections. Verify battery charge.
- Strømmåling fungerer ikke: Check the fuse. Replace if blown (refer to fuse replacement section).
- NCV registrerer ikke: Ensure the NCV function is selected and the multimeter is close enough to the AC voltage kilde.
7. Spesifikasjoner
| Parameter | Verdi |
|---|---|
| Utstilling | 8000 tellers LCD-skjerm med bakgrunnsbelysning |
| DC Voltage (V) | 8.000V / 80.00V / 800.0V / 1000V |
| DC Voltage (mV) | 800mV |
| AC Voltage (V) | 8.000V / 80.00V / 750V |
| AC Voltage (mV) | 800mV |
| DC-strøm (A) | 8.000A / 20.00A |
| Likestrøm (mA) | 8.000mA / 80.00mA / 800.0mA |
| Likestrøm (µA) | 800 µA / 8000 µA |
| AC-strøm (A) | 8.000A / 20.00A |
| Vekselstrøm (mA) | 8.000mA / 80.00mA / 800.0mA |
| AC-strøm (µA) | 800 µA / 8000 µA |
| Motstand | 800.0Ω / 8.000kΩ / 80.00kΩ / 800.0kΩ / 8.000MΩ / 80.00MΩ |
| Kapasitans | 9.999nF / 99.99nF / 999.9nF / 9.999µF / 99.99µF / 999.9µF / 9.999mF / 99.99mF |
| Hyppighet | 9.999 Hz / 99.99 Hz / 999.9 Hz / 9.999 kHz / 99.99 kHz / 999.9 kHz / 9.999 MHz |
| Duty Cycle | 1 % ~ 99 % |
| Temperaturområde | -20°C ~ 1000°C (-4°F ~ 1832°F) |
| Batteritest | 1.5V / 9V / 12V |
| Rangering | Auto / Manuell |
| Oppdateringshastighet | 3 ganger / sekund |
| Ekte RMS | Ja |
| Datahold | Ja |
| Baklys/Lommelykt | Ja |
| Varsel om lavt batteri | Ja |
| Automatisk avslåing | Ja |
| Materiale | ABS / PVC |
| Strømkilde | Batteridrevet |
8. Garanti og støtte
This product is covered by a standard manufacturer's warranty against defects in materials and workmanship. Please refer to the warranty card included with your purchase for specific terms and conditions. For technical support or service inquiries, please contact your retailer or the manufacturer's customer service department.
9. Offisielle produktvideoer
Ingen offisielle produktvideoer fra selgeren er tilgjengelige for innebygging for øyeblikket.