1. Introduksjon
The Massive Audio Primo Series P8 Monoblock Mega AmpLifier er en høytytende klasse D-motor amplifier designed for car audio systems. This manual provides essential information for proper installation, operation, and maintenance of your P8 ampfor å sikre optimal ytelse og lang levetid.

Bilde 1.1: Topp view of the Massive Audio Primo Series P8 Monoblock Ampløft, showcasing dens elegante design og kompakte formfaktor.
2. Sikkerhetsinstruksjoner
Vennligst les og forstå alle sikkerhetsinstruksjoner før du installerer eller bruker dette ampHvis disse retningslinjene ikke følges, kan det føre til personskade eller skade på produktet eller kjøretøyet.
- Koble alltid fra bilens negative batteripol før du foretar noen elektriske tilkoblinger.
- Sørg for god ventilasjon rundt ampkjøler for å forhindre overoppheting.
- Bruk ledninger med passende diameter for strøm-, jord- og høyttalertilkoblinger som angitt i denne håndboken.
- Monter ampløfteren sikkert for å forhindre bevegelse under kjøretøyets kjøring.
- Unngå å installere ampløfteren i områder som er utsatt for fuktighet eller overdreven vibrasjon.
- Profesjonell installasjon anbefales for optimal sikkerhet og ytelse.
3. Pakkens innhold
Kontroller at alle gjenstander er til stede ved utpakking:
- One (1) Massive Audio Primo Series P8 Monoblock Mega Amplivligere
- Brukerhåndbok (dette dokumentet)
- Monteringsmaskinvare (hvis inkludert)
4. Nøkkelfunksjoner
P8 amplifier incorporates advanced features for superior audio performance and reliability:
- Input Sensitivity Low Level: 400mVrms ~ 10Vrms
- Auto Hi-Level Input via RCA Input
- 12v Remote Output When Hi-level Signal is Used
- Parametric EQ with 0 - 12 dB Boost
- All Models Linkable with Single RCA for easy upgrade
- Short Circuit, Thermal, Reverse Voltage, and Over Voltage Beskyttelse
- N-Channel Circuitry for High-Efficiency
- 24 dB Low Pass Crossovers with an adjustable range of 30Hz - 220Hz
- Heavy Duty Power Supply
- Opplyst logo
- Heavy-Duty Aluminum Heat Sink
- Designet og konstruert i USA
- Proprietary "Bass Kompressor" Circuitry provides Low-Frequency Enhancement
- Extreme Power in a Small Footprint
- "Q Control" to fine-tune the curve on the bass boost
- "Clip Limit Switch" allows the amplifier to take up to 16.5 volts
- Adjustable Low Pass 18dB Sub Harmonic Filter with a range of 0Hz - 60Hz
- Adjustable center frequency range of 30-80 Hz
- Nickel-Plated Connectors
- High-Efficiency Class "D" Design
5. Oppsett og installasjon
Riktig installasjon er avgjørende for ytelsen og sikkerheten til din amplifier. Consult a professional installer if you are unsure about any steps.
5.1. Monteringssted
- Choose a dry, well-ventilated area away from direct sunlight or heat sources.
- Sørg for at monteringsflaten er solid nok til å støtte ampløfterens vekt.
- Sørg for tilstrekkelig plass rundt ampkjøler for luftsirkulasjon.
5.2. Kablingstilkoblinger
Refer to the diagram below for proper wiring of power, ground, remote, and speaker connections.

Image 5.1: Rear panel of the P8 ampLifier som viser strøm-, jord-, fjernkontroll- og høyttalerterminaler.
5.2.1. Power Connection (+12V)
Connect a heavy-gauge power cable (e.g., 4 AWG or larger) from the amplifier's +12V terminal to the positive terminal of the vehicle's battery. Install an appropriate fuse (not supplied) within 18 inches (45 cm) of the battery.
5.2.2. Ground Connection (GND)
Connect a heavy-gauge ground cable (e.g., 4 AWG or larger) from the amplifier's GND terminal to a clean, unpainted metal surface of the vehicle chassis. Ensure a solid, low-resistance connection.
5.2.3. Remote Turn-On (REM IN/OUT)
Connect a 18-gauge wire from your head unit's remote output to the amplifier's REM IN terminal. The REM OUT terminal can be used to daisy-chain the remote signal to other amplivsstil.
5.2.4. Speaker Connection (SPEAKER)
Connect your subwoofer(s) to the SPEAKER terminals. Ensure the total impedance of the connected speakers is not below 0.5 Ohm. Observe correct polarity (+ to + and - to -).
5.2.5. Signal Input (LINE IN)
Koble RCA-kabler fra hovedenhetens for-amp utgang til amplifier's LINE IN RCA inputs. The amplifier also supports auto hi-level input via the RCA inputs.
6. Betjening og justeringer
P8 amplifier features various controls to fine-tune your audio system. Familiarize yourself with these controls for optimal sound.
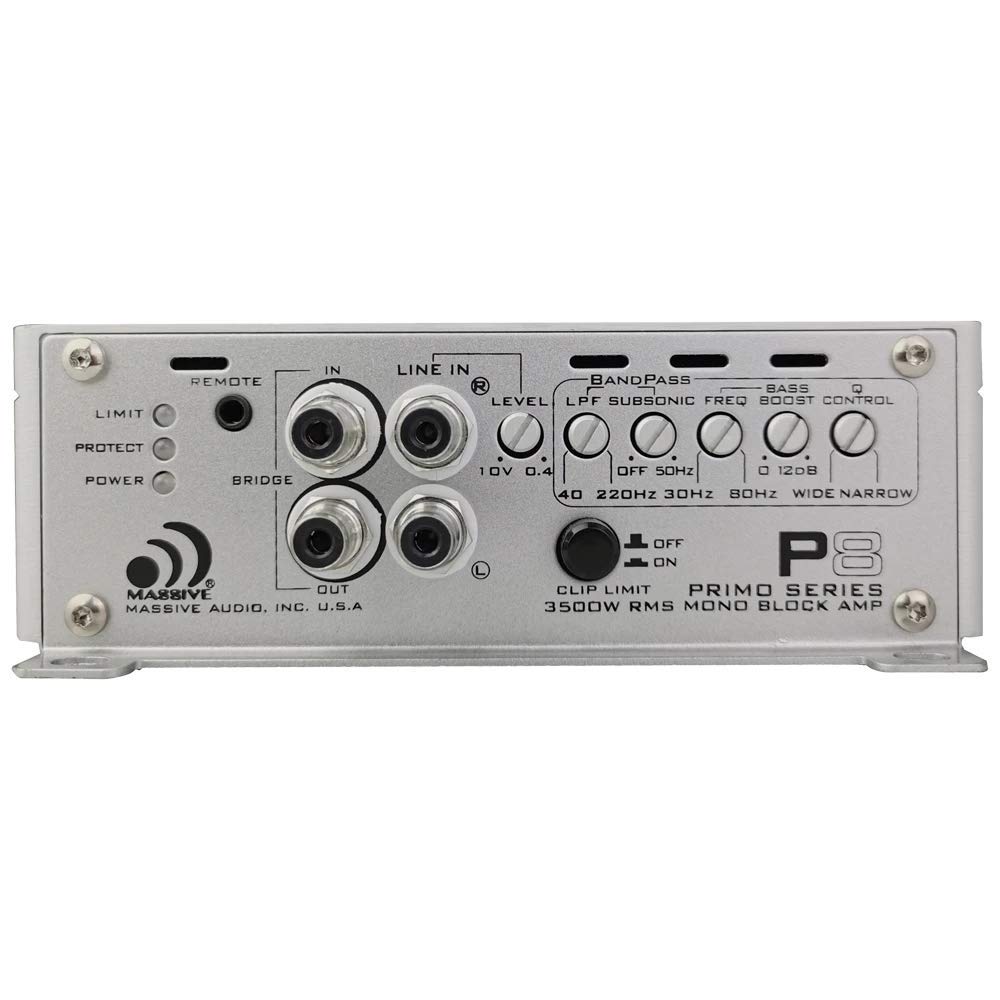
Image 6.1: Front panel of the P8 amplifier displaying the control layout for audio adjustments.
6.1. Kontrollpanel overview
- FJERN: Input for optional remote bass control knob.
- LIMIT/PROTECT/POWER Indicators: LEDs indicating amplivligere status.
- LINJE INN: RCA inputs for audio signal.
- LEVEL (Input Sensitivity): Adjusts the input gain to match the head unit's output. Range: 400mVrms - 10Vrms.
- LPF (lavpassfilter): Adjusts the upper frequency limit for the subwoofer. Range: 30Hz - 220Hz (24 dB/octave).
- SUBSONIC FREQ (High Pass Filter): Filters out ultra-low frequencies below the audible range to protect subwoofers. Range: 0Hz - 60Hz (18 dB/octave).
- BASS BOOST: Increases bass output at a specific frequency. Range: 0 - 12 dB.
- Q CONTROL: Fine-tunes the bandwidth of the bass boost.
- CLIP LIMIT SWITCH: Tillater amplifier to handle up to 16.5 volts, preventing clipping at high input levels.
6.2. Initial Setup and Adjustments
- Still inn alle amplifier controls (LEVEL, LPF, SUBSONIC, BASS BOOST) to their minimum or off positions.
- Turn your head unit volume to about 75% of its maximum.
- Øk sakte amplifier's LEVEL control until you hear slight distortion, then back off slightly.
- Adjust the LPF to suit your subwoofers and personal preference, typically between 60Hz and 100Hz for subwoofers.
- Set the SUBSONIC FREQ to protect your subwoofers from frequencies below their resonant frequency, usually around 20Hz to 30Hz.
- Use the BASS BOOST and Q CONTROL sparingly to enhance bass, avoiding excessive boost that can lead to distortion or speaker damage.
7. Vedlikehold
Regelmessig vedlikehold bidrar til å sikre levetiden og ytelsen til din amplivligere.
- Behold ampFjerneren er ren og fri for støv og rusk. Bruk en myk, tørr klut til rengjøring.
- Sjekk alle ledningsforbindelser med jevne mellomrom for tetthet og korrosjon.
- Sørg for at amplifier's cooling fins are not obstructed to maintain proper heat dissipation.
8. Feilsøkingsveiledning
Hvis du opplever problemer med din amplifier, refer to the table below for common problems and solutions.
| Problem | Mulig årsak | Løsning |
|---|---|---|
| Ingen strøm / Strøm-LED av | Blown fuse, poor power/ground connection, faulty remote wire. | Check inline fuse near battery. Verify +12V, GND, and REM connections. Ensure remote wire has +12V when head unit is on. |
| No Sound / Protect LED On | Speaker short circuit, impedance too low, overheating, faulty RCA cables. | Check speaker wiring for shorts. Verify speaker impedance is 0.5 Ohm or higher. Ensure adequate ventilation. Check RCA cable integrity. |
| Forvrengt lyd | Gain set too high, improper LPF/Subsonic settings, poor signal quality, low voltage. | Reduce LEVEL (gain) control. Adjust LPF and Subsonic filters. Check RCA cables. Verify vehicle's electrical system. |
| Amplifier overopphetes | Insufficient ventilation, impedance too low, prolonged high output. | Omplassere amplifier for better airflow. Check speaker impedance. Reduce listening volume or duration. |
9. Tekniske spesifikasjoner
| Spesifikasjon | Verdi |
|---|---|
| RMS-effekt (1 ohm) | 2300 w x 1 |
| RMS-effekt (2 ohm) | 1400 w x 1 |
| RMS-effekt (0.5 ohm) | 3500 w x 1 |
| Toppkraft | 7000 w x 1 |
| Minimum impedans | 0.5 Ohm |
| Bass Boost Frequency | 30Hz - 120Hz |
| Total harmonisk forvrengning (THD) | Mindre enn 0.03% |
| Signal-til-støy-forhold (S/N) | Mer enn 100dB |
| Subsonic Filter (HPF) | 0-60Hz |
| RCA Input Voltage | 400 mV - 10 V |
| Frekvensrespons | 10Hz - 220Hz |
| Dimensjoner (L x B x H) | 19.9 cm x 6.5 cm x 2.1 cm |
| Voltage | 12 volt (DC) |
| Maksimal forsyning Voltage | 12 volt |
| Monteringstype | Frittstående |
| Modellnummer | P8 |
| Produsent | Massive Audio |
10. Garantiinformasjon
Massive Audio products typically come with a limited manufacturer's warranty. Please refer to the official Massive Audio website or your purchase documentation for specific warranty terms and conditions, including coverage period and claim procedures. Keep your proof of purchase for warranty validation.
11. Kundestøtte
For technical assistance, service, or further inquiries regarding your Massive Audio Primo Series P8 Monoblock Amplifier, please visit the official Massive Audio website or contact their customer support department. You can also visit the Massive Audio Store on Amazon for product information: