Introduksjon
This manual provides detailed instructions for the setup, operation, and maintenance of your BUFFBEE Glow Alarm Clock HRS-BLACK. Please read this manual thoroughly before using the product to ensure proper function and longevity.
Produkt overview
The BUFFBEE Glow Alarm Clock is a versatile device combining a digital alarm clock, FM radio, and a 7-color night light. It is designed to enhance your sleep and wake-up experience with customizable features.
Nøkkelfunksjoner:
- 3-i-1-funksjonalitet: Digital alarm clock, FM radio, and night light.
- 7-farget nattlys: Adjustable with 5 brightness levels.
- Doble alarmer: Set two independent alarms with choice of FM radio, built-in beep, or bird sounds.
- Justerbar skjermdimmer: 0-100% brightness control for the time display.
- Opplyste knapper: For easy operation in low light conditions.
- Nap Timer: Quick nap setting from 10 to 120 minutes.
- Auto-Off Sleep Timer: Automatically turns off night light and FM radio after a set duration.
- USB-ladeport: For lading av eksterne elektroniske enheter.
- Strømalternativer: AC powered with AAA battery backup (batteries not included).
Pakkeinnhold:
- 1 x BUFFBEE Glow Alarm Clock
- 1 x strømadapter
- 1 x brukerhåndbok
Komponentidentifikasjon:
Se bildet nedenfor for en oversiktview of the alarm clock's buttons and display.

Bilde: Foran view of the BUFFBEE Glow Alarm Clock, showing the digital time display, alarm indicators, and control buttons on the top panel. The top edge features a light strip.
Oppsett
1. Strømtilkobling:
- Koble den medfølgende strømadapteren til DC-inngangsporten på baksiden av vekkerklokken.
- Koble adapteren til en vanlig stikkontakt.
2. Batteribackup (valgfritt):
For uavbrutt drift under strømbruddtages, install 3 AAA batteries (not included) into the battery compartment on the bottom of the unit. The clock will maintain time and alarm settings, and the alarm will still function, but the display and night light may be limited to conserve power.

Bilde: Bak view of the alarm clock showing the power input and battery compartment, alongside a power adapter and three AAA batteries (not included).
3. Innstilling av starttidspunkt:
- When first powered on, the display will show a default time.
- Trykk og hold inne TIDEN SATT button (usually located on the top panel) until the hour digits flash.
- Bruk +/- knapper (eller lignende navigasjonsknapper) for å justere timen.
- Pressen TIDEN SATT igjen for å bekrefte timen og gå videre til minuttjustering.
- Bruk +/- knapper for å justere minuttene.
- Pressen TIDEN SATT én gang til for å bekrefte og avslutte tidsinnstillingsmodus.
- For å bytte mellom 12-timers og 24-timers format, trykk på 12/24H button (if available, often combined with time set or a dedicated button).
Bruksanvisning
1. Setting Alarms (Alarm 1 & Alarm 2):
Klokken støtter to uavhengige alarmer.
- Trykk på ALARM 1 knappen (eller ALARM 2) once to display the current alarm time.
- Trykk og hold inne ALARM 1 (eller ALARM 2) button until the hour digits flash.
- Bruk +/- knapper for å justere timen.
- Trykk på ALARM knappen igjen for å bekrefte timen og gå videre til minuttjustering.
- Bruk +/- knapper for å justere minuttene.
- Trykk på ALARM button again to select the alarm sound: FM radio, built-in beep, or bird sounds. Use +/- for å bla gjennom alternativene.
- Trykk på ALARM button one more time to confirm and activate the alarm. An alarm icon will appear on the display.
- To turn off an active alarm, press the corresponding ALARM button. The alarm icon will disappear.
2. Snooze-funksjon:
Når en alarm går, trykk på den store SNOOZE / LIGHT button on top to temporarily silence the alarm for 9 minutes. The alarm will sound again after the snooze period.
3. Night Light Operation:
The alarm clock features a 7-color night light with adjustable brightness.

Image: The alarm clock shown with its top light strip illuminated in various colors, demonstrating the 7-color night light feature.
- Trykk på LYS button (often combined with SNOOZE or a dedicated button) to turn the night light on/off.
- When the night light is on, press the LYS -knappen gjentatte ganger for å bla gjennom de 7 tilgjengelige fargene.
- To adjust the brightness, use the +/- buttons while the night light is active. There are 5 brightness levels.
4. FM-radio:
Den innebygde FM-radioen lar deg lytte til favorittstasjonene dine.
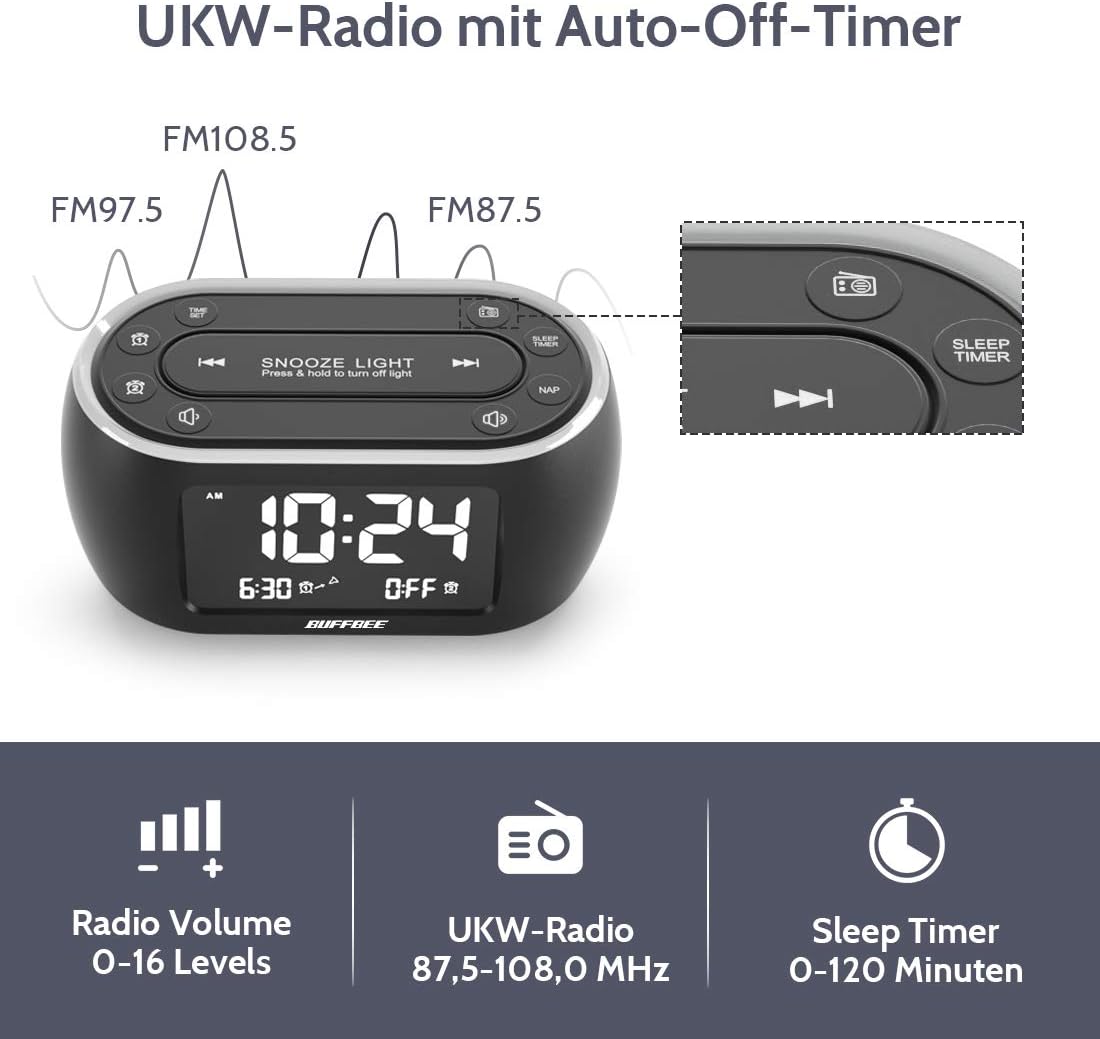
Image: The alarm clock display showing FM radio frequencies (FM108.5, FM97.5, FM87.5) and icons for radio volume and sleep timer.
- Trykk på RADIO button to turn the FM radio on/off.
- Trykk på SKANNING button (or similar) to automatically scan and save available FM stations.
- Bruk FORREGT/NESTE knapper for å navigere gjennom lagrede stasjoner eller stille inn manuelt.
- Juster volumet med VOLUM +/- buttons. The volume can be set from 0 to 16 levels.
5. Nap Timer:
The nap timer allows for quick, short sleep periods without affecting regular alarm settings.
- Trykk på LUR button. The display will show the default nap time (e.g., 10 minutes).
- Trykk på LUR button repeatedly to cycle through preset nap durations (e.g., 10, 20, 30, 60, 90, 120 minutes).
- The nap timer will start automatically after selection.
- To cancel the nap timer, press the LUR button until "OFF" is displayed.
6. Auto-Off Sleep Timer:
Set a timer for the night light and/or FM radio to automatically turn off after a specified duration.
- While the night light or FM radio is active, press the SLEEP TIMER knapp.
- Trykk på SLEEP TIMER button repeatedly to cycle through available durations (e.g., 15, 30, 60, 90, 120 minutes, or OFF).
- The selected duration will be displayed, and the timer will begin. The night light and/or FM radio will turn off automatically when the timer expires.
7. Display Dimmer:
Adjust the brightness of the main time display from 0% to 100%.

Image: Six different views of the alarm clock display, illustrating the range of brightness from very dim to fully bright, and also showing the night light dimmer.
Bruk den dedikerte MØRKERE ring eller DIMMER +/- buttons (if available) to adjust the display brightness to your preference. This allows for comfortable viewi alle lysforhold.
8. USB Charging Port:
A USB port is located on the back of the unit for charging small electronic devices.

Image: The alarm clock with a smartphone plugged into its side USB port, indicating the charging function.
Connect your device's USB charging cable to the port. The clock must be powered by the AC adapter for the USB charging function to work.
Vedlikehold
To ensure the longevity and optimal performance of your BUFFBEE Glow Alarm Clock, follow these maintenance guidelines:
- Rengjøring: Wipe the unit with a soft, dry cloth. Do not use abrasive cleaners, waxes, or solvents as they may damage the surface.
- Makt: Always disconnect the power adapter from the wall outlet before cleaning or if the unit will be unused for an extended period.
- Miljø: Keep the alarm clock away from direct sunlight, heat sources, and excessive moisture.
- Batteribytte: If using battery backup, replace AAA batteries annually or when the battery indicator suggests low power. Ensure correct polarity when inserting new batteries.
Feilsøking
If you encounter issues with your BUFFBEE Glow Alarm Clock, refer to the following common problems and solutions:
| Problem | Mulig årsak | Løsning |
|---|---|---|
| Klokkedisplayet er tomt eller flimrer. | No power or loose connection. Low battery backup. | Ensure the power adapter is securely plugged into the clock and the wall outlet. Check if AAA batteries are installed correctly and have sufficient charge. |
| Alarmen lyder ikke. | Alarm not activated. Alarm volume too low. | Verify that the alarm icon is displayed. Check the alarm volume setting. Ensure the correct alarm time is set. |
| FM-radiomottaket er dårlig. | Weak signal. Antenna not extended. Interference. | Extend the FM antenna fully. Try repositioning the clock. Perform an auto-scan for stations again. |
| Nattlyset fungerer ikke. | Lysfunksjonen er slått av. | Press the LIGHT button to turn it on. Check if the brightness is set to 0%. |
| USB-lading fungerer ikke. | Clock not connected to AC power. Device not compatible. | Ensure the clock is powered by the AC adapter. Check if your device is compatible with standard USB charging. |
Spesifikasjoner
| Trekk | Detalj |
|---|---|
| Merke | BUFFBEE |
| Modellnummer | HRS-BLACK |
| Dimensjoner (L x B x H) | 12 x 3.81 x 6 cm (4.72 x XUMX x 1.5 inches) |
| Vekt | 330 gram (0.73 lbs) |
| Strøminngang | AC 100-240V, 50/60Hz |
| Batterisikkerhetskopiering | 3 x AAA-batterier (ikke inkludert) |
| Visningstype | Digital |
| Skjermens lysstyrke | 0-100% justerbar |
| Nattlysfarger | 7 farger |
| Nattlysets lysstyrke | 5 nivåer justerbare |
| FM-radiofrekvens | 87.5-108.0 MHz |
| Alarmvolum | 0-16 nivåer justerbar |
| Spesielle funksjoner | Ambient light, Dual Alarm, Nap Timer, Sleep Timer, USB Charging Port |
Garanti og støtte
BUFFBEE products are designed for reliability and performance. For specific warranty information, please refer to the documentation included with your purchase or contact BUFFBEE customer support.
If you require technical assistance or have questions regarding your BUFFBEE Glow Alarm Clock, please visit the official BUFFBEE website or contact their customer service department. Contact details are typically found on the product packaging or the manufacturer's webnettstedet.