1. Sikkerhetsinformasjon
Please read and understand this entire manual before attempting to assemble, operate, or install the product. Failure to do so could lead to electric shock, fire, or other injuries.
- Koble alltid fra strømmen ved hovedsikringen før installasjon eller vedlikehold.
- All electrical connections must be in accordance with local codes, ordinances, and the National Electric Code. If you are unfamiliar with electrical wiring, consult a qualified electrician.
- Sørg for at installasjonsstedet kan bære vekten av viften.
- Ikke bruk viften med skadede blader eller hus.
- Hold hendene unna viftebladene under drift.
2. Produktet er overview
2.1 Nøkkelfunksjoner
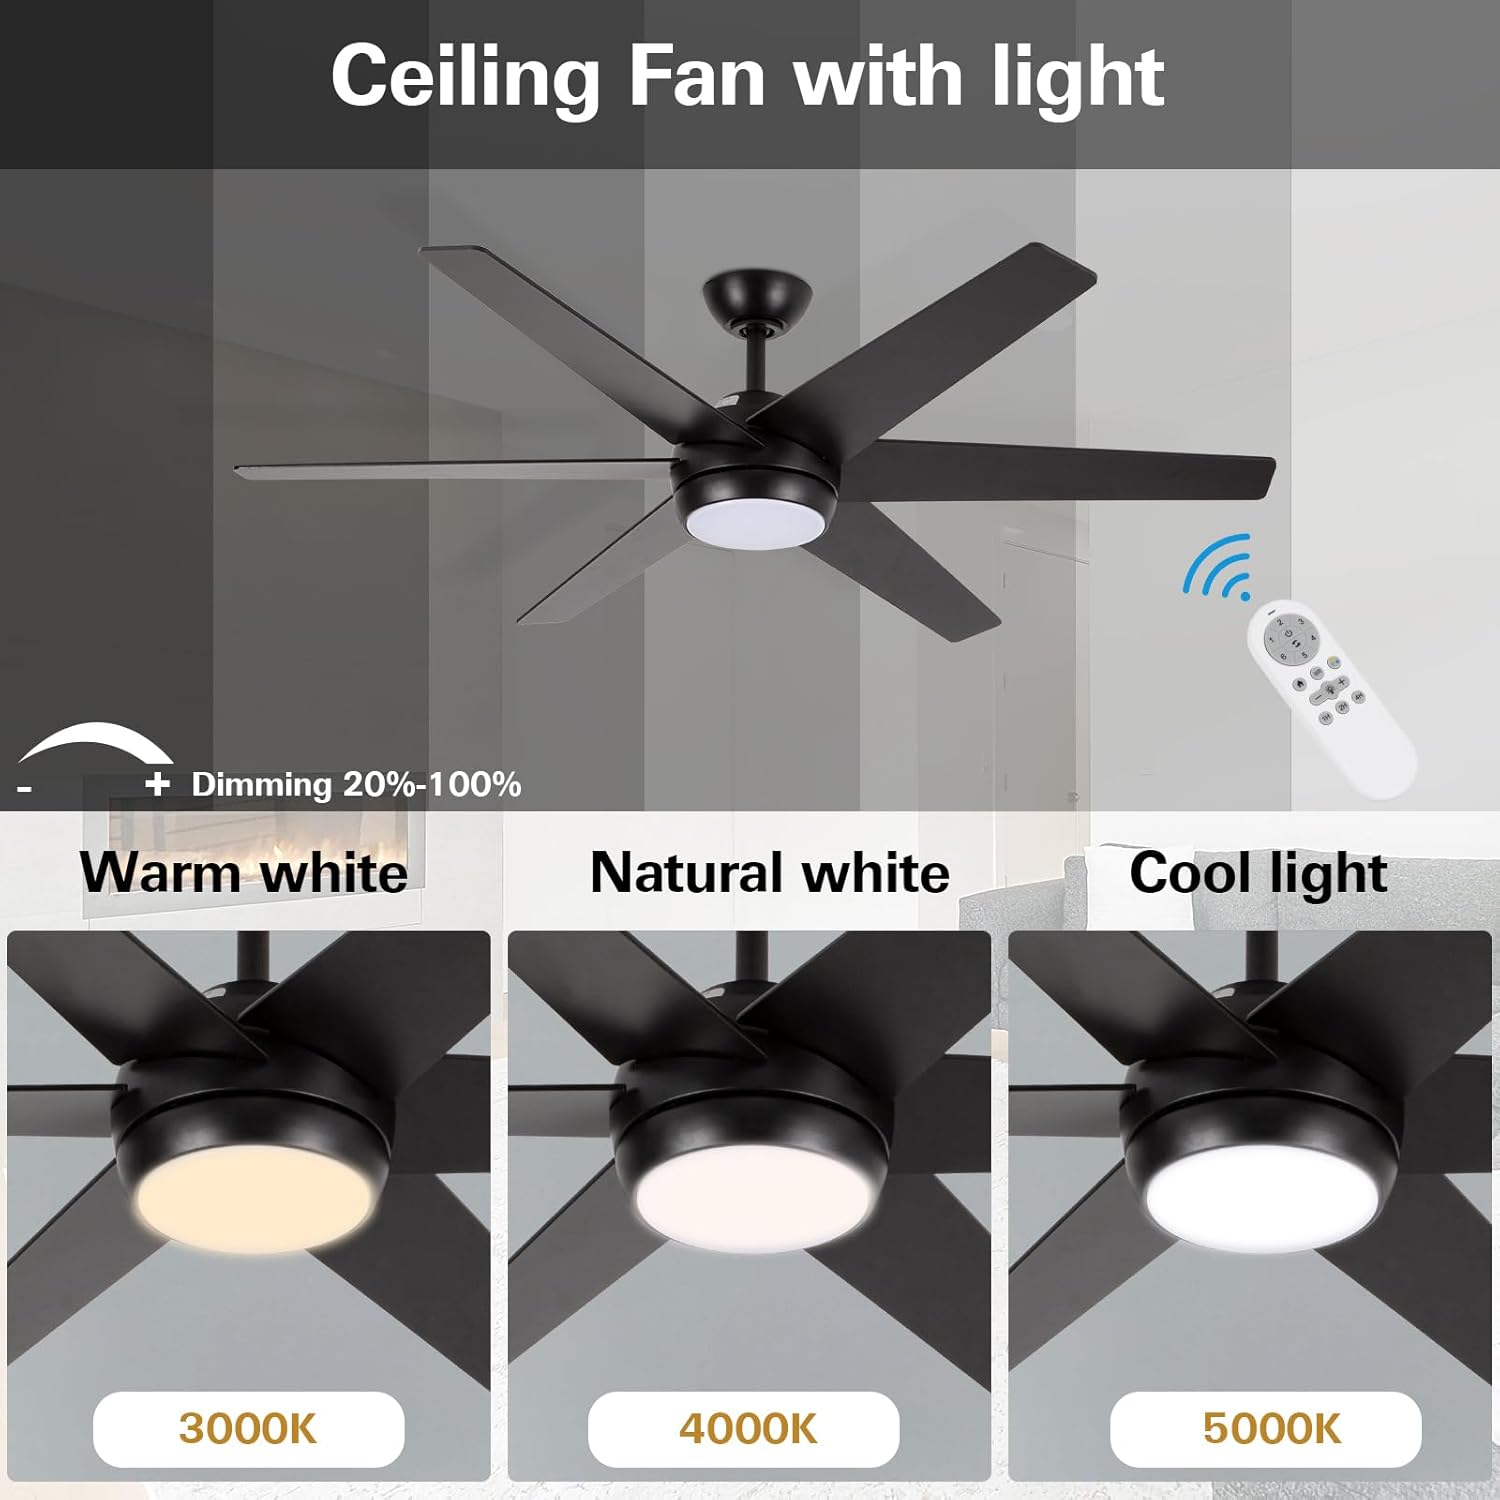
- Moderne minimalistisk design: 52-inch ceiling fan with metal motor housing and six dual-color blades. Features an acrylic cover and flicker-free integrated LED light.
- Dimbar LED-lys: Replaceable 18W LED light source with three color temperature options (3000K Warm White, 4000K Natural White, 5000K Cool White) and adjustable brightness (20%–100%).
- Stillegående reversibel motor: Allows for downward airflow in summer for cooling and upward airflow in winter for warm air distribution. Designed for quiet operation.
- Multifunction Remote Control: Offers six fan speeds, a natural wind option, 1/2/4-hour timer functions, and a security anti-theft function (light turns on for 5 minutes every two hours).
2.2 Spesifikasjoner
| Attributt | Spesifikasjon |
|---|---|
| Merke | hykolitet |
| Modellnummer | HYK-52BK-LED-RC |
| Størrelse | 52 tommer |
| Farge | Svart |
| Materiale | Wood (blades), Metal (shade) |
| Lyskilde | Integrert LED (18W) |
| Fargetemperatur | 3000K, 4000K, 5000K |
| Lysstyrke | 870 lumen |
| Kontrollmetode | Fjernkontroll |
| Viftehastigheter | 6 speeds + Natural Wind |
| Timer funksjon | 1, 2, 4 timer |
| Innendørs/utendørs bruk | Kun innendørs |
| Produktdimensjoner | 52 cm L x 5.9 cm B x 13.2 cm H |
2.3 Produktgrafikk


3. Installasjon
For detailed visual instructions, please refer to the official installation video below. Ensure power is disconnected at the circuit breaker before beginning installation.
Video: Official Installation Guide for hykolity 52 inch Ceiling Fan with LED Light and Remote Control. This video demonstrates the step-by-step process of assembling and mounting the fan, including wiring connections.
3.1 Steg-for-steg installasjonsveiledning
- Prepare the Downrod:
- Loosen the hanging ball screw and remove the horizontal bolt to detach the hanging ball.
- Remove the lower latch from the hanging pipe.
- Prepare the Motor Assembly:
- Partially loosen the preassembled set screws in the yoke at the top of the motor assembly.
- Assemble Downrod to Motor:
- Thread the main wiring harness through the hole at the bottom of the lifting pipe (downrod).
- Slip the downrod into the motor assembly yoke, aligning the holes for the safety pin and cotter pin.
- Tighten the set screws in the motor assembly yoke.
- Install Remote Control Receiver:
- Insert the remote control receiver (BCE) into the lifting pipe.
- Put the crossbolt back through the lifting ball to secure it, then replace the original latch and tighten the lifting screw.
- Monter opphengsbraketten:
- Install the hanging bracket to the outlet box using the provided outlet box screws (or original screws).
- Connect the GROUND (GREEN) wires from the fan and remote control receiver to the BARE/GREEN supply wire from the ceiling.
- Connect the BLACK wire from the remote control receiver to the BLACK supply wire from the ceiling.
- Connect the WHITE wire (labeled AC IN N) from the remote control receiver to the WHITE supply wire from the ceiling.
- Connect the wire group from the remote control receiver to the wire group from the motor assembly.
- Heng viften:
- Grab the fan firmly with two hands. Slide the downrod through the opening in the hanging bracket and let the hanging ball rest on the hanging bracket.
- Vri den hengende kulespalten til den er på linje med tappen til hengende brakett.
- Gently slide the remote control receiver flat-side up into the mounting bracket.
- Re-insert the screw that was removed and then tighten both screws securely.
- Installer vifteblader:
- Loosen the screws and remove the installation fan blade decorative panel.
- Slide a blade through one of the narrow, rectangular openings on the motor housing, aligning holes in the blade with holes in the blade arm.
- Insert 3 blade attachment screws with fingers first and then tighten screws securely with a Phillips screwdriver. Repeat this procedure for the remaining blades.
- Install LED Light Kit:
- Connect the wire group from the motor housing to the wire group from the LED light kit. Ensure Molex connections snap together securely.
- Stram alle 3 skruene med en Phillips-skrutrekker.
- Legg ved Lampskygge:
- Roter lampshade clockwise to ensure fixation.
4. Bruksanvisning
The hykolity ceiling fan is operated using the included multifunction remote control.
4.1 Fjernkontrollfunksjoner
- Viftehastighet (1–6): Justerer viftehastigheten fra lav (1) til høy (6).
- Vifte på/av: Slår viften av eller på.
- Vendbar motor: Changes the direction of the fan blades for summer (downward airflow) or winter (upward airflow) modes.
- Lys på/av: Turns the integrated LED light on or off.
- Light Dimming (20%-100%): Justerer lysstyrken til LED-lyset.
- Color Temperature (3000K/4000K/5000K): Cycles through Warm White, Natural White, and Cool White light settings.
- Naturlig vind: Activates a mode that simulates natural breeze by varying fan speeds.
- Timer Function (1H/2H/4H): Sets the fan to automatically turn off after 1, 2, or 4 hours.
- Security Anti-Theft Function: Activates a mode where the light turns on for 5 minutes every two hours.
4.2 Reversibel motordrift
The reversible motor feature allows you to optimize air circulation for different seasons:
- Sommermodus: Set the fan to rotate counter-clockwise to create a downward airflow, producing a cooling effect.
- Vintermodus: Set the fan to rotate clockwise to circulate warm air upwards, helping to distribute heat evenly throughout the room.
5. Vedlikehold
Regelmessig vedlikehold sikrer optimal ytelse og levetid for takviften din.
- Rengjøring: Bruk en myk, damp klut til å rengjøre viftebladene og motorhuset. Ikke bruk slipende rengjøringsmidler eller løsemidler.
- Bladinspeksjon: Periodically check the fan blades for any signs of damage or warping. Ensure all blade attachment screws are secure.
- Elektriske tilkoblinger: Annually inspect all electrical connections for tightness and wear.
- Lyskilde: The integrated LED light source is replaceable. Contact customer service for replacement parts if needed.
6. Feilsøking
If you experience issues with your hykolity ceiling fan, refer to the following common problems and solutions:
| Problem | Mulig årsak | Løsning |
|---|---|---|
| Viften starter ikke | No power to the fan; loose wiring connections; remote control battery dead. | Sjekk sikringen; sørg for at alle ledningstilkoblinger er sikre; bytt batteri i fjernkontrollen. |
| Light does not turn on/off | Loose wiring connection to light kit; LED light source failure; remote control issue. | Check light kit wiring; contact customer service for LED replacement; ensure remote is functioning correctly. |
| Viften brummer | Loose mounting screws; unbalanced blades; motor issue. | Tighten all mounting screws; ensure blades are balanced and securely attached; if noise persists, contact customer service. |
| Fjernkontrollen virker ikke | Dead battery; remote not paired with receiver; interference. | Replace battery; refer to remote pairing instructions (if applicable, usually automatic); ensure no strong interference sources nearby. |
7. Garanti og kundestøtte
For warranty information or any further assistance, please contact hykolity customer service. Refer to the product packaging or the official hykolity webnettstedet for spesifikke garantidetaljer og kontaktinformasjon.
If you encounter any issues during use, feel free to contact us for assistance.