ETA ETA251590000
ETA Falco Smart Robot Vacuum Cleaner with Mopping Function User Manual
Modell: ETA251590000
1. Introduksjon
Thank you for choosing the ETA Falco Smart Robot Vacuum Cleaner with Mopping Function. This manual provides essential information for the safe and efficient operation, maintenance, and troubleshooting of your device. Please read this manual thoroughly before using the product and keep it for future reference.
Viktig sikkerhetsinformasjon
- Always ensure the robot is placed on a stable, level surface.
- Hold enheten unna vann og fuktighet.
- Ikke la barn eller uautoriserte personer bruke roboten.
- Use only the original charging adapter and accessories provided.
- Before cleaning or maintenance, ensure the robot is powered off and unplugged from the charging station.
- Avoid operating the robot near open flames or flammable materials.
2. Produktet er overview
Komponenter og kontroller
Familiarize yourself with the main parts and controls of your ETA Falco Smart robot vacuum cleaner.
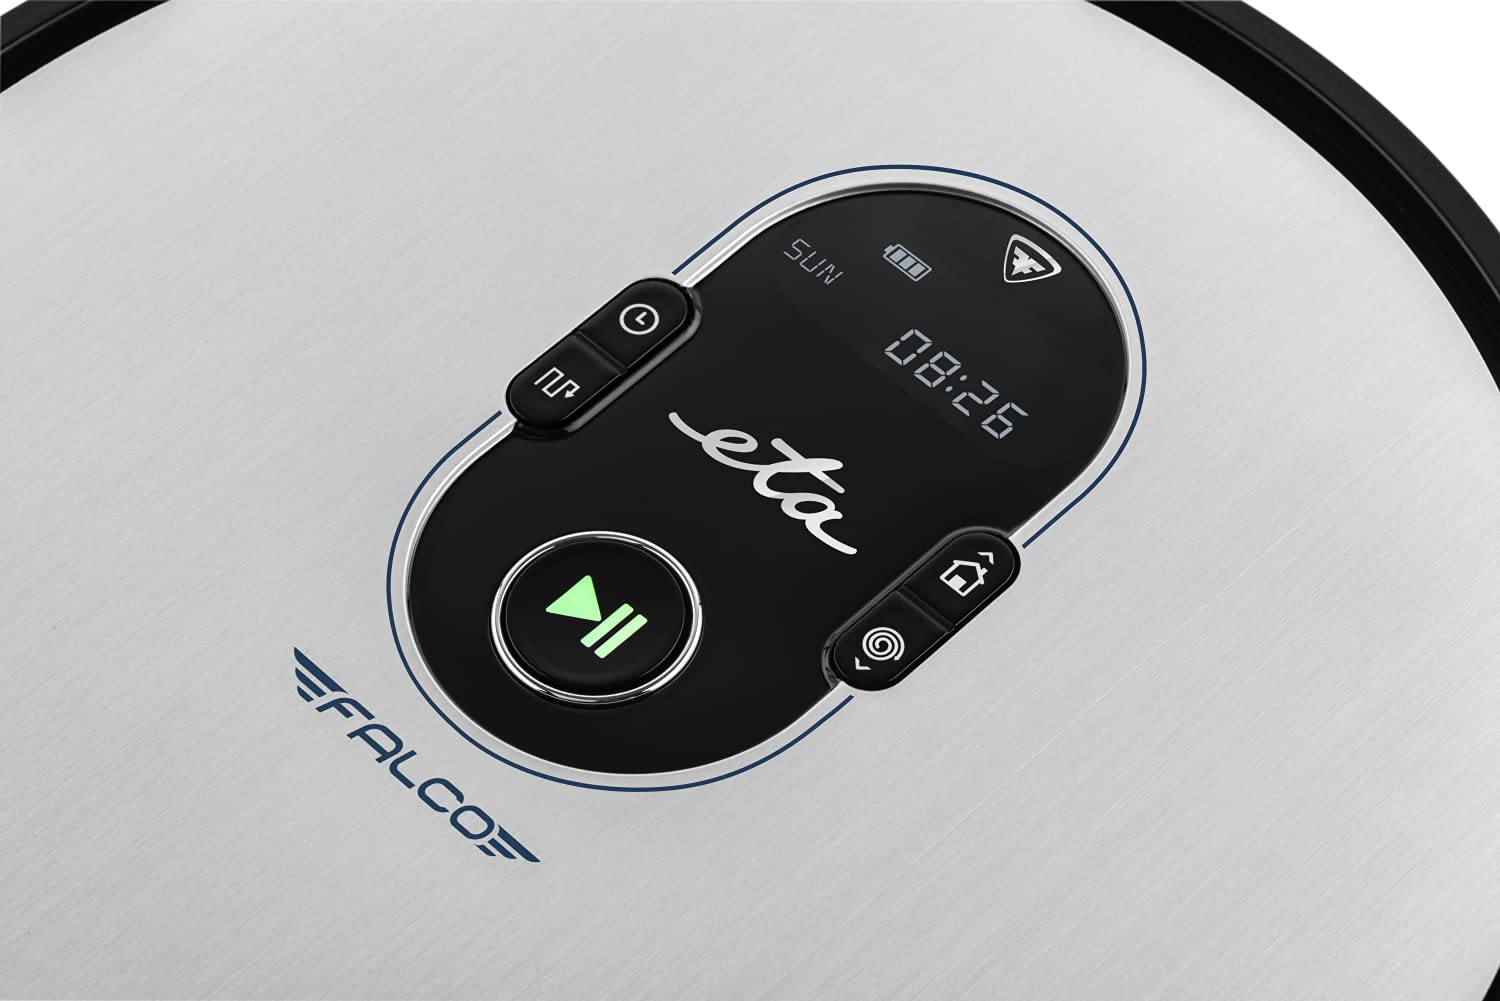
Bilde 2.1: Top panel controls. This image shows the main control panel on the top of the robot, including buttons for power, scheduling, and return to charging station, along with a digital display.

Bilde 2.2: Underside view. This image displays the bottom of the robot, highlighting the main brush, two side brushes, and the mop attachment.

Bilde 2.3: Underside diagram. This diagram labels the key components on the robot's underside, including the side brushes, main brush, and mop attachment.
3. Pakkens innhold
Ved utpakking, sørg for at alle følgende gjenstander er til stede:
- ETA Falco Smart Robot Vacuum Cleaner
- Ladestasjon
- Ladeadapter
- Fjernkontroll
- 2x Spare Side Brushes
- Special Rotary and Lamella Brush
- 2x Cleaning Cloths (Mop Pads)
- Reserve HEPA-filter
- Mop Attachment with 300 ml Water Tank
- Virtuell vegg
4. Oppsett
4.1 Innledende lading
- Plasser ladestasjonen mot en vegg i et åpent område, og sørg for at det ikke er noen hindringer innenfor 1 meter til sidene og 2 meter foran.
- Connect the charging adapter to the charging station and plug it into a power outlet.
- Place the robot vacuum cleaner on the charging station. Ensure the charging contacts align. The robot will begin charging automatically. A full charge takes approximately 5 hours.
4.2 Montering av sidebørster
Attach the side brushes to the designated posts on the underside of the robot by pressing them down until they click into place. Ensure the 'L' and 'R' markings on the brushes match the corresponding markings on the robot.
4.3 Connecting to the ETA SMART App
The ETA SMART app enhances the functionality of your robot. Download the app from your smartphone's app store. Follow the in-app instructions to connect your robot to your home Wi-Fi network and pair it with the app.
4.4 Setting up the Virtual Wall
The virtual wall creates an invisible barrier to restrict the robot's access to certain areas. Place the virtual wall device on the floor where you want to create a boundary. Ensure the infrared beam is directed towards the area you wish to block. The robot will detect this beam and avoid crossing it.

Bilde 4.1: Robot with charging station and virtual wall. This image shows the robot positioned near its charging station, with a virtual wall device placed nearby to illustrate its function.
5. Bruksanvisning
5.1 Rengjøringsmoduser
The ETA Falco Smart offers four distinct cleaning modes:
- SMART: General cleaning mode for optimal coverage.
- KLASSISK: Standard rengjøringsmønster.
- KANT: Rengjør langs vegger og møbelkanter.
- FÅ ØYE PÅ: Concentrated cleaning in a specific area.
You can select these modes via the ETA SMART app or the remote control.
5.2 Planlegging av rengjøring
Use the ETA SMART app to set a cleaning schedule for your robot. You can program specific times and days for the robot to automatically start cleaning.
5.3 Manuell kontroll
You can manually control the robot's movement and functions using the remote control or the ETA SMART app. The app also allows you to monitor cleaning activity, battery charge, and view cleaning routes.

Bilde 5.1: ETA Smart App features. This image displays the ETA Smart App interface on a smartphone, highlighting features such as remote control, cleaning history, activity monitoring, battery status, cleaning modes (SMART, CLASSIC, EDGE, SPOT), cleaning schedule, mopping intensity control, and suction power adjustment.
5.4 Moppefunksjon
- Fill the 300 ml water tank with clean water. Do not use detergents or cleaning solutions that are not approved for robot vacuums.
- Attach a clean mop pad to the mop attachment.
- Slide the mop attachment into the designated slot on the underside of the robot.
- Start en rengjøringssyklus. Roboten vil støvsuge og moppe samtidig.
6. Vedlikehold
Regelmessig vedlikehold sikrer optimal ytelse og forlenger levetiden til robotstøvsugeren din.
6.1 Cleaning the Dust Bin and Filter
- Trykk på utløserknappen for støvbeholderen og fjern støvbeholderen.
- Åpne støvbeholderen og tøm innholdet i en søppelbøtte.
- Remove the HEPA filter and primary filter. Tap them gently to remove dust. If washable, rinse under running water and allow to air dry completely before reinserting.
- Wipe the inside of the dust bin with a dry cloth.
- Reassemble the filters and dust bin, then reinsert into the robot.
6.2 Rengjøring av hovedbørsten
- Snu roboten.
- Remove the main brush cover by pressing the release tabs.
- Løft ut hovedbørsten.
- Use the cleaning tool (if provided) or scissors to remove hair and debris tangled around the brush.
- Clean the brush compartment.
- Sett hovedbørsten tilbake på plass og fest dekselet.
6.3 Rengjøring av sidebørster
Periodically check the side brushes for tangled hair or debris. If necessary, remove them by gently pulling upwards and clean them. Replace worn or damaged brushes with the spare ones provided.
6.4 Rengjøring av moppeputen og vanntanken
After each mopping session, remove the mop pad and wash it thoroughly. Empty any remaining water from the water tank and rinse it. Allow both to air dry completely before storing or reusing.
6.5 Rengjøring av sensorer
Wipe the anti-drop sensors, bumper sensors, and charging contacts on the robot and charging station with a clean, dry cloth to ensure proper function.
7. Feilsøking
If your robot vacuum cleaner encounters an issue, refer to the following common problems and solutions:
| Problem | Mulig årsak | Løsning |
|---|---|---|
| Roboten slår seg ikke på | Lavt batteri; Strømmen er slått av | Lad roboten; Sørg for at strømbryteren er PÅ |
| Roboten lader ikke | Ladekontaktene er skitne; Ladestasjonen er koblet fra | Clean charging contacts; Ensure charging station is plugged in |
| Dårlig rengjøringsytelse | Støvbeholder full; Børster flokete; Filter tett | Tøm støvbeholderen; Rengjør børster; Rengjør/skift filter |
| Roboten setter seg ofte fast | Hindringer på gulvet; Sensorer skitne | Clear floor of cables/small items; Clean sensors |
| Virtual wall not working | Virtual wall batteries low; Incorrect placement | Replace batteries; Adjust virtual wall position |
Hvis problemet vedvarer etter at du har prøvd disse løsningene, kan du kontakte kundestøtte.
8. Spesifikasjoner
Technical specifications for the ETA Falco Smart Robot Vacuum Cleaner (Model ETA251590000):
| Trekk | Detalj |
|---|---|
| Produsent | ETA |
| Produktdimensjoner (L x B x H) | 32.5 x 33.5 x 7.5 cm |
| Vekt | 250 gram |
| Vare modellnummer | ETA251590000 (T2261) |
| Modellfarge | Blå |
| Materiale | Plast |
| Strømtype | Batteridrevet |
| Voltage | 3 Volts (14.4V Li-ion battery, 2400 mAh) |
| Antall varer i pakken | 1 |
| Spesielle funksjoner | Pet brush compatibility, Smart App control, Floating brush system, HEPA filter, Virtual wall |
| Inkluderte komponenter | Battery, Filter, Charging station, Adapter, Remote control, Side brushes, Rotary brush, Cleaning cloths, Mop attachment, Virtual wall |
| Batterisammensetning | Litium-ion |
| Batterilevetid | Opptil 120 minutter |
| Ladetid | Ca. 5 timer |
| Overflateanbefaling | Laminat |
| Kontrollertype | App kontroll |
| Reservedeler tilgjengelig | Informasjon ikke tilgjengelig om reservedeler |
9. Garanti og støtte
For warranty information, product support, or to inquire about spare parts, please refer to the warranty card included with your purchase or visit the official ETA webnettstedet. Ta vare på kjøpsbeviset for garantikrav.