1. Introduksjon
Takk for kjøpetasing the JCPOWER JC1800.5 5-Channel AmpDenne håndboken gir viktig informasjon for riktig installasjon, drift og vedlikehold av din ampVennligst les denne håndboken nøye før du prøver å installere eller bruke enheten for å sikre optimal ytelse og sikkerhet.
The JC1800.5 is designed to deliver high-quality audio performance for your vehicle's sound system, featuring a 5-channel configuration for versatile speaker and subwoofer setups.
2. Sikkerhetsinstruksjoner
Følg følgende sikkerhetsregler under installasjon og drift:
- Profesjonell installasjon anbefalt: Installation of this product requires experience with electrical wiring and car audio systems. Professional installation is highly recommended.
- Koble fra batteriet: Koble alltid fra bilens negative batteripol før du starter installasjonsarbeid for å unngå kortslutninger.
- Riktig ledning: Ensure all wiring is correctly connected and insulated to prevent short circuits and damage to the amplifier or vehicle's electrical system. Use appropriate gauge wires as specified.
- Montering: Monter amplifier securely in a dry, well-ventilated area, away from direct sunlight, heat sources, and moisture. Ensure adequate airflow around the unit to prevent overheating.
- Sikringer: Always use fuses of the specified rating. Never replace a fuse with one of a higher amperage or bypass the fuse.
- Volumnivåer: Langvarig eksponering for høyt volum kan forårsake hørselsskade. Juster volumet til et komfortabelt nivå.
- Varmespredning: De amplifier generates heat during operation. Do not cover the amplifier or obstruct its heat sinks.
3. Pakkens innhold
Bekreft at alle varene er til stede i pakken:
- JCPOWER JC1800.5 5-Channel Amplivligere
- Brukerhåndbok (dette dokumentet)
- Monteringsutstyr (skruer)
- Spare Fuses (if included)

Figure 3.1: JCPOWER JC1800.5 Amplifier in its retail packaging.
4. Oppsett og installasjon
Riktig installasjon er avgjørende for ytelsen og levetiden til din amplifier. Refer to the diagram below for connection points.
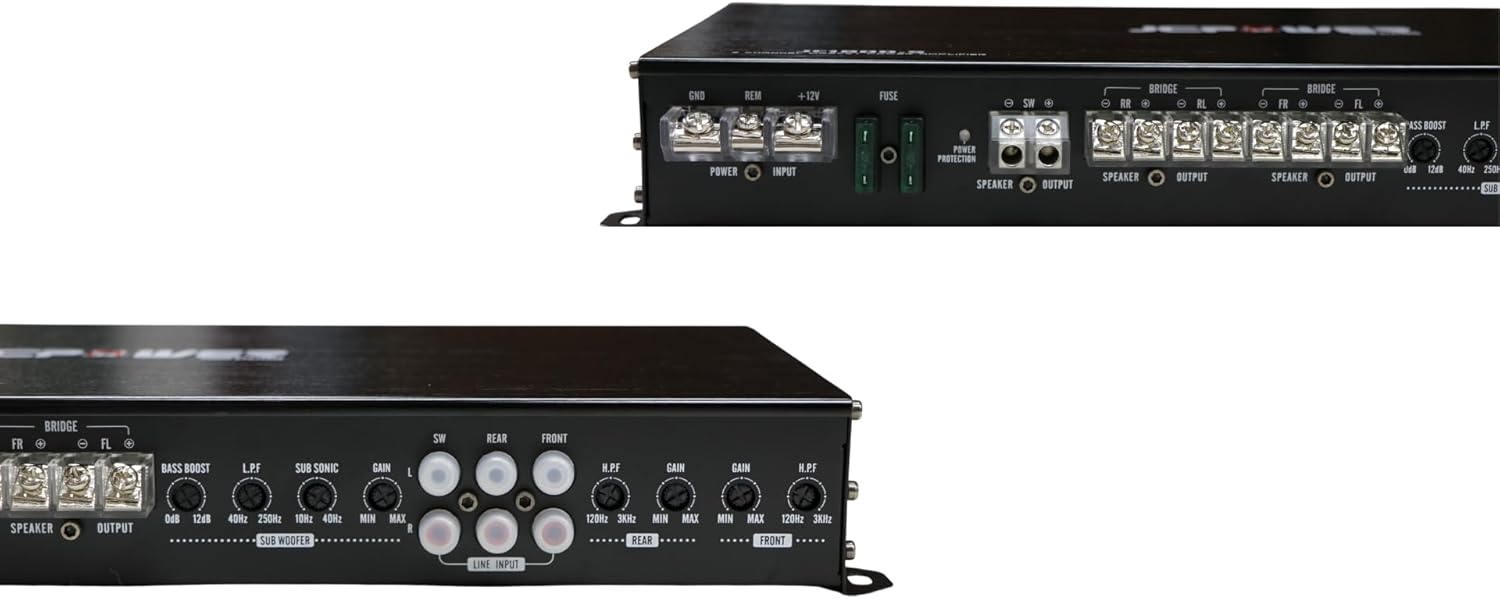
Figure 4.1: Rear panel connections and controls of the JCPOWER JC1800.5 amplivligere.
4.1. Strømtilkoblinger
- Bakke (GND): Connect a heavy-gauge wire (minimum 8 AWG, preferably 4 AWG) from the amplifier's GND terminal to a clean, unpainted metal point on the vehicle's chassis. Ensure a solid, low-resistance connection.
- Fjernkontroll (REM): Connect a 18 AWG wire from the ampREM-terminalen til fjernutgangen på hovedenheten. Denne ledningen slår på ampslå av og på med bilstereoen.
- +12V (strøm): Connect a heavy-gauge wire (minimum 8 AWG, preferably 4 AWG) from the amplifier's +12V terminal directly to the positive terminal of the vehicle's battery. Install an in-line fuse holder within 18 inches (45 cm) of the battery, using a fuse of appropriate amperage (refer to specifications).
4.2. Høyttalertilkoblinger
The JC1800.5 is a 5-channel amplifier. Channels 1-4 are typically used for full-range speakers, and Channel 5 (Subwoofer channel) is for a subwoofer.
- Connect your front speakers to the FR+ and FR- terminals and FL+ and FL- terminals.
- Connect your rear speakers to the RR+ and RR- terminals and RL+ and RL- terminals.
- Connect your subwoofer to the SW+ and SW- terminals.
- Ensure correct polarity (+ to + and - to -) for all speaker connections. Incorrect polarity can lead to poor sound quality.
- Bridging (Channels 1-4): Channels 1-4 can be bridged to power two speakers at higher power. Refer to the amplifier's specifications for minimum impedance when bridging. Connect the speaker to the FL+ and FR- terminals for one bridged channel, and RL+ and RR- for the other.
4.3. Input Connections (RCA)
Koble RCA-kabler fra hovedenhetens for-amp outputs to the corresponding RCA input jacks on the amplifier (FRONT, REAR, SUBWOOFER). Ensure a secure connection.
5. Betjening og justeringer
Etter installasjon, juster forsiktig ampLifier-innstillinger for optimal lydytelse.
5.1. Forsterkningsjustering
The GAIN control matches the amplifier's input sensitivity to the output of your head unit. It is ikke a volume control.
- Snu på amplifier's GAIN controls to their minimum (counter-clockwise) position.
- Still inn hovedenhetens volum til omtrent 75–80 % av maksimumsvolumet.
- Øk sakte amplifier's GAIN control until you hear slight distortion, then back it off slightly until the sound is clear.
- Repeat for FRONT, REAR, and SUBWOOFER channels independently.
5.2. Crossover Settings (LPF/HPF)
The built-in crossovers allow you to direct specific frequency ranges to your speakers.
- LPF (lavpassfilter): Used for subwoofers. This allows frequencies under the set point to pass through. Adjust the LPF for the subwoofer channel (typically 80Hz-120Hz) to blend with your main speakers.
- HPF (høypassfilter): Used for full-range speakers. This allows frequencies over the set point to pass through. Adjust the HPF for the FRONT and REAR channels (typically 80Hz-100Hz) to prevent low frequencies from distorting smaller speakers.
5.3. Bass Boost
The BASS BOOST control (on the subwoofer channel) provides an increase in output at a specific low frequency. Use sparingly, as excessive bass boost can lead to distortion and potential speaker damage.
6. Vedlikehold
Regular maintenance ensures the longevity and performance of your amplivligere.
- Rengjøring: Tørk av med jevne mellomrom amplifier's exterior with a soft, dry cloth. Do not use harsh chemicals or abrasive cleaners. Ensure ventilation fins are free of dust and debris.
- Tilkoblinger: Occasionally check all power, ground, remote, and speaker connections to ensure they are secure and free from corrosion.
- Miljø: Sørg for at amplifier remains in a dry, well-ventilated environment. Avoid exposing it to extreme temperatures or moisture.
7. Feilsøking
Hvis du opplever problemer med din amplifier, se følgende vanlige problemer og løsninger:
| Problem | Mulig årsak | Løsning |
|---|---|---|
| Ingen strøm / Strøm-LED av | Har gått sikring Dårlig strøm-/jordforbindelse Ingen fjernsignal for påslåing | Sjekk og bytt sikring Kontroller at alle strøm- og jordforbindelser er sikre Check remote wire connection and head unit output |
| No Sound / Protection LED On | Høyttaler kortslutning Overoppheting Lav voltage | Sjekk høyttalerledningene for kortslutninger Ensure adequate ventilation; allow amplifier to cool Check battery and charging system |
| Forvrengt lyd | Forsterkningen er satt for høyt Feil innstillinger for delefilter Uoverensstemmelse mellom høyttalerimpedans | Reduser forsterkningsinnstillingen Adjust LPF/HPF settings Kontroller at høyttalerimpedansen er innenfor amplifier's limits |
| Engine Noise (Whine) | Dårlig jordforbindelse RCA cables routed near power wires Defekte RCA-kabler | Improve ground connection Reroute RCA cables away from power wires Replace RCA cables |
8. Spesifikasjoner
Key technical specifications for the JCPOWER JC1800.5 amplivligere:
- Kanaler: 5
- RMS Power Output (4 ohm): 35 W x 4 CH + 250 W x 1 CH
- RMS Power Output (2 ohm): 50 W x 4 CH + 500 W x 1 CH
- Bridged Power Output (4 ohm): 100 W x 2 CH (for channels 1-4)
- Total utgangseffekt: 250 Watts (as per product data, likely peak or combined)
- Monteringstype: Independent Mount
- Produktvekt: 3 kilo
- Pakkedimensjoner: 47.6 x 22.2 x 7 cm
- Modellnummer: JC1800.5
9. Garanti og støtte
JCPOWER products are designed and manufactured to the highest quality standards. This product is covered by a limited warranty against defects in materials and workmanship. The specific terms and duration of the warranty may vary by region and retailer.
For warranty service, technical support, or further inquiries, please contact your authorized JCPOWER dealer or visit the official JCPOWER webnettsted for kontaktinformasjon.
Ta vare på kjøpsbeviset for garantikrav.