1. Introduksjon
Takk for kjøpetasing the Aogamb D3000 Kids Alarm Clock. This device combines a digital alarm clock, Bluetooth speaker, wake-up light, and sleep sound machine to create a versatile and engaging experience for children's bedrooms. Please read this manual carefully to ensure proper use and maintenance of your device.
Pakkeinnhold:
- Aogamb D3000 Alarm Clock
- USB ladekabel
- Brukerhåndbok

Image: The Aogamb D3000 Alarm Clock, USB charging cable, and user manual are shown as included items.
2. Sikkerhetsinformasjon
- Ikke utsett enheten for ekstreme temperaturer, direkte sollys eller høy luftfuktighet.
- Hold enheten unna vann eller andre væsker.
- Ikke forsøk å demontere eller reparere enheten selv. Kontakt kundestøtte for å få hjelp.
- Bruk kun den medfølgende USB-ladekabelen eller en tilsvarende sertifisert kabel.
- Ensure the device is placed on a stable surface to prevent falling.
3. Oppsett
Innledende lading
Before first use, fully charge the alarm clock using the provided USB cable. Connect the USB cable to the charging port on the back of the device and to a suitable USB power adapter (not included). The charging indicator light will be red during charging and turn blue when fully charged.
Bilde: Et nærbilde view of the USB charging interface located on the back of the alarm clock.
Protective Film Removal
Before operating the device, gently remove the transparent protective film from the black display lens.
Image: A hand is shown peeling off a transparent protective film from the black display area of the alarm clock.
4. Bruksanvisning
Kontrollene er overview
Familiarize yourself with the buttons located on the top of the alarm clock:
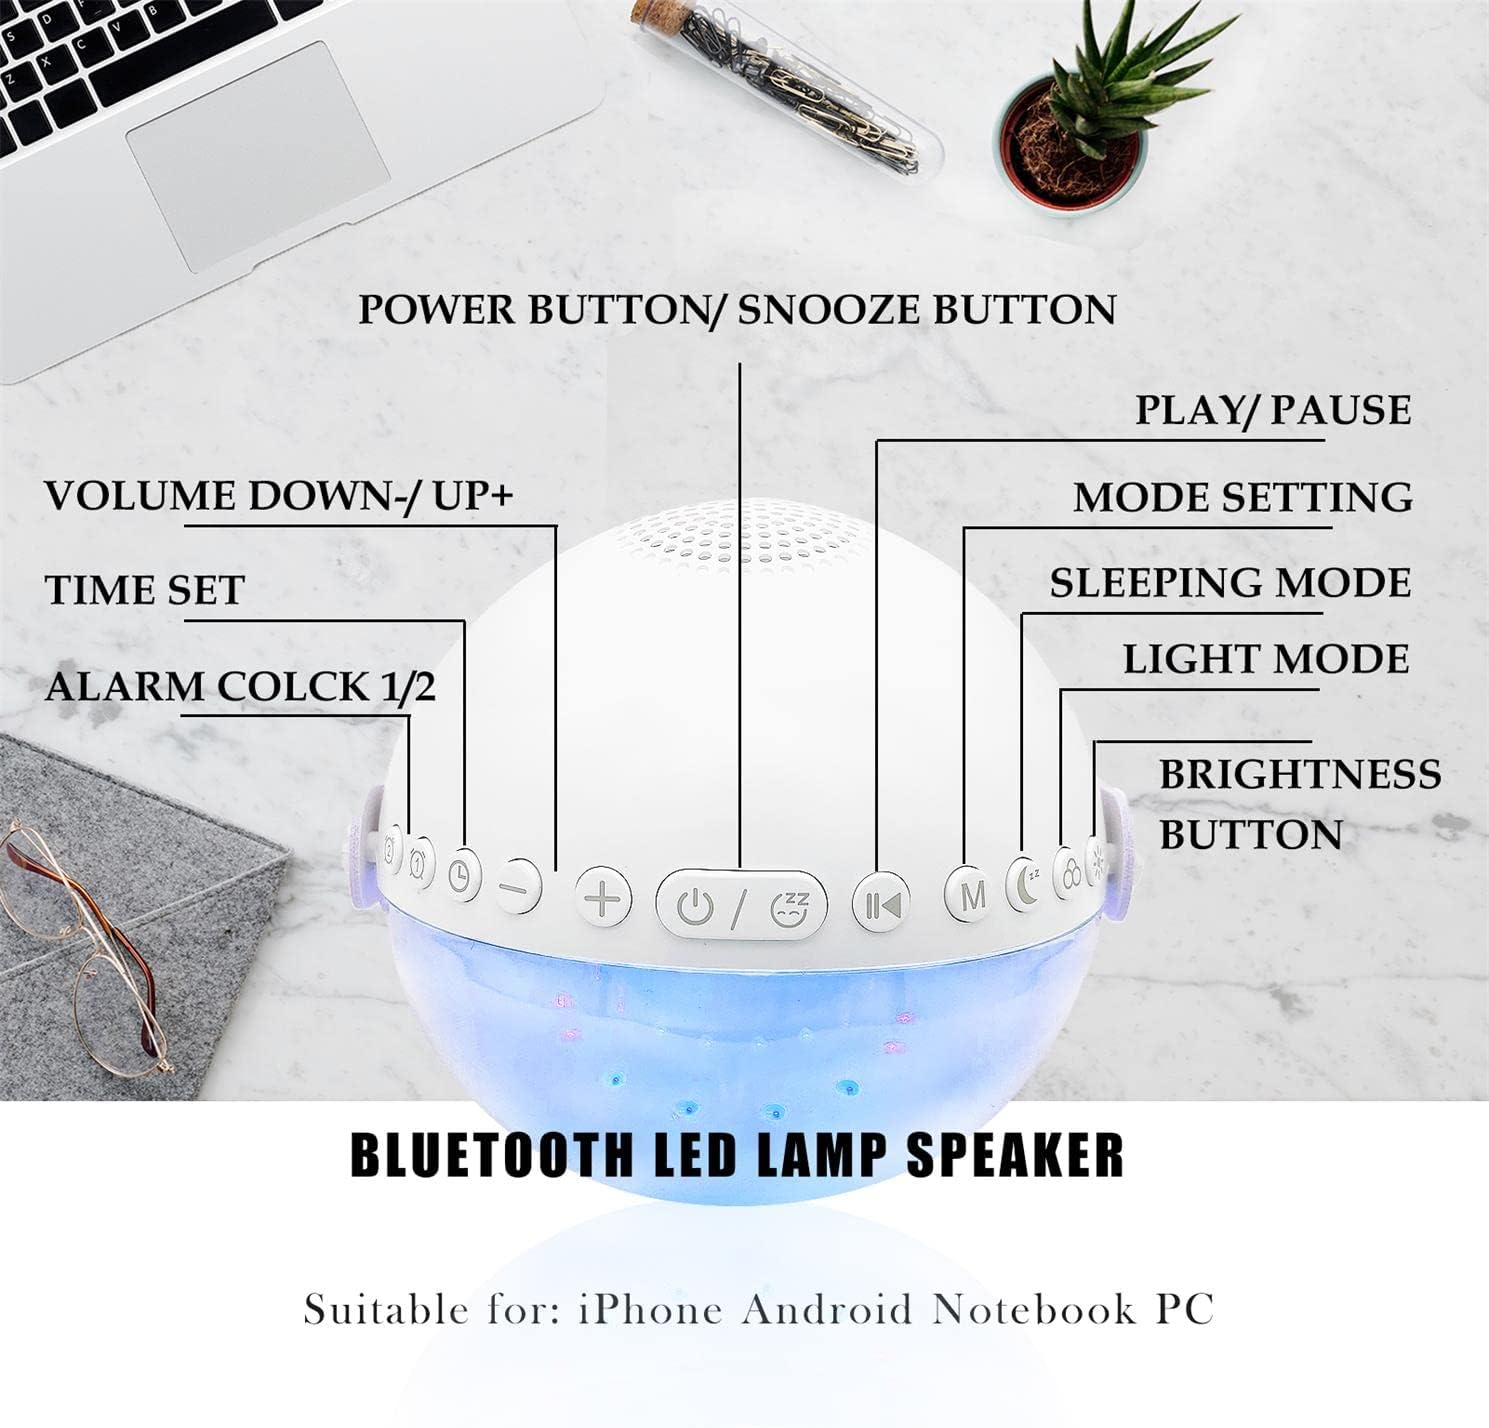
Bilde: En overhead view of the alarm clock with labels pointing to each button: Power/Snooze, Volume Down/Up, Time Set, Alarm 1/2, Play/Pause, Mode Setting, Sleeping Mode, Light Mode, and Brightness Button.
- Power Button / Snooze Button: Press to power on/off. Short press during an alarm to activate snooze.
- Volume Down (-) / Volume Up (+): Kort trykk for å justere volumet.
- Tiden satt: Press to enter time setting mode.
- Alarm 1 / Alarm 2: Press to set or activate/deactivate Alarm 1 or Alarm 2.
- Spill av / Pause: Controls media playback in Bluetooth or Sound Machine mode.
- Mode Setting (M): Press to cycle through modes (Bluetooth, Sound Machine).
- Sovemodus: Activates sleep mode features.
- Lysmodus: Cycles through light colors and effects.
- Lysstyrke-knapp: Adjusts display and light brightness.
Tidsinnstilling
- Trykk på Tid satt knappen. Timevisningen vil blinke.
- Bruk Volum opp (+) or Volum ned (-) knapper for å justere timen.
- Pressen Tid satt igjen for å bekrefte timen og gå videre til minuttinnstilling.
- Bruk Volum opp (+) or Volum ned (-) knapper for å justere minuttene.
- Pressen Tid satt én gang til for å bekrefte og avslutte tidsinnstillingen.
- The clock supports a 24-hour format.
Alarm Setting (Dual Alarms)
The device features two independent alarms. You can customize ringtones, alarm volume, and light color/brightness for each.
- Trykk på Alarm 1 or Alarm 2 button to select an alarm. The alarm icon will flash.
- Follow the time setting steps to set the desired alarm time.
- After setting the time, you can customize the alarm sound, volume, and wake-up light settings using the respective buttons (e.g., Lysmodus, Volum +/-).
- Trykk på Alarm 1 or Alarm 2 button again to activate/deactivate the alarm. The alarm icon will appear/disappear on the display.
Image: Two panels illustrate customized alarm times: one for waking up at 7:30 AM and another for going to sleep at 10:00 PM, both for Monday to Friday.
Snooze-funksjon
Når en alarm lyder, trykk på Power Button / Snooze Button to activate the snooze function. The alarm will pause for 5 minutes and then sound again. This can be repeated up to three times, after which the alarm will turn off automatically.
Image: The alarm clock is displayed with a clear indication of its snooze function.
Bluetooth-høyttalermodus
The alarm clock features advanced Bluetooth 5.0 technology for wireless audio streaming.
- Trykk på Mode Setting (M) button repeatedly until the Bluetooth icon appears on the display.
- On your smartphone or Bluetooth-enabled device, search for "Aogamb D3000" in the Bluetooth settings and pair.
- Once connected, you can play music or audio from your device through the alarm clock speaker.
- Bruk Spill / Pause knappen for å styre avspillingen.
- Bruk Volum opp (+) or Volum ned (-) knappene for å justere volumet.

Image: A child and adult are shown with the alarm clock, which is wirelessly connected to a smartphone via Bluetooth, playing music.
Sovelydmaskin
The alarm clock offers 8 soothing natural sounds to aid sleep or relaxation.
- Trykk på Mode Setting (M) button repeatedly until the Sound Machine icon appears on the display.
- Trykk kort på Volum opp (+) or Volum ned (-) buttons to cycle through the 8 available sounds: Rain, Ocean Waves, Birds, Water Stream, White Noise, Cicada, Bonfire, Tick-Tock.
- Trykk lenge på Volum opp (+) or Volum ned (-) buttons to adjust the volume of the sleep sounds.
- Trykk på Spill / Pause -knappen for å starte eller stoppe lyden.

Image: A child and adult are shown sleeping, with the alarm clock nearby. Icons for 8 natural sounds (Rain, Water Stream, Cicadas, Birds, Ocean Waves, White Noise, Bonfire, Tick-Tock) are displayed, indicating the sleep sound feature.
Wake-up Light / Night Light
The alarm clock features a touch-activated backlight and adjustable colored lights.
- Touch-Activated Backlight: Gently tap the device to activate the backlight for checking the time in the dark.
- Lysmodus: Trykk på Lysmodus button to cycle through various light colors (Warm White, Green, Red, Blue, Orange, Yellow) and lighting effects (e.g., breathing lights, flashing light).
- Juster lysstyrke: Trykk på Lysstyrkeknapp to adjust the intensity of the light (3 levels: Low, Middle, High).

Image: The alarm clock is shown displaying various colorful night light options, including 9 different colors, 3 breathing light effects, and 1 flashing light, with adjustable brightness levels (Low, Middle, High).

Image: The alarm clock is shown with various light colors and brightness settings, illustrating its wake-up light functionality.
Sleep Trainer Function (Sun & Moon Icons)
The alarm clock features sun and moon icons on the LED display to help children understand day and night cycles, promoting better sleep habits. The sun icon indicates daytime, and the moon icon indicates nighttime.
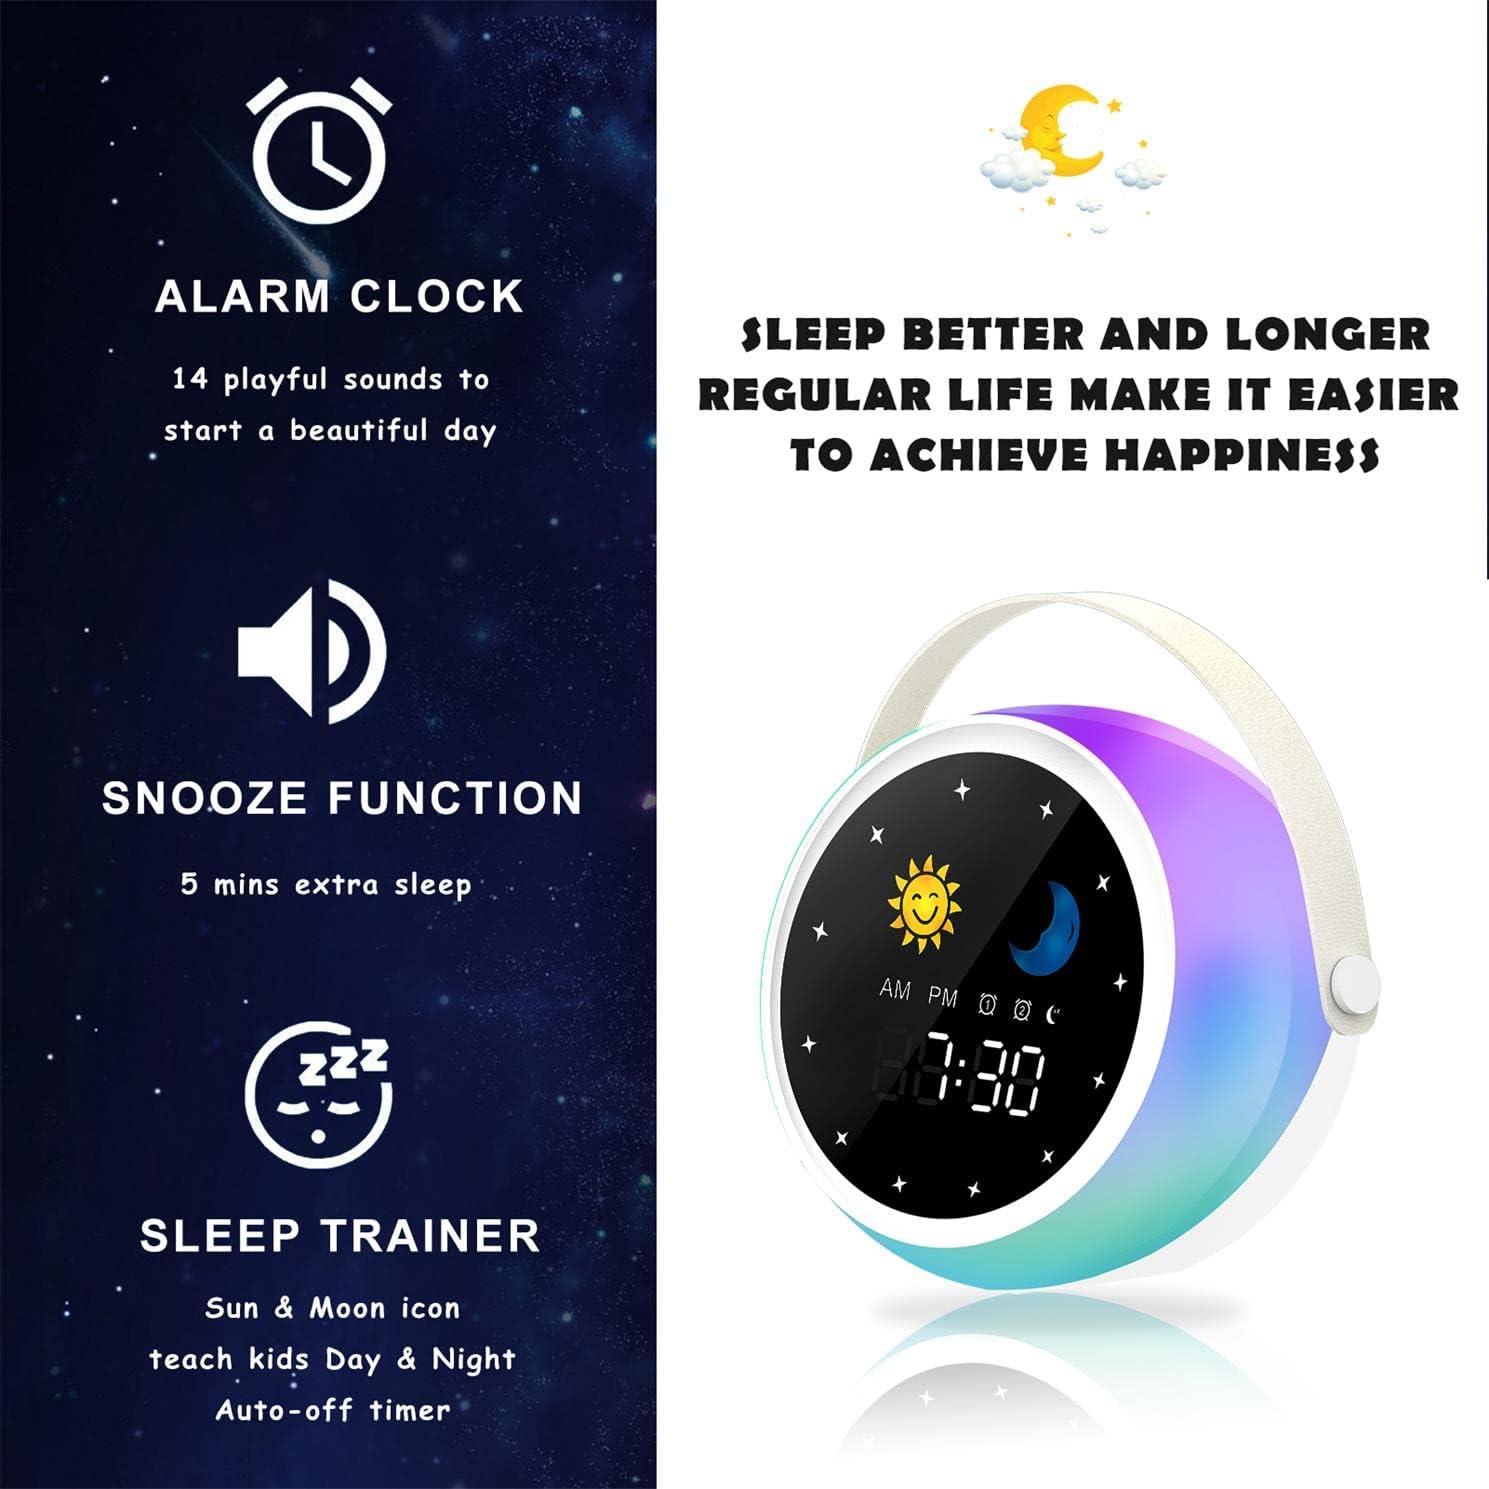
Image: A visual representation of the alarm clock's key features: alarm, snooze, and sleep trainer, with the sun and moon icons visible on the display to teach day and night.

Image: Two panels show the alarm clock display: one for sleep time (10:30 PM with moon icon) and one for wake-up time (7:00 AM with sun icon), illustrating the sleep trainer function.
5. Vedlikehold
- Rengjør enheten med en myk, tørr klut. Ikke bruk slipende rengjøringsmidler eller løsemidler.
- Sørg for at ladeporten er fri for støv og rusk.
- Oppbevar enheten på et kjølig og tørt sted når den ikke er i bruk over lengre tid.
6. Feilsøking
Enheten slår seg ikke på:
- Ensure the device is fully charged. Connect it to a power source using the USB cable.
- Press and hold the Power Button for a few seconds.
Problemer med Bluetooth-paring:
- Make sure the alarm clock is in Bluetooth mode (Bluetooth icon visible).
- Ensure your smartphone or device's Bluetooth is enabled and within range.
- Try restarting both the alarm clock and your Bluetooth device.
- Glem enheten fra telefonens Bluetooth-liste og prøv å pare på nytt.
Alarmen går ikke:
- Bekreft at alarmen er aktivert (alarmikonet er synlig på skjermen).
- Check the alarm volume settings.
- Ensure the alarm time is set correctly.
7. Spesifikasjoner
| Merke | Aogamb |
| Modellnummer | D3000 |
| Farge | Hvit |
| Dimensjoner (L x B x H) | 12 x 12.1 x 10.5 cm |
| Vekt | 430 g |
| Materiale | Krystall |
| Visningstype | Digital |
| Strømkilde | Elektrisk kabel |
| Spesielle funksjoner | Alarm, Charging Port, Snooze, Bluetooth Speaker, Wake-up Light, Sleep Sound Machine |
| Batterier inkludert | Ingen |
8. Garanti og støtte
This product comes with a standard manufacturer's warranty. For detailed warranty information, please refer to the product packaging or contact Aogamb customer support. If you encounter any issues or have questions not covered in this manual, please reach out to our support team for assistance.
Kundestøttekontakt: Please refer to the contact information provided on the product packaging or the official Aogamb webnettstedet.