1. Introduksjon
The Oster Oven Fryer 12L 3-in-1 electric air fryer is designed for preparing lighter and healthier meals. This versatile appliance combines the functions of an air fryer, oven, and dehydrator, offering an expanded capacity suitable for daily family use. It provides practical and quick options for a variety of healthy preparations.

This image illustrates the key features: 3-in-1 functionality (Air Fryer, Oven, Dehydrator), 12 liters capacity, and 1800W power.
2. Viktige sikkerhetsinstruksjoner
Les alle instruksjonene nøye før du bruker apparatet. Hvis du ikke følger disse instruksjonene, kan det føre til elektrisk støt, brann eller alvorlig skade.
- Elektrisk sikkerhet: Sørg for at voltage av strømuttaket samsvarer med voltage specified on the appliance. Do not immerse the cord, plug, or appliance in water or other liquids.
- Varme overflater: The appliance surfaces become hot during use. Always use oven mitts or gloves when handling hot components or accessories. Do not touch hot surfaces directly.
- Plassering: Place the appliance on a stable, heat-resistant surface, away from walls and other heat sources. Ensure adequate ventilation around the unit.
- Tilsyn: Nøye tilsyn er nødvendig når et apparat brukes av eller i nærheten av barn. Ikke la apparatet være uten tilsyn under bruk.
- Tilbehør: Only use accessories recommended by the manufacturer. Using unapproved accessories may cause injury or damage to the appliance.
- Vedlikehold: Trekk støpselet til apparatet ut av stikkontakten når det ikke er i bruk og før rengjøring. La det avkjøles helt før du håndterer eller rengjør deler.
- Skader: Ikke bruk apparater med skadet ledning eller støpsel, eller etter at apparatet ikke fungerer som det skal eller har blitt skadet på noen måte. Kontakt kundeservice for undersøkelse, reparasjon eller justering.
- Tiltenkt bruk: Dette apparatet er kun til husholdningsbruk. Ikke bruk utendørs.
3. Produktkomponenter
The Oster Oven Fryer comes with the following components:
- Main Unit (Oven Fryer)
- 2 x Airflow Racks (Grids)
- 1 x Rotisseriekurv
- 1 x Accessory Removal Hook
- 1 x Rotisserie Spit
- 1 x dryppbrett
- 1 x bruksanvisning
- 1 x Warranty and Technical Assistance Leaflet
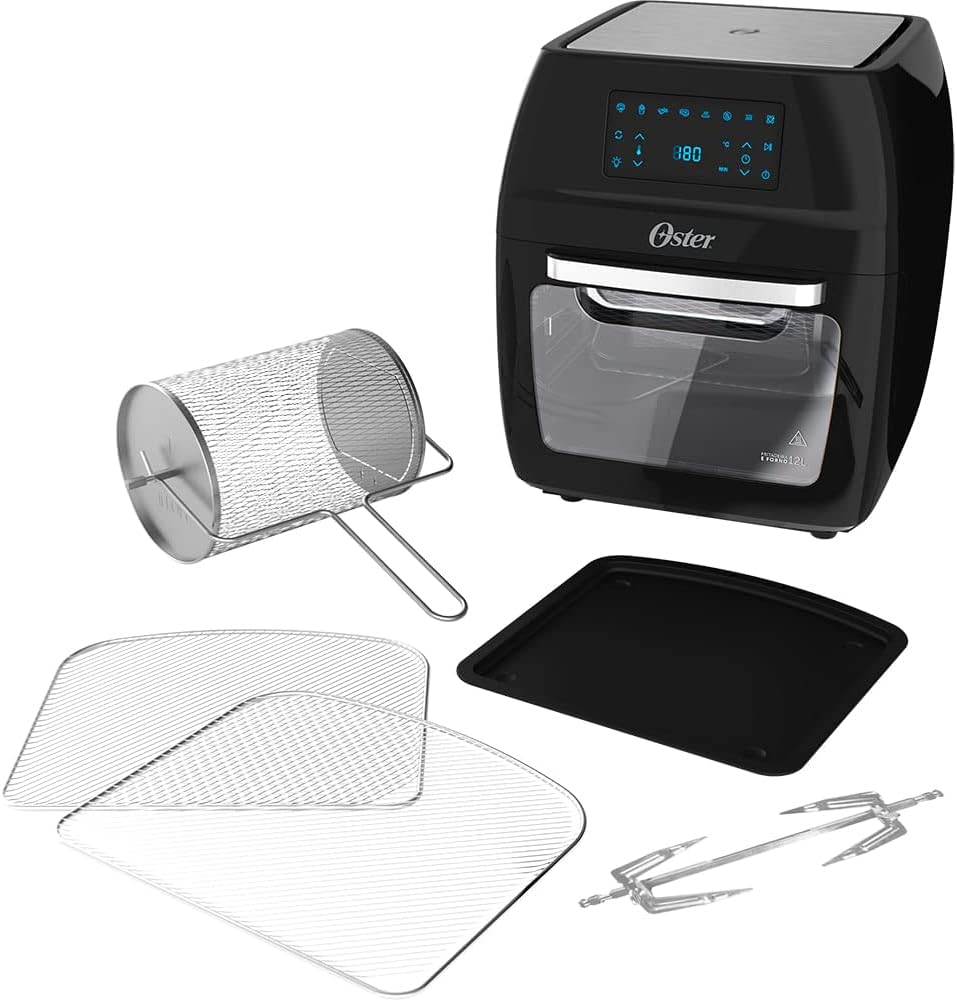
This image displays all included accessories alongside the main Oven Fryer unit.
4. Oppsettveiledning
4.1 Utpakking
- Fjern forsiktig alle komponenter fra emballasjen.
- Remove any protective film or stickers from the appliance and accessories.
- Ta vare på emballasjematerialene for senere oppbevaring eller avhending.
4.2 Innledende rengjøring
- Wash the airflow racks, rotisserie basket, rotisserie spit, and drip tray with warm, soapy water. Rinse thoroughly and dry completely.
- Tørk av innsiden og utsiden av hovedenheten med en klut.amp klut. Ikke bruk skurende rengjøringsmidler.
4.3 Plassering
- Place the Oven Fryer on a stable, level, and heat-resistant surface.
- Ensure there is at least 10-15 cm (4-6 inches) of clear space around the back and sides of the appliance for proper ventilation.
- Do not place the appliance near flammable materials or under cabinets.
4.4 Første gangs bruk (avbrenning)
- Plug the appliance into a grounded 220V electrical outlet.
- Run the appliance empty for approximately 10-15 minutes at 180°C (350°F). This helps to burn off any manufacturing residues and eliminate initial odors. A slight odor or smoke during this process is normal.
- Sørg for at området er godt ventilert under denne første avbrenningen.
5. Bruksanvisning
5.1 Kontrollpanel overview
The Oster Oven Fryer features an intuitive touch control panel. The digital display shows temperature and time settings, while various icons represent pre-programmed functions and customizable settings.

The touch control panel allows for easy selection of cooking functions and adjustments.
5.2 Forhåndsprogrammerte funksjoner
The appliance includes 4 pre-programmed functions for common dishes:
- Grønnsaker: Optimized settings for cooking various vegetables.
- Pommes frites: Ideal for crispy French fries.
- Fjærfe: Passer til kylling, kalkun og annet fjærkre.
- Kjøtt: For tilberedning av forskjellige typer kjøtt.

These icons represent the four pre-programmed cooking functions.
5.3 Customizable Functions
In addition to pre-programmed options, you can customize settings using these 5 functions:
- Dehydrere: For drying fruits, vegetables, and meats.
- Air Fry: For oil-free frying.
- Stek: For roasting various foods.
- Gjenoppvarming: For warming up previously cooked meals.
- Rotisseri: For cooking whole poultry or large cuts of meat with continuous rotation.
5.4 Temperature and Time Adjustment
- The temperature can be adjusted from 40 °C til 200 °C (105 °F til 400 °F).
- The timer allows for precise cooking durations and features an automatisk avstenging for safety and convenience.
5.5 Bruk av tilbehør
Plasser alltid dryppbrett at the bottom of the oven to catch any oil or food particles.
5.5.1 Airflow Racks
- Insert the airflow racks into the desired slots within the oven.
- These are suitable for general air frying, roasting, or dehydrating.
- When using multiple racks, rotate them halfway through cooking for even results, especially with larger items.

The interior of the Oven Fryer showing the placement of two airflow racks.
5.5.2 Rotisserie Basket
- Place smaller items like French fries or vegetables into the rotisserie basket.
- To install, first insert the left side of the basket into the motor drive socket, then secure the right side into its support.
- Select the 'Rotisserie' function for continuous 360° rotation, ensuring even cooking.
- Use the accessory removal hook to safely remove the hot basket after cooking.
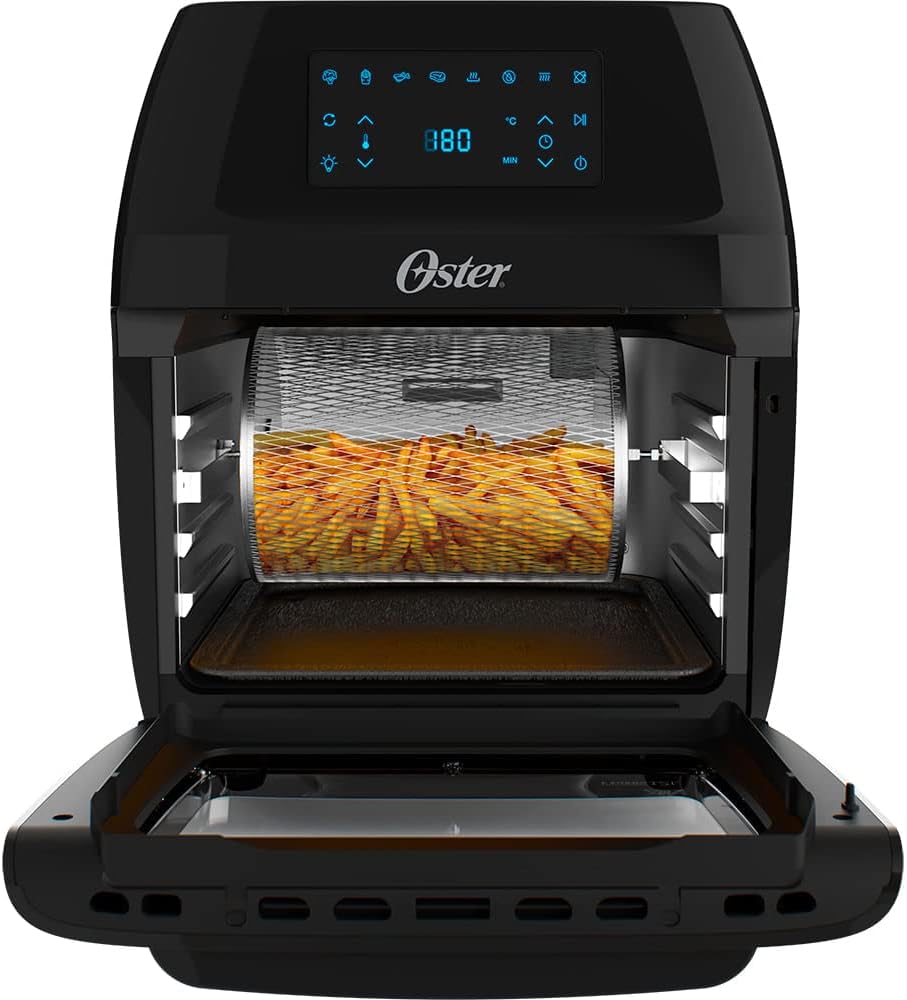
The rotisserie basket is ideal for achieving crispy results on items like French fries.
5.5.3 rotisseriespyd
- Secure a whole chicken or large roast onto the rotisserie spit.
- Insert the left side of the spit into the motor drive socket, then secure the right side into its support.
- Activate the 'Rotisserie' function for 360° rotation, which ensures uniform cooking and browning.
- Use the accessory removal hook to safely remove the hot spit and food after cooking.

A whole chicken cooking evenly on the rotisserie spit inside the Oven Fryer.
5.6 Starte og sette på pause
- After selecting your desired function and settings, press the Spill av/pause for å starte matlagingen.
- Trykk på Spill av/pause button again to temporarily stop cooking. You can then adjust settings or check food.
- The appliance also features a omprogrammere function to change settings mid-cycle if needed.
5.7 Internal Illumination
The transparent door and internal illumination allow you to monitor the cooking process without opening the door, helping to maintain consistent temperature.
6. Rengjøring og vedlikehold
Proper cleaning and maintenance ensure the longevity and optimal performance of your Oster Oven Fryer.
- Koble fra og kjøl ned: Trekk alltid støpselet til apparatet ut av stikkontakten og la det avkjøles helt før rengjøring.
- Tilbehør: Remove all accessories (airflow racks, rotisserie basket, rotisserie spit, drip tray). Wash them with warm, soapy water using a non-abrasive sponge. Rinse thoroughly and dry completely. Note: Dette tilbehøret tåler ikke oppvaskmaskin.
- Interiør: Tørk av innvendige vegger med adamp cloth and mild detergent. For stubborn food residues, a soft brush can be used. Avoid using metal scouring pads or harsh abrasive cleaners, as they can damage the non-stick coating.
- Ytre: Tørk av utsiden av apparatet med adamp klut. Ikke bruk slipende rengjøringsmidler eller senk hovedenheten i vann.
- Lagring: Sørg for at alle delene er rene og tørre før du setter apparatet bort. Oppbevar det på et kjølig og tørt sted.
7. Feilsøkingsveiledning
Hvis du støter på problemer med Oster-frityrkokeren din, kan du se følgende vanlige problemer og løsninger:
| Problem | Mulig årsak | Løsning |
|---|---|---|
| Apparatet slås ikke på. | Ikke tilkoblet; problem med strømuttak; feil på apparatet. | Ensure the power cord is securely plugged into a working 220V outlet. Check the circuit breaker. If the issue persists, contact customer support. |
| Maten tilberedes ikke jevnt. | Overcrowding; incorrect temperature/time; improper accessory placement. | Do not overcrowd the racks or basket. Cook in smaller batches if necessary. Adjust temperature and time as per recipe. Ensure racks are rotated or food is shaken/flipped halfway through cooking. Verify rotisserie accessories are correctly installed. |
| Hvit røyk kommer fra apparatet. | Fett eller matrester på varmeelementet eller dryppskålen. | Unplug the appliance and let it cool. Clean the heating element and drip tray thoroughly. Ensure the drip tray is always in place. |
| Unusual odor during cooking. | First use burn-off; food residue. | A slight odor is normal during initial uses. Ensure the appliance is clean. If the odor is strong or persistent, unplug and contact support. |
| Rotisserie basket/spit not rotating. | Incorrect installation; 'Rotisserie' function not selected. | Ensure the left side of the accessory is fully engaged in the motor drive socket and the right side is secured. Select the 'Rotisserie' function on the control panel. |
8. Produktspesifikasjoner
Here are the technical specifications for the Oster Oven Fryer 12L 3-in-1:
- Modellnavn: OFRT780-220V
- Kapasitet: 12 liter
- Strømutgang: 1800 watt
- Voltage: 220 volt
- Dimensjoner (D x B x H): 34.7 cm x 39 cm x 42.8 cm (13.66 tommer x 15.35 tommer x 16.85 tommer)
- Varevekt: 5.9 kilo (13 lbs)
- Materiale: Plastic, Glass (exterior); Plastic (interior)
- Kontrollmetode: Berøringspanel
- Teknologi for luftfritering: Varmluftsirkulasjon
- Spesielle funksjoner: Programmable, Dehydrate Function, Automatic Shut-off Timer, Non-stick coating
- Anbefalt bruk: Roasting, Dehydrating, Frying
- Tåler oppvaskmaskin: No (for main unit and accessories)
- Opprinnelsesland: Kina
9. Garanti og støtte
9.1 Garantiinformasjon
This Oster Oven Fryer comes with a 12 måneders garanti against manufacturing defects. Please retain your proof of purchase for warranty claims. The warranty covers defects in materials and workmanship under normal household use.
9.2 Kundestøtte
For technical assistance, warranty claims, or any questions regarding your product, please refer to the contact information provided in the included Warranty and Technical Assistance leaflet. You may also visit the official Oster webnettsted for støtteressurser.