1. Introduksjon
Thank you for choosing the MAGIC SELECT B2222 Portable 4-in-1 Air Pump and Vacuum Cleaner. This versatile device combines a cordless air compressor, a car and home vacuum cleaner, a tire pressure detection system, and an integrated SOS LED flashlight. Designed for convenience and efficiency, it is ideal for inflating car, motorcycle, and bicycle tires, as well as balls and other inflatables, and for quick cleaning tasks.
Les denne håndboken nøye før du bruker produktet for å sikre trygg og optimal ytelse. Ta vare på denne håndboken for senere referanse.
2. Hva er i esken
- 1 x Cordless Air Compressor / Vacuum Cleaner Unit
- 1 x Inflation Tube
- 1 x LED Emergency Light (integrated)
- 1 x USB Type-C Laderkabel
- Various inflation nozzles/adapters
- Vacuum cleaner attachments (e.g., brush nozzle)

3. Produktfunksjoner
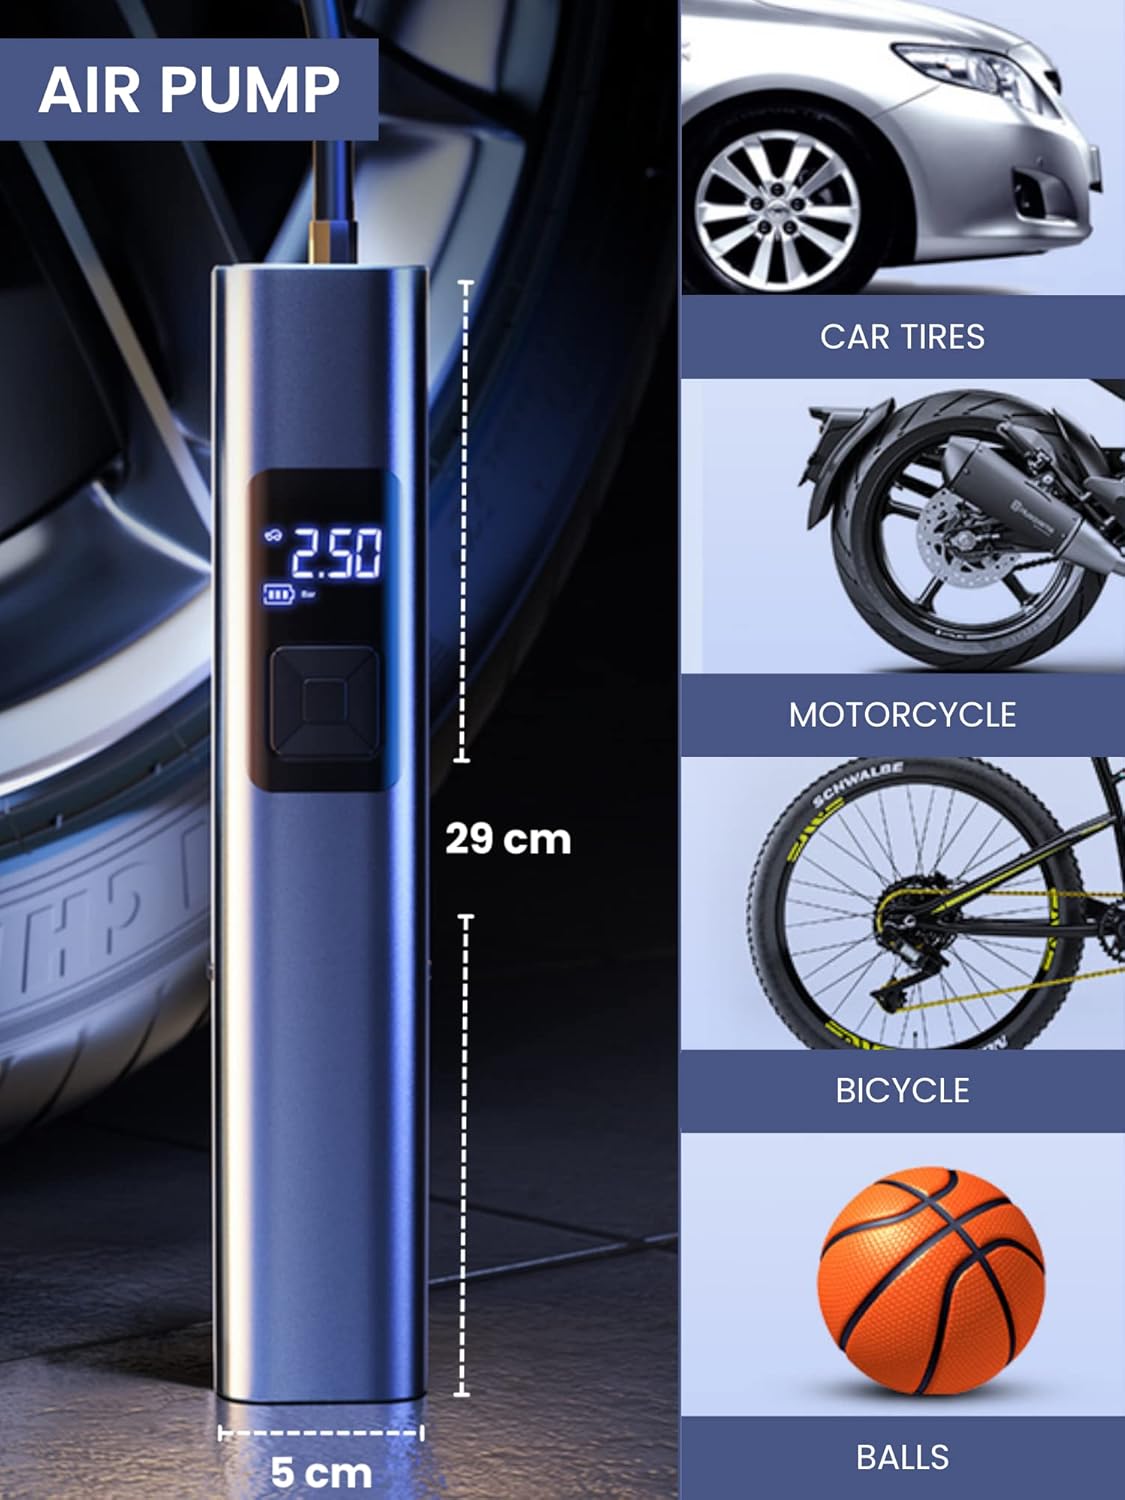
- 4-i-1-funksjonalitet: Air compressor, vacuum cleaner, tire pressure detection, and SOS LED light.
- Kraftig inflasjon: Suitable for car, motorcycle, bicycle tires, and various balls/inflatables.
- Smart Induction Chip: Automatically stops inflation once the preset pressure is reached, ensuring safety and preventing over-inflation.
- Integrert støvsuger: Efficiently cleans car interiors and small areas in the home.
- LED nødlys: Features 3 lighting modes: steady light, medium-speed flashing, and alternating medium/high-speed flashing for emergency situations.
- Langvarig batteri: Equipped with a 4400mAh lithium-ion battery, rechargeable via USB Type-C.
- Digital skjerm: Clear digital screen to monitor tire pressure and settings.
- Kompakt design: Bærbar og enkel å lagre.


4. Oppsett
4.1 Lading av enheten
- Locate the USB Type-C charging port on the upper side of the compressor.
- Koble den medfølgende USB Type-C-kabelen til enheten.
- Koble den andre enden av USB-kabelen til en kompatibel USB-strømadapter (ikke inkludert) eller en USB-port på en datamaskin.
- The digital display will indicate the charging status. Ensure the device is fully charged before first use for optimal battery life.
4.2 Feste tilbehør
- For Inflation: Screw the inflation tube into the designated hole at the top of the unit. Attach the appropriate nozzle for your item (car tire, bicycle valve, ball needle, etc.) to the other end of the inflation tube.
- For støvsuging: Insert the vacuum attachment into the hole located at the bottom of the unit.

5. Bruksanvisning
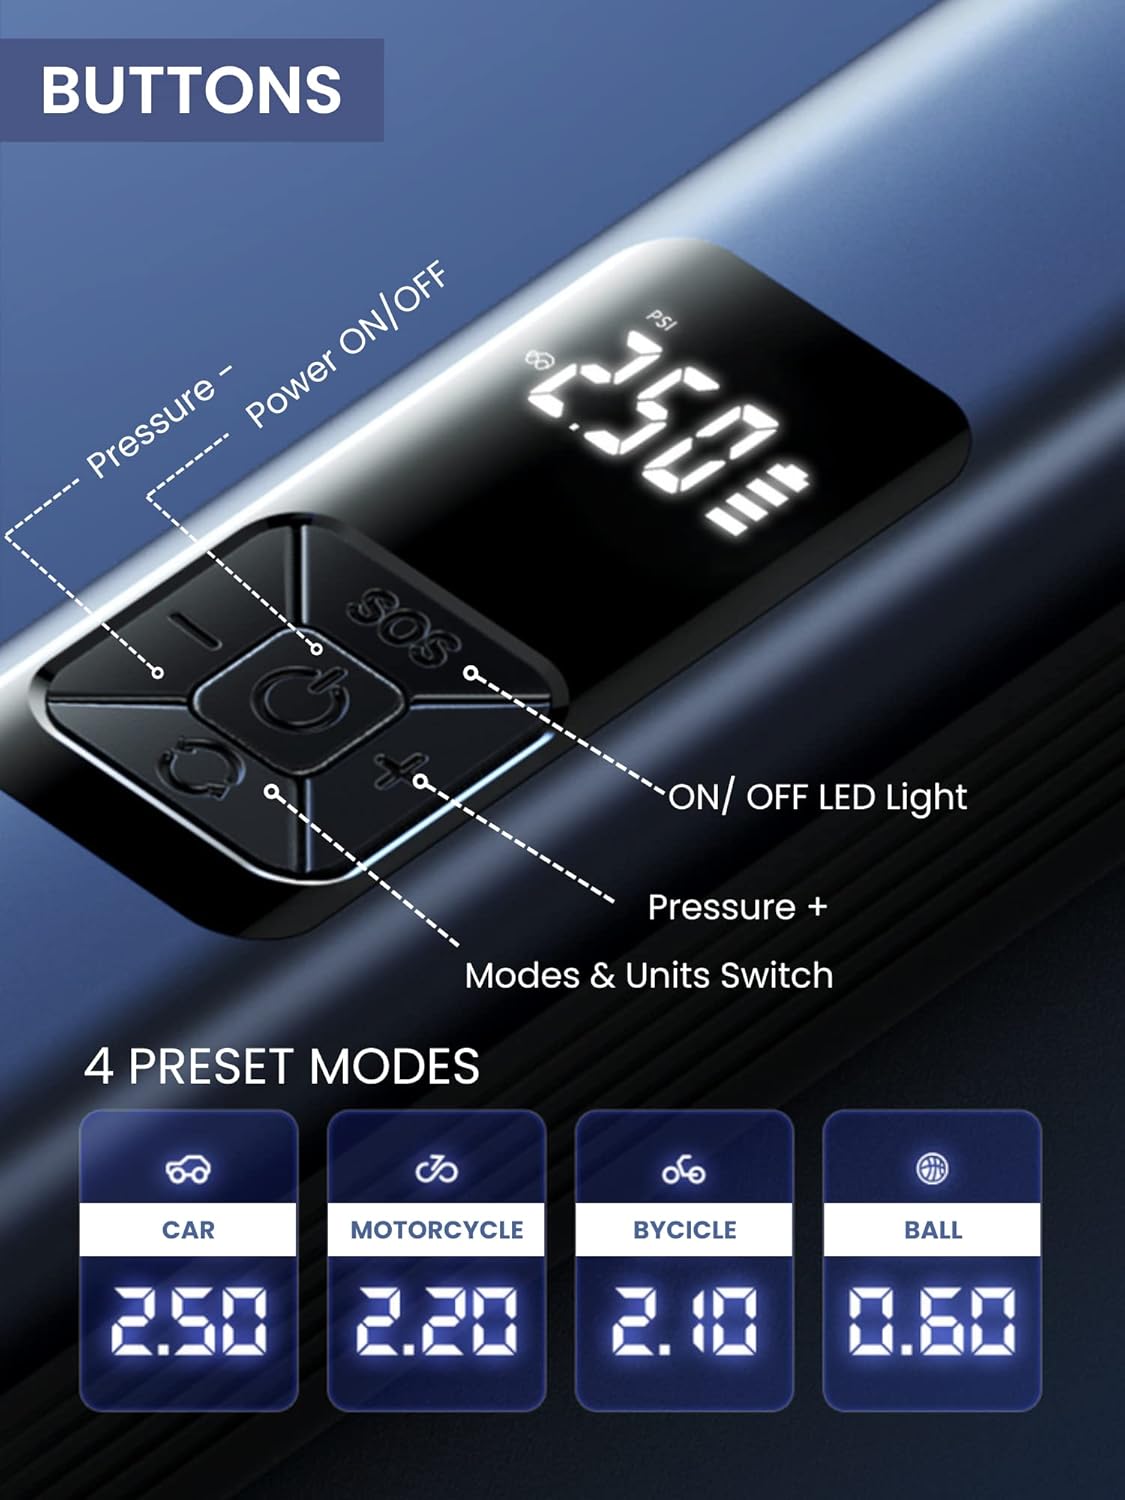
5.1 Kontrollpanel overview
The device features a digital display and 5 control buttons:
- Strøm PÅ/AV -knapp: Central button to turn the device on/off and start/stop inflation or vacuuming.
- Pressure - Button: Reduserer måltrykket.
- Pressure + Button: Øker måltrykket.
- LED-lys PÅ/AV-knapp: Aktiverer og veksler mellom LED-lysmoduser.
- Mode & Units Switch Button: Changes between preset inflation modes (Car, Motorcycle, Bicycle, Ball) and switches pressure units (e.g., PSI, Bar).
5.2 Using the Air Compressor (Inflation)
- Koble til: Screw the inflation tube onto the device and attach the correct nozzle to the item you wish to inflate.
- Strøm på: Press the Power ON/OFF button to turn on the device. The digital display will show the current tire pressure.
- Velg modus: Press the Mode & Units Switch button to cycle through preset modes (Car, Motorcycle, Bicycle, Ball) or to change pressure units (PSI, Bar).
- Still inn trykk: Use the Pressure + and Pressure - buttons to set your desired target pressure.
- Start inflasjon: Press the Power ON/OFF button again to begin inflation. The device will automatically stop when the preset pressure is reached.
- Frakople: Once inflation is complete, disconnect the nozzle from the item and then unscrew the inflation tube from the device.
5.3 Bruk av støvsugeren
- Feste: Insert the desired vacuum attachment into the vacuum port at the bottom of the device.
- Strøm på: Press the Power ON/OFF button to activate the vacuum function.
- Rengjøre: Use the device to vacuum dust, crumbs, and small debris from car interiors (seats, trunk, center console) or small areas in your home (sofas, lamp tables, windowsills, keyboards).
- Slå av: Press the Power ON/OFF button again to turn off the vacuum.

5.4 Using the LED Emergency Light
- Aktiver: Press the LED Light ON/OFF button to turn on the light.
- Syklusmoduser: Press the LED Light ON/OFF button repeatedly to cycle through the three lighting modes:
- First press: Steady light
- Second press: Medium-speed flashing light
- Third press: Alternating medium/high-speed flashing light (SOS signal)
- Slå av: Continue pressing the LED Light ON/OFF button until the light turns off, or hold the button for a few seconds.
6. Vedlikehold
6.1 Rengjøre enheten
- Tørk av utsiden av enheten med en myk, damp klut. Ikke bruk sterke kjemikalier eller skurende rengjøringsmidler.
- For the vacuum function, regularly empty the dust collection bin and clean the filter to maintain optimal suction power. The filter is washable; ensure it is completely dry before reinserting.
6.2 Oppbevaring
- Store the device and its accessories in a cool, dry place, away from direct sunlight and extreme temperatures.
- Sørg for at enheten er fulladet før langtidslagring for å bevare batteritilstanden.
7. Feilsøking
| Problem | Mulig årsak | Løsning |
|---|---|---|
| Enheten slås ikke på. | Lavt batteri. | Lad enheten med den medfølgende USB Type-C-kabelen. |
| Luftkompressoren blåser seg ikke opp. | Inflation tube or nozzle not properly connected. Incorrect pressure setting. | Ensure all connections are secure. Check and adjust the target pressure. |
| Vakuumsuget er svakt. | Dust bin full. Filter clogged. | Empty the dust bin. Clean or replace the filter. |
| Device stops unexpectedly during operation. | Overheat protection activated. Battery low. | Allow the device to cool down. Recharge the battery. |
8. Spesifikasjoner
| Trekk | Detalj |
|---|---|
| Modellnummer | B2222 |
| Merke | MAGISK UTVALG |
| Batterikapasitet | 4400mAh Litium-ion |
| Motor Speed (Vacuum) | 30000r/min |
| Dimensjoner (L x B x H) | 29 x 6 x 5.5 cm (ca.) |
| Vekt | 850 g |
| Ladeport | USB Type-C |
| Spesielle funksjoner | LED Emergency Light, Digital Display, Automatic Shut-off (Inflation) |
9. Garanti og støtte
For warranty information and customer support, please refer to the documentation provided with your purchase or contact MAGIC SELECT customer service directly. Keep your proof of purchase for warranty claims.
For further assistance or inquiries, please visit the official MAGIC SELECT website or contact their support team through the contact details provided on their packaging or product page.