
1. Introduksjon
This manual provides detailed instructions for the installation, operation, and maintenance of your darkFlash Aquarius Mesh Computer Case. Please read this manual thoroughly before beginning installation to ensure proper setup and safe use of your new computer chassis.
2. Sikkerhetsinformasjon
Følg alltid følgende sikkerhetsregler:
- Disconnect all power sources before installing or removing any components.
- Bruk en antistatisk håndleddsstropp for å forhindre skade på komponenter som følge av elektrostatisk utladning (ESD).
- Handle components carefully to avoid physical damage.
- Hold små deler og verktøy unna barn.
- Ensure proper ventilation around the computer case.
3. Pakkens innhold
Bekreft at alle varene er til stede i pakken din:
- darkFlash Aquarius Mesh Computer Case
- Tilbehørsboks (skruer, avstandsstykker, kabelstrips osv.)
- Brukerhåndbok (dette dokumentet)
4. Oppsett og installasjon
Follow these steps for proper component installation.
4.1. Forberedelse av saken
Before installing components, remove the side panels. The Aquarius Mesh case typically features a tempered glass side panel and a solid metal panel.
- Locate the thumbscrews on the rear of the case securing the side panels.
- Unscrew the thumbscrews and carefully slide the panels backward, then lift them off.

Figur 1: Forside og side view of the darkFlash Aquarius Mesh case. Note the mesh front panel and tempered glass side panel.

Figur 2: Bak view of the darkFlash Aquarius Mesh case, showing expansion slots and rear fan mount.
4.2. Installasjon av hovedkort
The Aquarius Mesh supports ATX, Micro-ATX, and Mini-ITX motherboards.
- Install the I/O shield into the cutout at the rear of the case.
- Align your motherboard with the pre-installed standoffs. Ensure the I/O ports align with the I/O shield.
- Fest hovedkortet med de riktige skruene fra tilbehørsboksen.
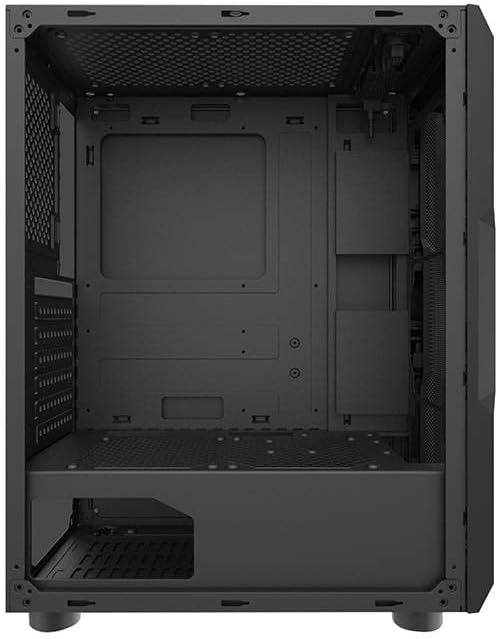
Figur 3: Interiør view of the darkFlash Aquarius Mesh case, highlighting the motherboard tray and cable routing options.
4.3. Installasjon av strømforsyningsenhet (PSU)
The PSU mounts at the bottom rear of the case.
- Slide the PSU into its designated compartment from the rear of the case.
- Align the screw holes and secure the PSU with screws.
4.4. Installasjon av lagringsstasjon
The case provides mounting options for 3.5-inch HDDs and 2.5-inch SSDs.
- 3.5" harddisker: Locate the drive cage usually beneath the PSU shroud or behind the motherboard tray. Slide the HDD into the bay and secure it with screws.
- 2.5" SSD-er: Mount SSDs to dedicated brackets behind the motherboard tray or on the PSU shroud. Secure with screws.
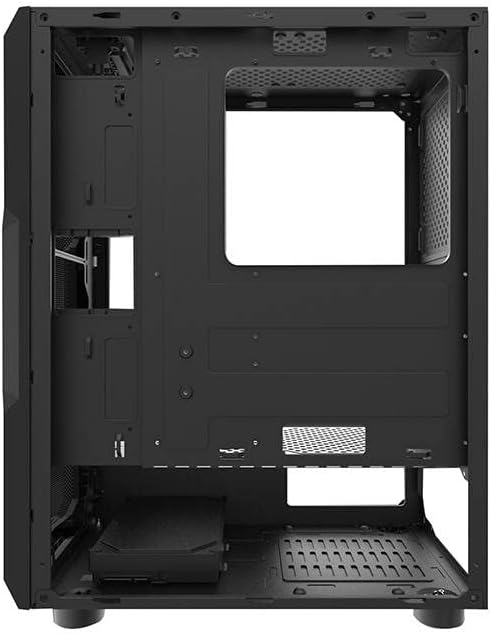
Figur 4: Bakre interiør view of the darkFlash Aquarius Mesh case, showing the motherboard cutout and potential SSD mounting points.
4.5. Expansion Card Installation (e.g., GPU)
- Fjern de nødvendige dekslene til utvidelsessporene fra baksiden av kabinettet.
- Insert the expansion card into the appropriate PCIe slot on the motherboard.
- Secure the card with the provided screws or retention clips.
4.6. Kabeladministrasjon
Bruk utsparingene for kabelføring og festepunkter bak hovedkortbrettet for å organisere kablene. Dette forbedrer luftstrømmen og estetikken.
4.7. Reassembling the Case
Once all components are installed and cables are managed:
- Carefully reattach the side panels, ensuring they slide into place correctly.
- Secure the side panels with the thumbscrews.
5. Bruksanvisning
After assembly, connect your peripherals and power cable.
- Connect your monitor, keyboard, mouse, and other peripherals to the motherboard's I/O ports.
- Connect the power cable to the PSU and a wall outlet.
- Press the power button located on the top panel of the case to start your computer.

Figur 5: Øverst view of the darkFlash Aquarius Mesh case, showing the front I/O panel with power button, reset button, USB ports, and audio jacks.
6. Vedlikehold
Regular maintenance helps ensure optimal performance and longevity of your computer components.
- Støvfiltre: The Aquarius Mesh case features removable dust filters (e.g., on the front, top, and bottom). Regularly remove and clean these filters with water and mild soap, or by vacuuming, to maintain good airflow. Ensure they are completely dry before reinstallation.
- Innvendig rengjøring: Periodically open the case and use compressed air to remove dust buildup from fans, heatsinks, and other components.
- Utvendig rengjøring: Tørk av de utvendige overflatene med en myk, damp klut. Unngå sterke kjemikalier.
7. Feilsøking
Hvis du støter på problemer, bør du vurdere følgende vanlige løsninger:
- Ingen strøm:
- Sørg for at strømforsyningsbryteren er i «PÅ»-posisjon.
- Sjekk alle strømtilkoblinger til hovedkortet og komponentene.
- Verify the power cable is securely plugged into the wall outlet and PSU.
- Vifter som ikke snurrer:
- Check fan connections to the motherboard or fan controller.
- Ensure fans are not obstructed by cables or dust.
- Frontpanel I/O fungerer ikke:
- Verify that the front panel connectors (USB, audio, power/reset switches) are correctly connected to the motherboard headers. Refer to your motherboard manual for header locations.
8. Spesifikasjoner
| Trekk | Detalj |
|---|---|
| Merke | mørkFlash |
| Modellnummer | Aquarius Mesh |
| Sakstype | Midt-tårnet |
| Materiale | Legert stål |
| Farge | Svart |
| Kjølemetode | Luft |
| Anbefalt bruk | Computer |
| Harddiskens formfaktor | 3.5 tommer |
9. Garanti og støtte
For warranty information or technical support, please refer to the official darkFlash webnettstedet eller kontakt kundeservicen deres. Ta vare på kjøpsbeviset for garantikrav.
For ytterligere hjelp kan du besøke darkFlash official webnettstedet.