GEEKVAPE AQ (Aegis Q) Pod Kit
Brukerhåndbok for GEEKVAPE AQ (Aegis Q) Pod-sett
Model: AQ (Aegis Q) Pod Kit
Introduksjon
Thank you for choosing the GEEKVAPE AQ (Aegis Q) Pod Kit. This user manual provides essential information for the safe and effective operation, maintenance, and troubleshooting of your device. Please read this manual thoroughly before using the product and keep it for future reference.
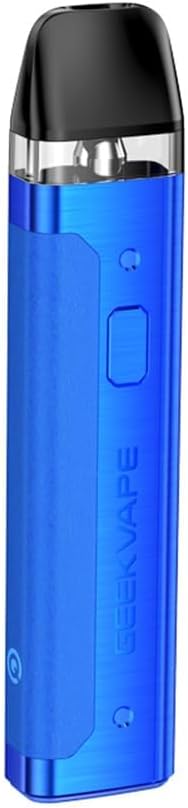
Image: The GEEKVAPE AQ (Aegis Q) Pod Kit in blue, showcasing dens elegante design og kompakte formfaktor.
Pakkeinnhold
Vennligst sjekk at alle varene som er oppført nedenfor er inkludert i pakken. Hvis noen varer mangler eller er skadet, vennligst kontakt forhandleren din.
- 1 x GEEKVAPE AQ (Aegis Q) Device
- 1 x GEEKVAPE Q Cartridge (2ml) (Pre-installed: 0.6Ω 18~25W)
- 1 x Spare GEEKVAPE Q Cartridge (2ml) (1.2Ω 8~12W)
- 1 x USB-C-kabel
- 1 x Drip Tip Cap

Image: Contents of the GEEKVAPE AQ (Aegis Q) Pod Kit package, including the device, two cartridges, USB-C cable, and drip tip cap.
Produktfunksjoner
- Top Fill System: Easy and convenient e-liquid refilling.
- Integrert 1000mAh batteri: Provides long-lasting power.
- Max 20W Output: Delivers consistent performance.
- Draw and Button Activation: Flexible activation methods.
- MTL & RDL Vaping: Supports both Mouth-to-Lung and Restricted Direct-to-Lung vaping styles.
- Robust Aluminum Alloy & Leather Design: Offers a solid grip and comfortable feel.
- Tri-proof Protection: Designed to resist spills, splashes, and dust, enhancing durability.
- Precise Output & Airflow Adjustments: Allows customization of your vaping experience.
Bilde: En overview of the GEEKVAPE AQ (Aegis Q) Pod Kit's key features, including top fill, tri-proof protection, precise adjustments, built-in battery, 20W max output, dual activation, and MTL/RDL compatibility.

Bilde: Nærbilde view highlighting the tri-proof protection and durable design of the GEEKVAPE AQ (Aegis Q) Pod Kit, featuring robust metal and smooth leather textures.
Oppsett
1. Lading av enheten
Lad enheten helt opp før første gangs bruk.
- Koble USB-C-kabelen til ladeporten på enheten.
- Connect the other end of the USB-C cable to a suitable power adapter (not included).
- The LED indicator will show charging status:
- Rødt lys: Batteri under 30 %
- Blue light: Battery 30%-70%
- Green light: Battery above 70%
- The LED will turn solid green when fully charged.
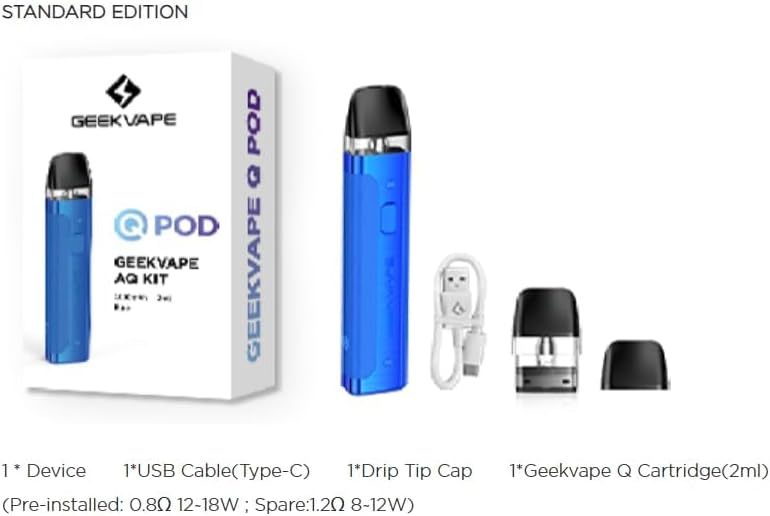
Image: Illustration of the GEEKVAPE AQ (Aegis Q) Pod Kit's durable built-in 1000mAh battery and its stable output, indicating charging via USB-C port.
2. Filling the Cartridge
The GEEKVAPE AQ (Aegis Q) Pod Kit features a convenient top-fill system.
- Remove the drip tip cap from the top of the cartridge.
- Locate the filling port.
- Insert the nozzle of your e-liquid bottle into the filling port and gently squeeze to fill the cartridge. Do not overfill.
- Replace the drip tip cap firmly.
- Allow the cartridge to stand for 5-10 minutes after first fill to ensure the coil is fully saturated. This prevents dry hits.
3. Installing the Cartridge
Ensure the cartridge is securely installed into the device.
- Align the cartridge with the pod slot on the device.
- Push the cartridge firmly into place until it clicks.
Bruksanvisning
Slå på/av
- Press the firing button 5 times rapidly to turn the device ON or OFF. The LED indicator will flash to confirm.
Vaping
The GEEKVAPE AQ (Aegis Q) supports both draw-activated and button-activated vaping.
- Draw Activation: Bare inhaler fra munnstykket for å aktivere enheten.
- Knappeaktivering: Trykk og hold inne avfyringsknappen mens du inhalerer.
Adjusting Output Level
The device offers three adjustable output levels.
- Press the firing button 3 times rapidly to cycle through the output levels.
- The LED indicator will show the current output level:
- Red light: Low output (3.1V)
- Blue light: Medium output (3.4V)
- Green light: High output (3.7V)

Bilde: Detaljert view of the GEEKVAPE AQ (Aegis Q) Pod Kit's single button for multi-use functions, including power on/off and 3-level output adjustments, along with the precise airflow control switch.
Justering av luftstrømmen
Customize your vaping experience from loose to tight by adjusting the airflow.
- Locate the airflow adjustment switch on the side of the device.
- Slide the switch to your desired position to increase or decrease airflow.
Vedlikehold
Bytte av kassett
Replace the cartridge when you notice a burnt taste, reduced vapor production, or a change in flavor.
- Remove the old cartridge by pulling it firmly from the device.
- Kast den brukte patronen på en ansvarlig måte.
- Install a new cartridge as described in the "Setup" section.
Rengjøring
Regelmessig rengjøring bidrar til å opprettholde optimal ytelse og hygiene.
- Wipe the device and cartridge connection points with a dry cotton swab or tissue to remove any e-liquid condensation.
- Clean the mouthpiece regularly.
- Ikke bruk sterke kjemikalier eller slipende rengjøringsmidler.
Lagring
- Oppbevar enheten på et kjølig og tørt sted, unna direkte sollys og ekstreme temperaturer.
- Oppbevares utilgjengelig for barn og kjæledyr.
- Hvis du oppbevarer batteriet over lengre tid, må du sørge for at batteriet er delvis ladet (rundt 50 %) for å forlenge levetiden.
Feilsøking
| Problem | Mulig årsak | Løsning |
|---|---|---|
| Enheten tenner ikke / Ingen damp |
|
|
| Brent smak |
|
|
| Lekkasje |
|
|
| LED Indicator flashes (Protection Warnings) |
|
|
Spesifikasjoner

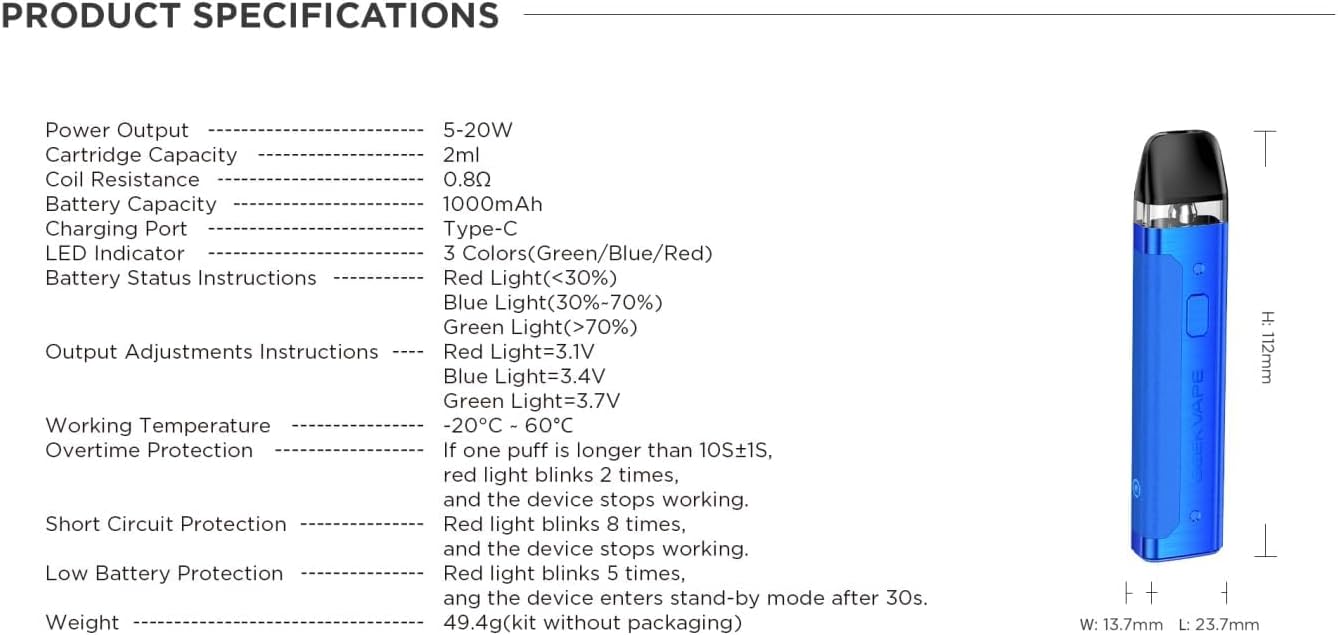
Image: A detailed graphic outlining the product specifications of the GEEKVAPE AQ (Aegis Q) Pod Kit, including dimensions, power output, battery capacity, and protection features.
| Parameter | Verdi |
|---|---|
| Dimensjoner | Height: 112 mm x Length: 23.7 mm x Width: 13.7 mm |
| Utgangseffekt | 5-20W |
| Patronkapasitet | 2 ml |
| Coil Resistance (Pre-installed) | 0.6Ω (18~25W) |
| Coil Resistance (Spare) | 1.2Ω (8~12W) |
| Batterikapasitet | 1000 mAh |
| Ladeport | Type-C |
| LED-indikator | 3 colors (Green/Blue/Red) |
| Batteristatusindikasjon | Red (<30%), Blue (30%-70%), Green (>70%) |
| Output Adjustment Indication | Red (3.1V), Blue (3.4V), Green (3.7V) |
| Driftstemperatur | -20 °C - 60 °C |
| Overtidsbeskyttelse | Red light flashes 2 times if puff > 10+1s |
| Kortslutningsbeskyttelse | Rødt lys blinker 8 ganger |
| Beskyttelse mot lavt batteri | Red light flashes 5 times, standby after 30s |
Viktig sikkerhetsinformasjon
- This product is intended for adult smokers only. Not for use by persons under the legal smoking age, pregnant or breastfeeding women, or persons with heart disease, high blood pressure, diabetes, or depression.
- This product is an empty device and does not contain e-liquid, nicotine, or tobacco.
- Ikke utsett enheten for ekstreme temperaturer, direkte sollys eller vann.
- Ikke demonter eller modifiser enheten.
- Bruk kun den medfølgende USB-C-kabelen til lading.
- Dispose of the device and cartridges responsibly according to local regulations.
- Oppbevares utilgjengelig for barn og kjæledyr.
Garanti og støtte
GEEKVAPE products come with a limited warranty. Please refer to the warranty card included in your package or visit the official GEEKVAPE webnettstedet for detaljerte garantivilkår.
For technical support or customer service, please contact your local retailer or GEEKVAPE customer support through their official channels. A verification label is included on the original product packaging to verify that it is an original product.
Relaterte dokumenter - AQ (Aegis Q) Pod Kit
 |
Návod na obsluhu GeekVape Aegis Boost - 1500mAh Podrobný návod na obsluhu elektronickej cigarety GeekVape Aegis Boost 1500mAh, vrátane obsahu balenia, parametrov, plnenia, nabíjania, funkcií a bezpečnostných pokynov. |
 |
Brukerhåndbok for VooPoo Argus Pod e-sigarett Omfattende brukermanual for VooPoo Argus Pod e-sigaretten, som dekker oppsett, bruk, vedlikehold, sikkerhetsadvarsler og tekniske spesifikasjoner. |
 |
Návod k použití – GeekVape Aegis Legend 3 Kit Podrobný návod k použití pro elektronickou cigaretu GeekVape Aegis Legend 3 Kit, včetně specifikací, funkcí, návodu k obsluze a bezpečnostních pokynů. |
 |
Vaporesso XROS 5 brukerhåndbok Comprehensive user manual for the Vaporesso XROS 5, detailing specifications, usage instructions, safety precautions, and troubleshooting. |
 |
GeekVape Aegis Legend 5 Kit: Printing Specifications and Multilingual Document Index Technical specifications for the printing of the GeekVape Aegis Legend 5 Kit manual, including material, color, process, and size details. Features a multilingual index indicating page references for English, French, German, Spanish, Italian, Russian, Korean, Arabic, Dutch, Indonesian, and Japanese. |
 |
GEEKVAPE Aegis Legend 2 KIT Brukermanual Omfattende brukermanual for GEEKVAPE Aegis Legend 2 KIT, med detaljer om produktfunksjoner, bruk, sikkerhetsretningslinjer og spesifikasjoner. Tilgjengelig på flere språk. |
Ask a question about this manual
Ask about setup, troubleshooting, compatibility, parts, safety, or missing instructions. Manuals+ will review the question and use this page’s manual context to help answer it.