1. Introduksjon
Thank you for choosing the Niagara Hydrotech Non-Electric Bidet Seat. This manual provides detailed instructions for the safe installation, operation, and maintenance of your new bidet seat. Please read this manual thoroughly before installation and retain it for future reference.
This bidet seat is designed to provide a hygienic and comfortable cleansing experience without requiring electricity. It features dual wash nozzles for front and rear cleansing, adjustable water pressure, and a soft-close seat for quiet operation.
2. Sikkerhetsinformasjon
- Vannforsyning: Ensure the water supply to the toilet is turned off before beginning installation.
- Vanntrykk: Do not connect the bidet seat to a hot water supply. This unit is designed for cold water connection only.
- Installasjon: Follow all installation steps carefully. If you are unsure about any step, consult a qualified plumber.
- Rengjøring: Use mild, non-abrasive cleaners. Avoid harsh chemicals that may damage the product finish or internal components.
- Barn: Hold oppsyn med barn for å sikre at de ikke leker med apparatet.
3. Pakkens innhold
Kontroller at alle komponenter er til stede før installasjonen starter.

Image: All components included in the Niagara Hydrotech Bidet Seat package, including the bidet seat, mounting plate, T-adapter, water supply hose, and mounting hardware.
- Niagara Hydrotech Bidet Seat (Elongated)
- Monteringsplate
- Mounting Bolts and Washers
- T-Adapter (7/8" x 7/8" x 1/2")
- Braided Metal Water Supply Hose (1/2" x 1/2")
- Installasjonshåndbok
4. Produktet er overview
Familiarize yourself with the different parts of your bidet seat.
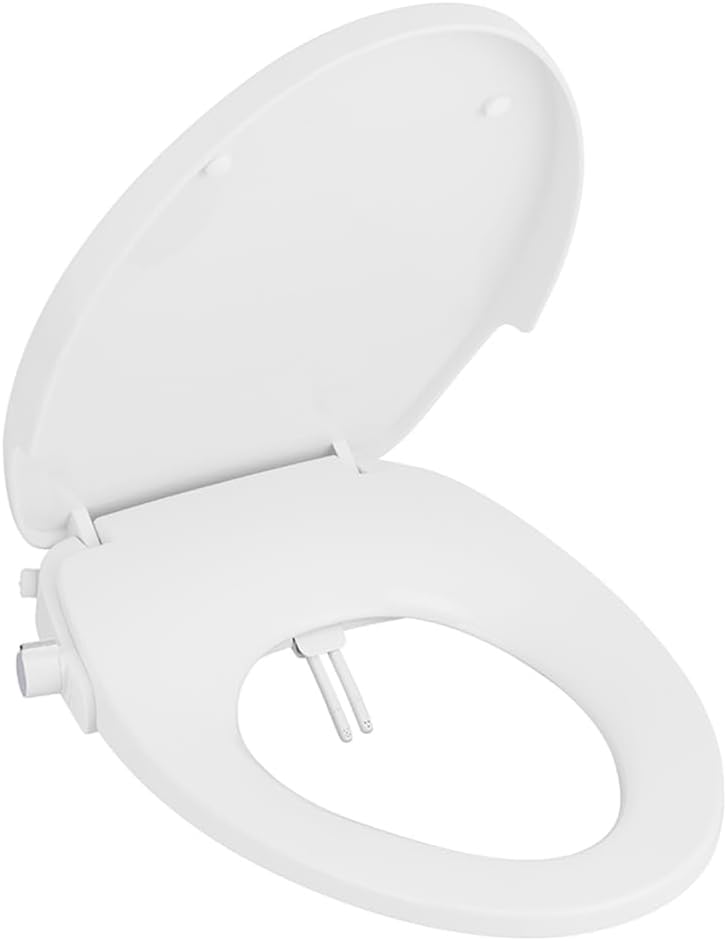
Bilde: Ovenfra og ned view of the Niagara Hydrotech Bidet Seat with the lid open, revealing the dual retractable nozzles.
- Kontrollknott: Located on the right side, used to select wash mode and adjust water pressure.
- Doble dyser: Retractable nozzles for front and rear wash.
- Hurtigutløserknapp: Allows for easy removal of the seat for cleaning.
- Vanninntak: Tilkoblingspunkt for vanntilførselsslangen.
- Soft-Close Lid and Seat: Forhindrer smelling og reduserer støy.
5. Installasjonsveiledning
This bidet seat is designed for easy DIY installation. No special tools are required beyond a wrench for tightening connections.
5.1 Kontroller før installasjon
- Ensure your toilet bowl is an elongated type. This bidet seat is not compatible with round toilet bowls.
- Locate the toilet's water supply valve and turn it off. Flush the toilet to drain the tank.
- Place a towel or small bucket under the toilet tank to catch any residual water.

Image: Diagram illustrating the difference between round and elongated toilet bowls, indicating compatibility with elongated bowls.
5.2 Removing Your Existing Toilet Seat
- Lift the hinge covers at the back of your current toilet seat.
- Unscrew the bolts holding the seat to the toilet bowl. You may need a screwdriver or wrench.
- Remove the old toilet seat and clean the area thoroughly.
5.3 Installing the Bidet Seat
- Place the mounting plate over the bolt holes on the toilet bowl. Adjust its position to align with the holes.
- Insert the mounting bolts through the mounting plate and toilet bowl holes.
- Secure the bolts from underneath the toilet bowl using the washers and nuts. Do not overtighten yet, allowing for minor adjustments.
- Slide the Niagara Hydrotech Bidet Seat onto the mounting plate until it clicks into place.
- Adjust the seat's position for a comfortable fit, then fully tighten the mounting bolts.

Image: The Niagara Hydrotech Bidet Seat fully installed on a toilet, showing the water connection hose.
5.4 Tilkobling av vannforsyningen
- Disconnect the existing water supply hose from the toilet tank's fill valve.
- Install the T-adapter onto the toilet tank's fill valve. Ensure the rubber washer is properly seated to prevent leaks.
- Reconnect the original toilet water supply hose to the top of the T-adapter.
- Connect one end of the provided braided metal water supply hose to the side of the T-adapter.
- Connect the other end of the braided metal water supply hose to the water inlet on the bidet seat.
- Slowly turn on the toilet's water supply valve. Check for any leaks at all connection points. Tighten connections gently if leaks are observed.
6. Drift
The Niagara Hydrotech Bidet Seat is simple to operate using the control knob located on the right side.

Bilde: Et nærbilde view of the control knob on the side of the bidet seat, used for adjusting water pressure and selecting wash modes.
6.1 Wash Options

Image: Detail of the dual nozzles, illustrating their function for both front and rear cleansing.
- Vask bak: Turn the control knob towards the "Rear" icon. The rear nozzle will extend and spray water.
- Frontvask: Turn the control knob towards the "Front" icon. The front nozzle will extend and spray water.
6.2 Adjusting Water Pressure
- While a wash option is selected, continue to rotate the control knob further in the chosen direction to increase water pressure.
- Rotate the knob back towards the center to decrease water pressure.
- To stop the wash, return the control knob to the central "Off" position. The nozzles will retract automatically.
7. Vedlikehold og rengjøring
Regular cleaning ensures optimal performance and hygiene of your bidet seat.
7.1 Routine Cleaning (Quick Release)

Image: A close-up of the quick release button located on the side of the bidet seat, designed for easy removal for cleaning.
- Press the Quick Release button located on the side of the bidet seat.
- Slide the bidet seat forward and lift it off the mounting plate.
- Clean the bidet seat and the toilet bowl area with a mild, non-abrasive cleaner and a soft cloth.
- Realign the bidet seat with the mounting plate and slide it back until it clicks into place.
7.2 Dyserengjøring
- The nozzles are self-cleaning and retract behind a gate after each use.
- For deeper cleaning, gently pull out the nozzles manually and wipe them with a soft cloth and mild soap. Do not use harsh chemicals or abrasive materials.
- Ensure the nozzles retract fully after cleaning.
8. Feilsøking
| Problem | Mulig årsak | Løsning |
|---|---|---|
| Ingen vannspray eller svak spray |
|
|
| Vannlekkasje |
|
|
| Nozzles do not retract |
|
|
| Seat is loose |
|
|
9. Spesifikasjoner
- Modell: WP-EL0621
- Type: Non-Electric Bidet Seat
- Kompatibilitet: Elongated Toilet Bowls
- Materiale: Plast
- Farge: Hvit
- Produktdimensjoner: 18.63 cm L x 15.25 cm B
- Varevekt: 6.36 pund
- Vanntilkobling: Bare kaldt vann
- UPC: 732291500012
- Produsent: Niagara
10. Garanti og støtte
Niagara products are manufactured to high-quality standards. For warranty information or technical support, please contact Niagara customer service.
- Kundeservice: Refer to the contact information provided on the product packaging or the official Niagara webnettstedet.
- Nettressurser: Besøk Niagara Store on Amazon for ytterligere produktinformasjon og støtte.