1. Introduksjon
Thank you for choosing the WORKPRO 1500W Rotary Hammer Drill. This heavy-duty tool is designed for demanding tasks such as drilling in concrete, wood, and steel, as well as chiseling applications. This manual provides essential information for the safe and efficient operation, maintenance, and troubleshooting of your rotary hammer drill. Please read it thoroughly before first use and keep it for future reference.

Image 1.1: WORKPRO 1500W Rotary Hammer Drill and included accessories.
2. Generelle sikkerhetsinstruksjoner
Følg alltid grunnleggende sikkerhetsregler for å redusere risikoen for brann, elektrisk støt og personskade. Unnlatelse av å følge disse instruksjonene kan føre til alvorlig skade.
- Sikkerhet på arbeidsområdet: Hold arbeidsområdet rent og godt opplyst. Rotete eller mørke områder innbyr til ulykker. Ikke bruk elektroverktøy i eksplosive atmosfærer, for eksempel i nærheten av brennbare væsker, gasser eller støv.
- Elektrisk sikkerhet: Støpsler på elektroverktøy må passe til stikkontakten. Aldri modifiser støpselet på noen måte. Unngå kroppskontakt med jordede overflater. Ikke utsett elektroverktøy for regn eller våte forhold.
- Personlig sikkerhet: Always wear eye protection. Use hearing protection when operating the tool for extended periods. Wear a dust mask if drilling in dusty conditions. Dress properly; avoid loose clothing or jewelry.
- Bruk og stell av verktøy: Ikke bruk makt på elektroverktøyet. Bruk riktig elektroverktøy til ditt bruk. Trekk ut støpselet fra strømkilden før du foretar justeringer, bytter tilbehør eller oppbevarer elektroverktøy.
- Vedlikehold: Vedlikehold elektroverktøy. Se etter feil justering eller binding av bevegelige deler, brudd på deler og andre forhold som kan påvirke verktøyet.
3. Product Components and Included Items
Familiarize yourself with the parts of your WORKPRO Rotary Hammer Drill and the accessories provided.

Image 3.1: Key components of the rotary hammer drill, including SDS-PLUS Chuck, Four Functions Switch, Grease Pot, Shock Absorber, On/Off Switch, Cushioned Handle, Variable Speed Control, 360° Rotatable Handle, and Heat Outlet.
Inkludert tilbehør:

Image 3.2: The complete set of accessories includes a carrying case, rotary hammer drill, SDS-plus point flat bit (250mm), SDS-plus point chisel bit (250mm), wrench, grease, SDS-plus drill bits (8mm, 10mm, 12mm), and a dust collector.
- 1 x Heavy-duty Rotary Hammer Drill
- 3 x SDS-plus Drill Bits (8 mm, 10 mm, 12 mm)
- 1 x Round Shank Chisel (Φ14 × 250 mm)
- 1 x Flat Chisel (Φ14 × 250 mm)
- 1 x Grease container
- 1 x Carbon Brush set
- 1 x støvdeksel
- 1 x skiftenøkkel
- 1 x bæreveske
4. Oppsett og montering
4.1 Feste hjelpehåndtaket
The 360° rotatable handle provides better control and comfort. Loosen the handle clamp, position the handle to your desired angle, and tighten the clamp sikkert.
4.2 Inserting and Removing SDS-plus Bits
The SDS-plus chuck allows for quick and secure bit changes.
- Setter inn: Clean the bit shank. Pull back the chuck collar, insert the bit into the chuck until it clicks into place. Release the collar. Pull on the bit to ensure it is securely locked.
- Fjerner: Pull back the chuck collar and pull the bit out.

Image 4.1: Illustration of the auto-lock SDS-plus chuck for secure bit clamping.
4.3 Attaching the Dust Collector
For cleaner operation and to protect the user, attach the dust collector to the front of the tool when drilling.

Image 4.2: The anti-dust cover protects users and the machine from dust and debris.
5. Bruksanvisning
The WORKPRO Rotary Hammer Drill features four operating modes and variable speed control for versatile applications.
5.1 Modusvalg
Use the four-function switch located on the side of the tool to select the desired operating mode:
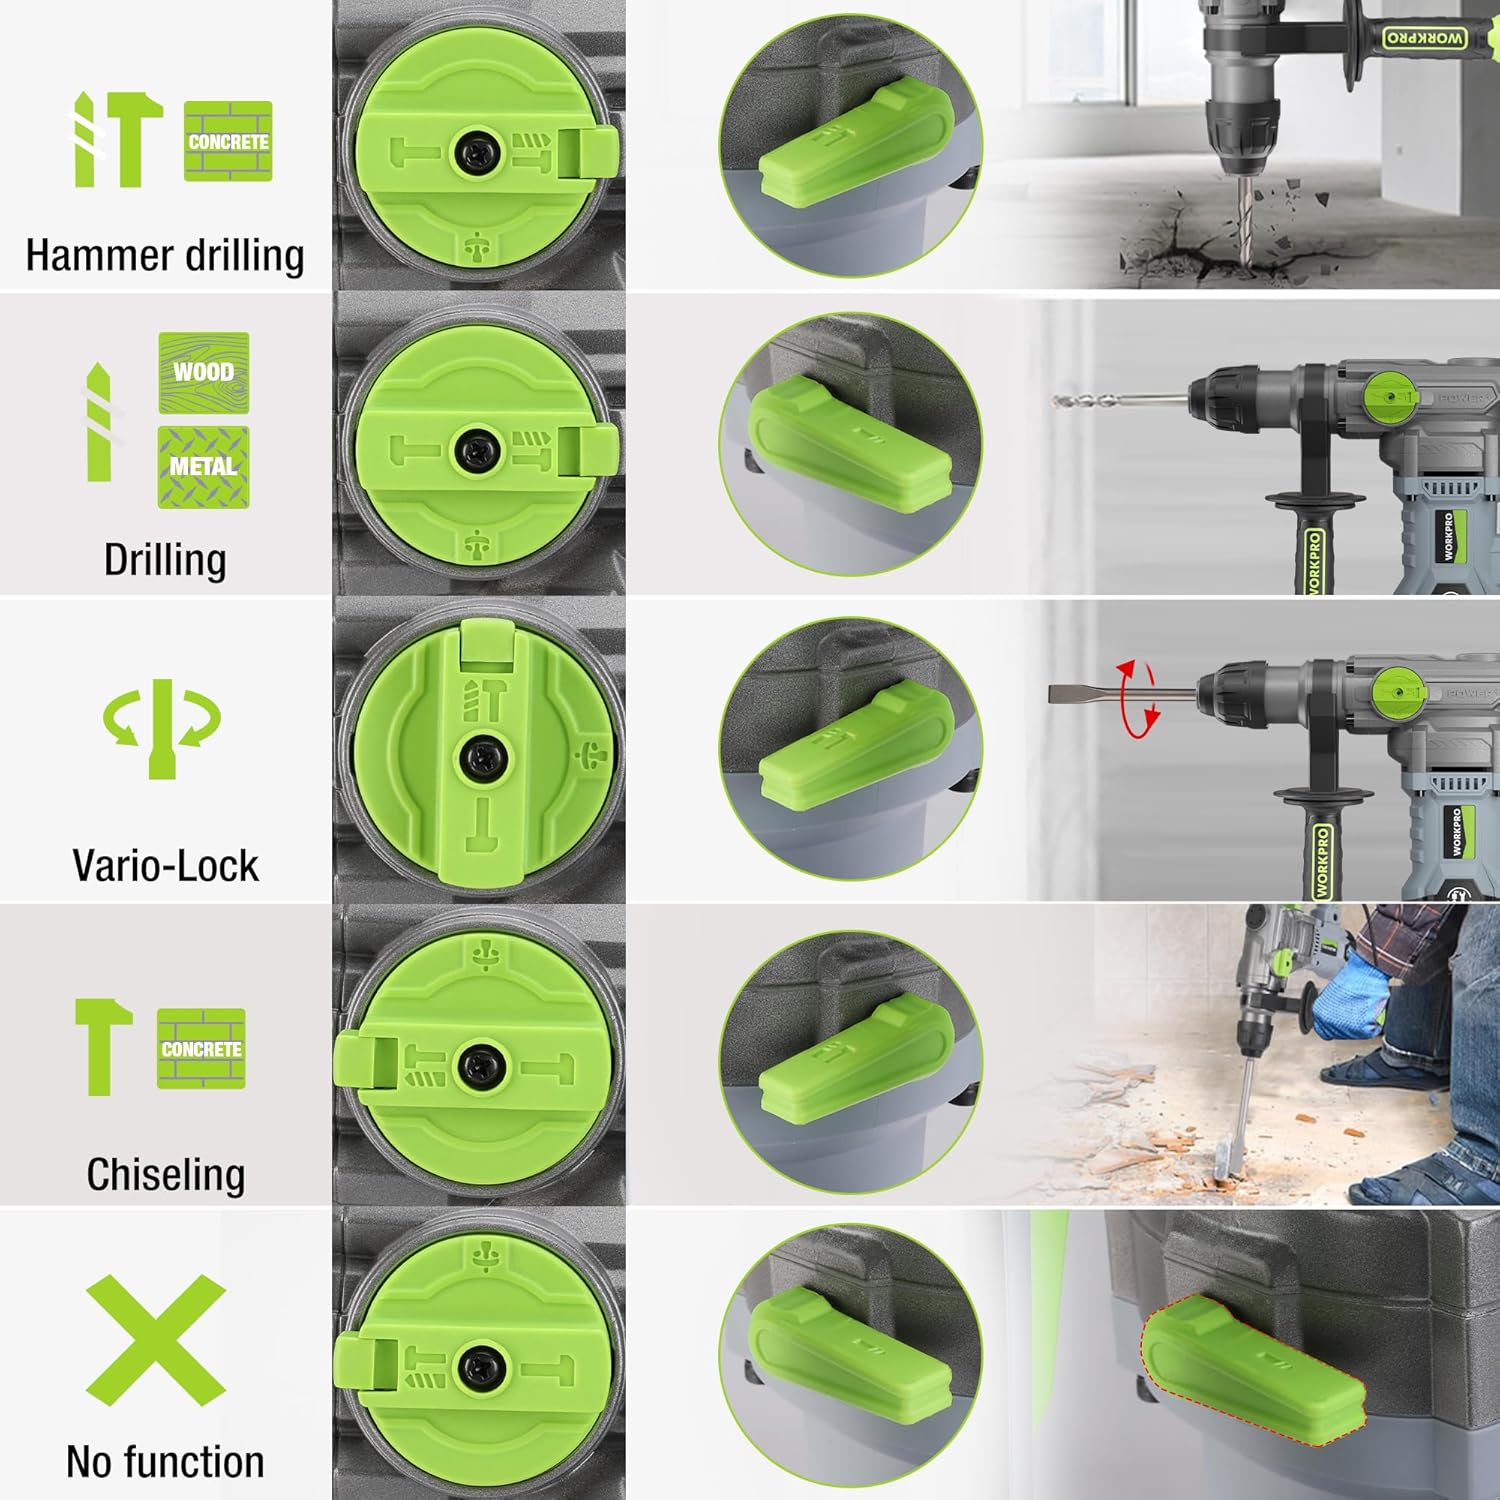
Image 5.1: The four-function switch allows selection between Hammer Drilling, Drilling, Vario-Lock (Chisel Adjust), and Chiseling modes.
- Hammerboring: For boring i betong og murverk med slag.
- Boring: For drilling in wood, metal, and plastic without impact.
- Chiseling (Hammer Only): For light chiseling work in concrete and masonry.
- Vario-Lock (Chisel Adjust): Allows you to rotate and lock the chisel in various positions to optimize the working angle.

Image 5.2: Visual representation of the hammer drilling, drilling, hammer, and chisel adjust modes.
5.2 Variabel hastighetskontroll
The variable speed control allows you to adjust the rotation speed (0-930 RPM) and impact frequency (0-4300 BPM) to match the material and application.
- Rotate the speed adjustment dial to increase or decrease the speed.
- Start with a lower speed for precise drilling and increase as needed.
5.3 Drilling Capacities
The tool offers excellent drilling performance across various materials:
- Betong: Opp til 32 mm
- Tre: Opp til 42 mm
- Stål: Opp til 13 mm
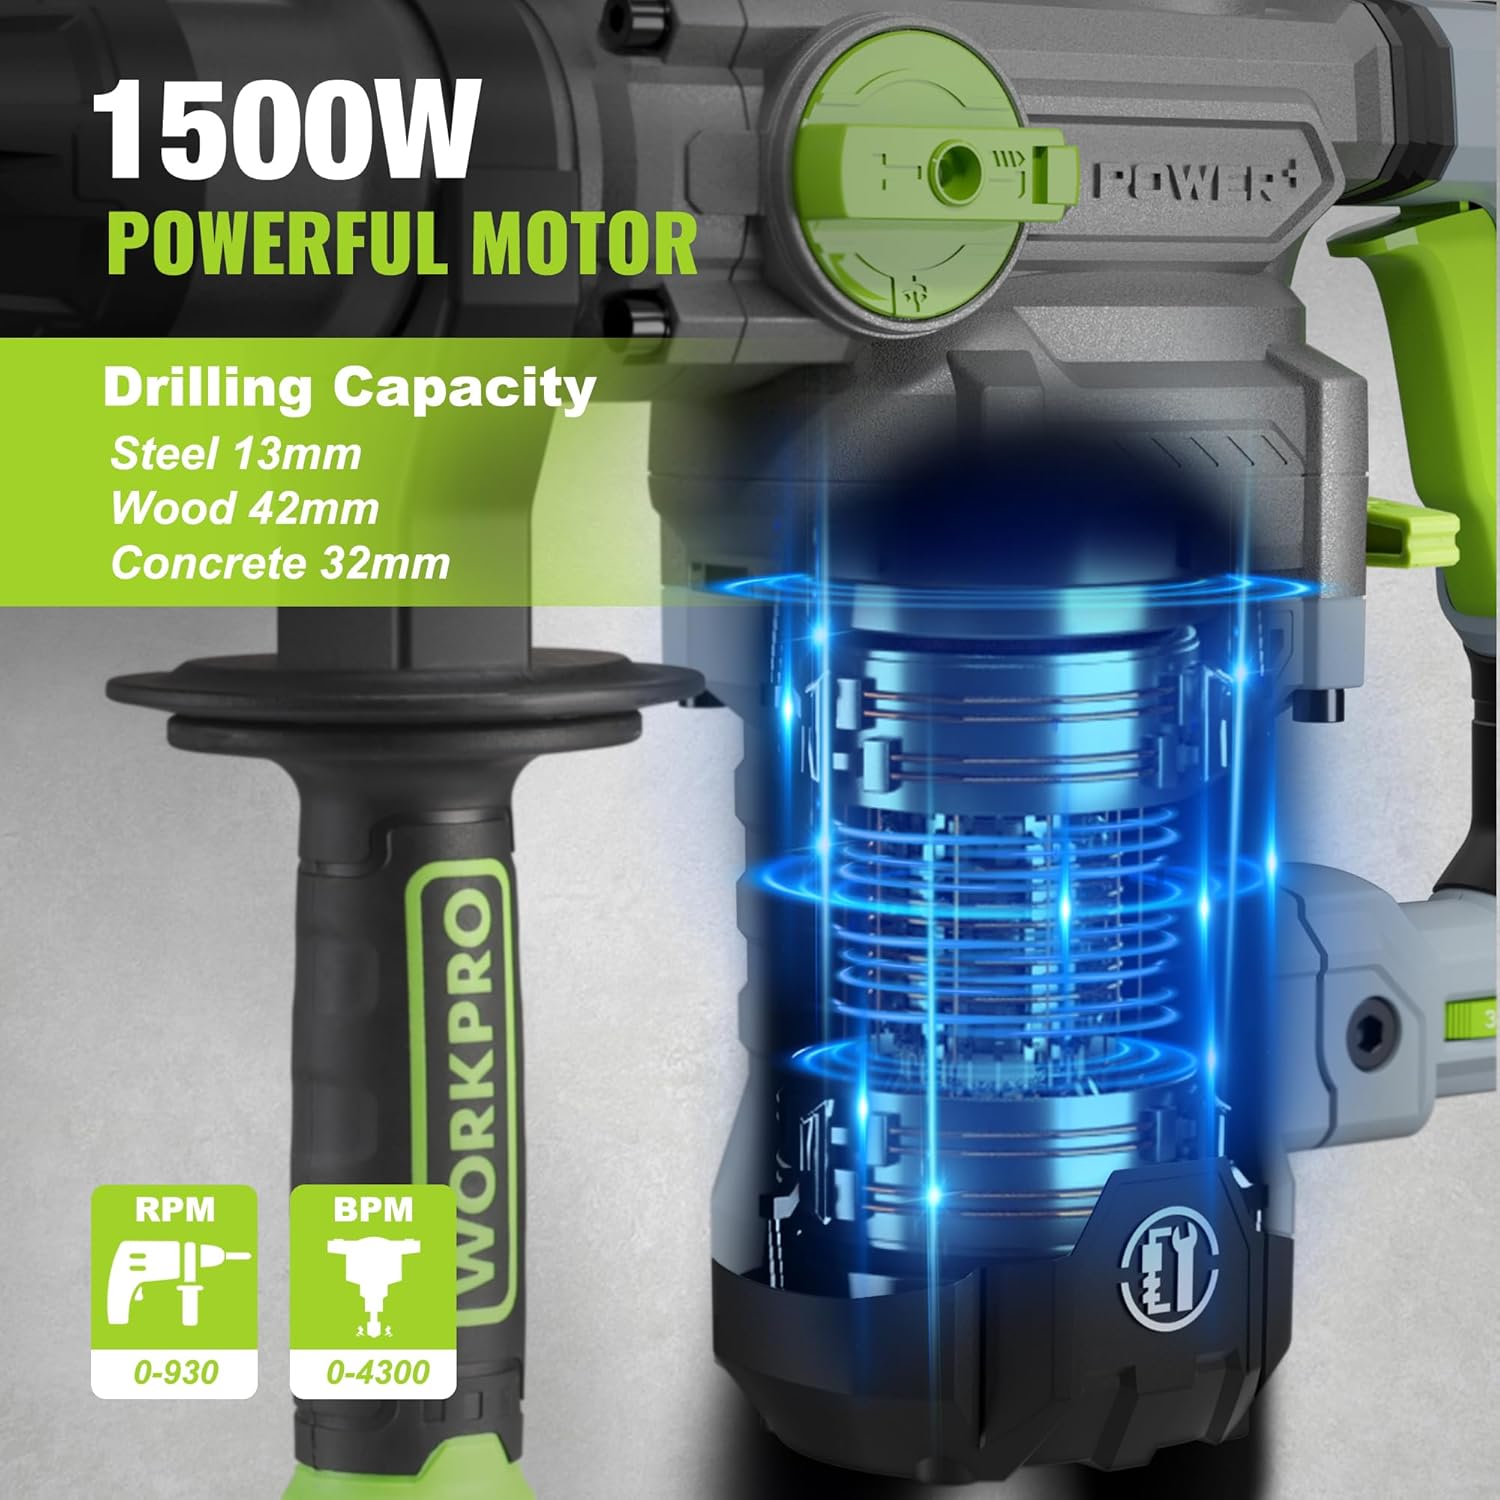
Image 5.3: The 1500W motor provides sufficient power for drilling in steel, wood, and concrete.
5.4 Søknad Eksamples

Image 5.4: The tool is suitable for various tasks including chiseling concrete, removing tiles, concrete drilling, and floor breaking.
6. Vedlikehold
Regelmessig vedlikehold sikrer verktøyets levetid og optimale ytelse.
6.1 Rengjøring
- Koble alltid verktøyet fra strømforsyningen før rengjøring.
- Rengjør ventilasjonsåpningene regelmessig for å forhindre overoppheting.
- Tørk av verktøyhuset med en myk klutamp klut. Ikke bruk sterke kjemikalier eller skurende rengjøringsmidler.
- The tool features a dust-proof design and anti-dust bottom structure to extend its service life.
6.2 Grease Replenishment
To maintain optimal performance and durability, replenish the grease every 30-40 hours of cumulative use.
- Use the provided wrench to open the grease pot.
- Apply the advanced lubricant (grease) as instructed.
- Securely close the grease pot after replenishment.
Image 6.1: Instructions for grease replenishment using the provided spanner and grease.
6.3 Utskifting av karbonbørste
Carbon brushes are wear parts and should be checked periodically. Replace them when they are worn down to their limit to ensure consistent motor performance.
7. Feilsøking
Denne delen tar for seg vanlige problemer du kan støte på. Kontakt kundestøtte for problemer som ikke er oppført her.
| Problem | Mulig årsak | Løsning |
|---|---|---|
| Verktøyet starter ikke | Ingen strømforsyning; Defekt bryter; Slitte karbonbørster | Check power connection; Test switch; Replace carbon brushes |
| Redusert boreytelse | Dull drill bit; Incorrect mode selected; Insufficient grease | Replace or sharpen drill bit; Select correct mode; Replenish grease |
| Overdreven vibrasjon/støy | Loose components; Damaged bit; Internal issue | Check all connections; Replace bit; Contact service center |
| Overoppheting | Blokkerte ventilasjonsåpninger; Langvarig tung bruk | Clean ventilation slots; Allow tool to cool down |
8. Tekniske spesifikasjoner
| Trekk | Spesifikasjon |
|---|---|
| Modellnummer | W125244A |
| Inngang Voltage | 230-240 V |
| Hyppighet | 50 Hz |
| Nominell inngangseffekt | 1500 W |
| Hastighet uten belastning | 0-930 rpm ±10% |
| Påvirkningsfrekvens | 0-4300 bpm ±10% |
| Single Impact Force | 5.5 J |
| Borekapasitet (betong) | 32 mm |
| Borekapasitet (tre) | 42 mm |
| Borekapasitet (stål) | 13 mm |
| Chuck Type | SDS-pluss |
| Produktdimensjoner (L x B x H) | 38.6 x 10.4 x 26.4 cm |
| Vekt | 8.34 kg |
| Strømkilde | Elektrisk med ledning |
| Antall gir | 6 (Variable Speed) |
9. Garanti- og støtteinformasjon
For warranty details, product support, or service inquiries, please refer to the warranty card included with your purchase or contact WORKPRO customer service directly. Keep your proof of purchase for any warranty claims.