1. Introduksjon
Thank you for choosing the SZELAM Projection Alarm Clock. This device combines a digital alarm clock with a rotatable time projector, an RGB night light, and convenient USB charging ports. This manual provides detailed instructions for setup, operation, and maintenance to ensure optimal performance and longevity of your product.

Image 1.1: The SZELAM Projection Alarm Clock displaying time on its mirror surface and projecting it onto a wall, with its RGB base light illuminated.
2. Pakkens innhold
- SZELAM Projection Alarm Clock
- USB strømkabel
- Brukerhåndbok
3. Produktet er overview
Familiarize yourself with the various components and features of your alarm clock.
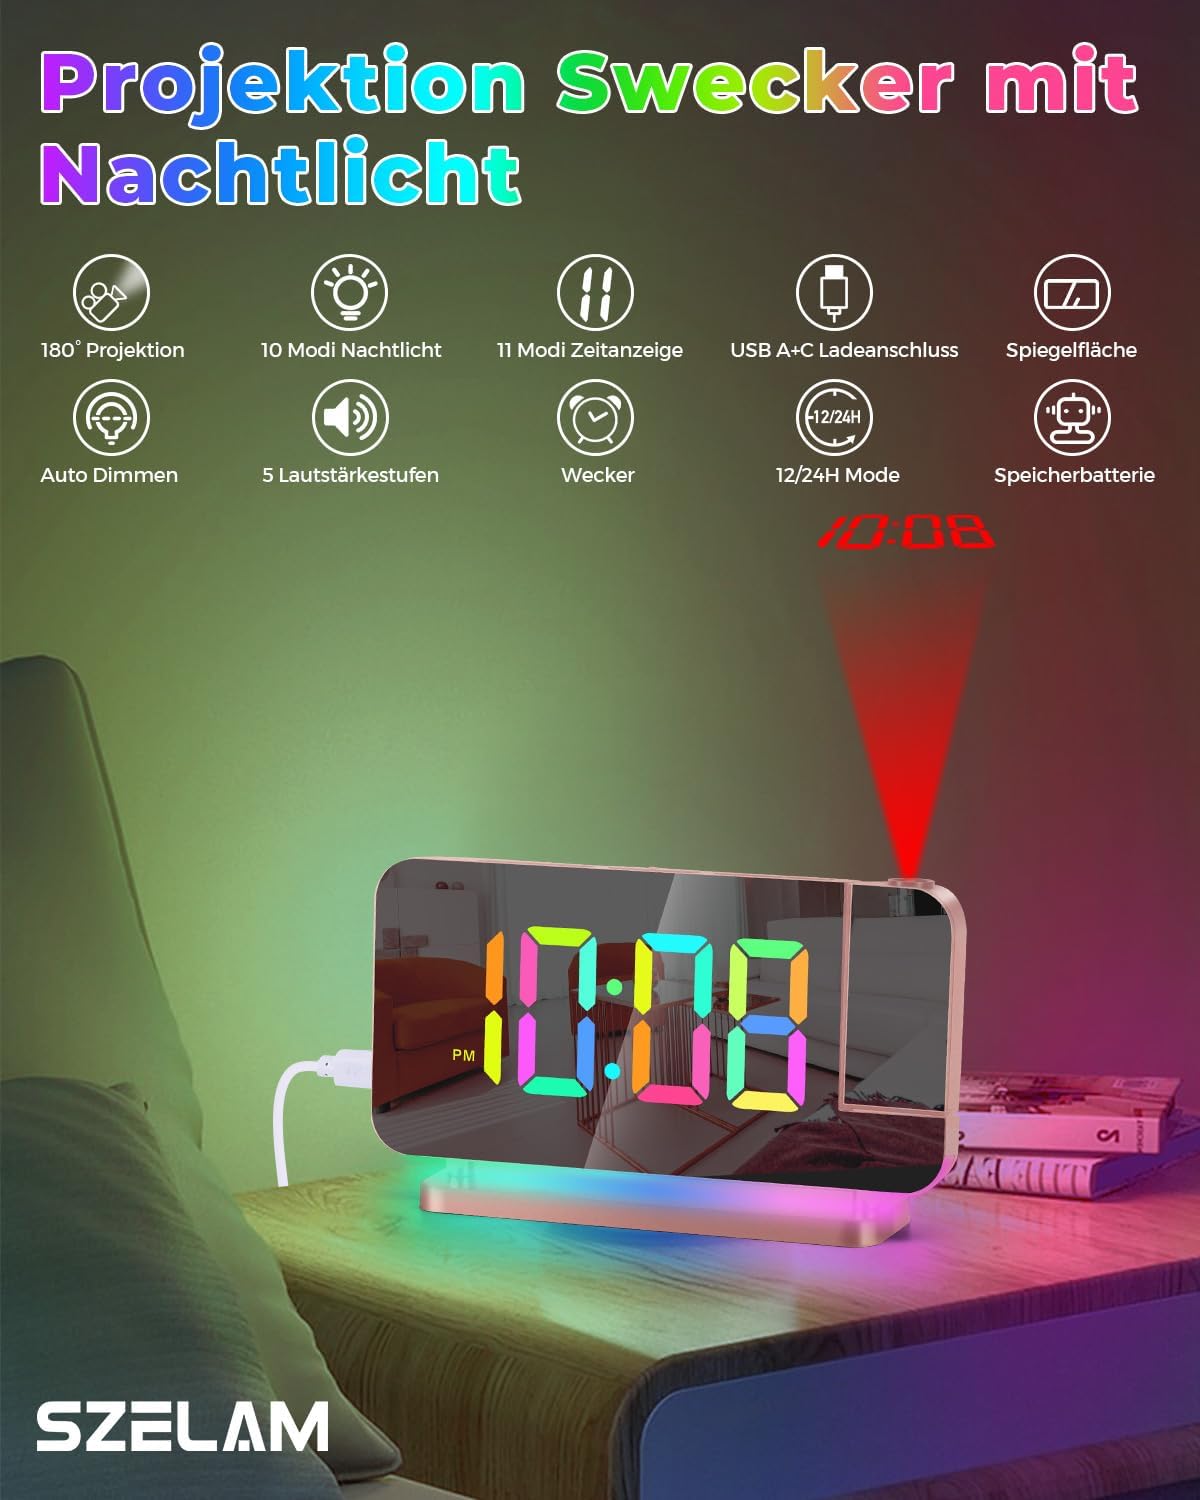
Bilde 3.1: En overview of the alarm clock's features, including 180° projection, 10 night light modes, 11 time display modes, USB A+C charging ports, mirror surface, auto dimming, 5 volume levels, alarm function, 12/24H mode, and backup battery capability.
4. Oppsett
4.1 Strømtilkobling
- Connect the provided USB power cable to the USB-C input port on the back of the alarm clock.
- Plug the other end of the USB cable into a standard USB power adapter (not included) and then into a wall outlet.
- The clock display will illuminate, indicating it has power.
4.2 Innstilling av starttidspunkt
Upon initial power-up, the clock may display a default time. Refer to the 'Operating Instructions' section for detailed steps on setting the correct time and date.
5. Bruksanvisning
5.1 Time Display Settings
The clock features an 11-color RGB digital display with adjustable brightness.

Image 5.1: The clock display showcasing 11 different color modes for the time digits, along with options for auto dimming and 6 brightness levels.
- Innstillingstid: Press the 'SET' button to enter time setting mode. Use the '+' and '-' buttons to adjust hours and minutes. Press 'SET' again to confirm each step.
- 12/24-timers format: In time setting mode, press the '12/24H' button to switch between 12-hour (with AM/PM indicator) and 24-hour formats.
- Skjermens lysstyrke: Press the 'DIMMER' button repeatedly to cycle through 6 brightness levels or activate auto-dimming mode.
- Display Color Modes: Press the 'COLOR' button to cycle through 4 dynamic RGB colors and 7 fixed color modes for the digital display.
5.2 Alarminnstillinger
- Stille inn alarm: Press the 'ALARM' button to enter alarm setting mode. Use '+' and '-' to set the desired alarm time. Press 'ALARM' again to confirm.
- Aktivere/deaktivere alarm: Press the 'ALARM' button briefly outside of setting mode to toggle the alarm on or off. An alarm icon will appear/disappear on the display.
- Snooze-funksjon: When the alarm sounds, press the 'SNOOZE' button (usually a large button on top) to temporarily silence it for a set duration (e.g., 9 minutes). The alarm will sound again after the snooze period.
- Stopper alarm: To stop the alarm completely, press any other button (except 'SNOOZE') when it is sounding.
5.3 Projeksjonsfunksjon
The clock features a 180° rotatable projector to display time on your wall or ceiling.

Image 5.2: The 180° rotatable projector lens and examples of the four adjustable brightness levels for the projected time (Off, Dimmed, Medium, Bright).
- Aktivering av projeksjon: Locate the projector lens on the side of the clock. Press the 'PROJECTOR' button to turn the projection on/off.
- Justering av projeksjonsvinkel: Manually rotate the projector lens up to 180° to direct the time display to your desired surface (wall or ceiling).
- Adjusting Projection Brightness: Press the 'PROJECTOR' button repeatedly to cycle through 4 brightness levels for the projected time.
- Flipping Projected Time: If the projected time appears upside down, press the 'FLIP' button (often combined with the projector button) to rotate the display 180°.
5.4 Nattlysdrift
The alarm clock includes a built-in LED night light with multiple color modes.

Image 5.3: The clock's base illuminated with various dynamic RGB night light modes, demonstrating the 10 available color options and 5 adjustable brightness levels.
- Slå på/av: Press the 'LIGHT' button to turn the night light on or off.
- Endre farger: Press the 'LIGHT' button repeatedly to cycle through 3 dynamic RGB colors and 7 fixed color modes.
- Justering av lysstyrke: Use the '+' and '-' buttons when the night light is active to adjust its brightness through 5 levels.
5.5 USB-ladeporter
The clock is equipped with two USB output ports for charging external devices.
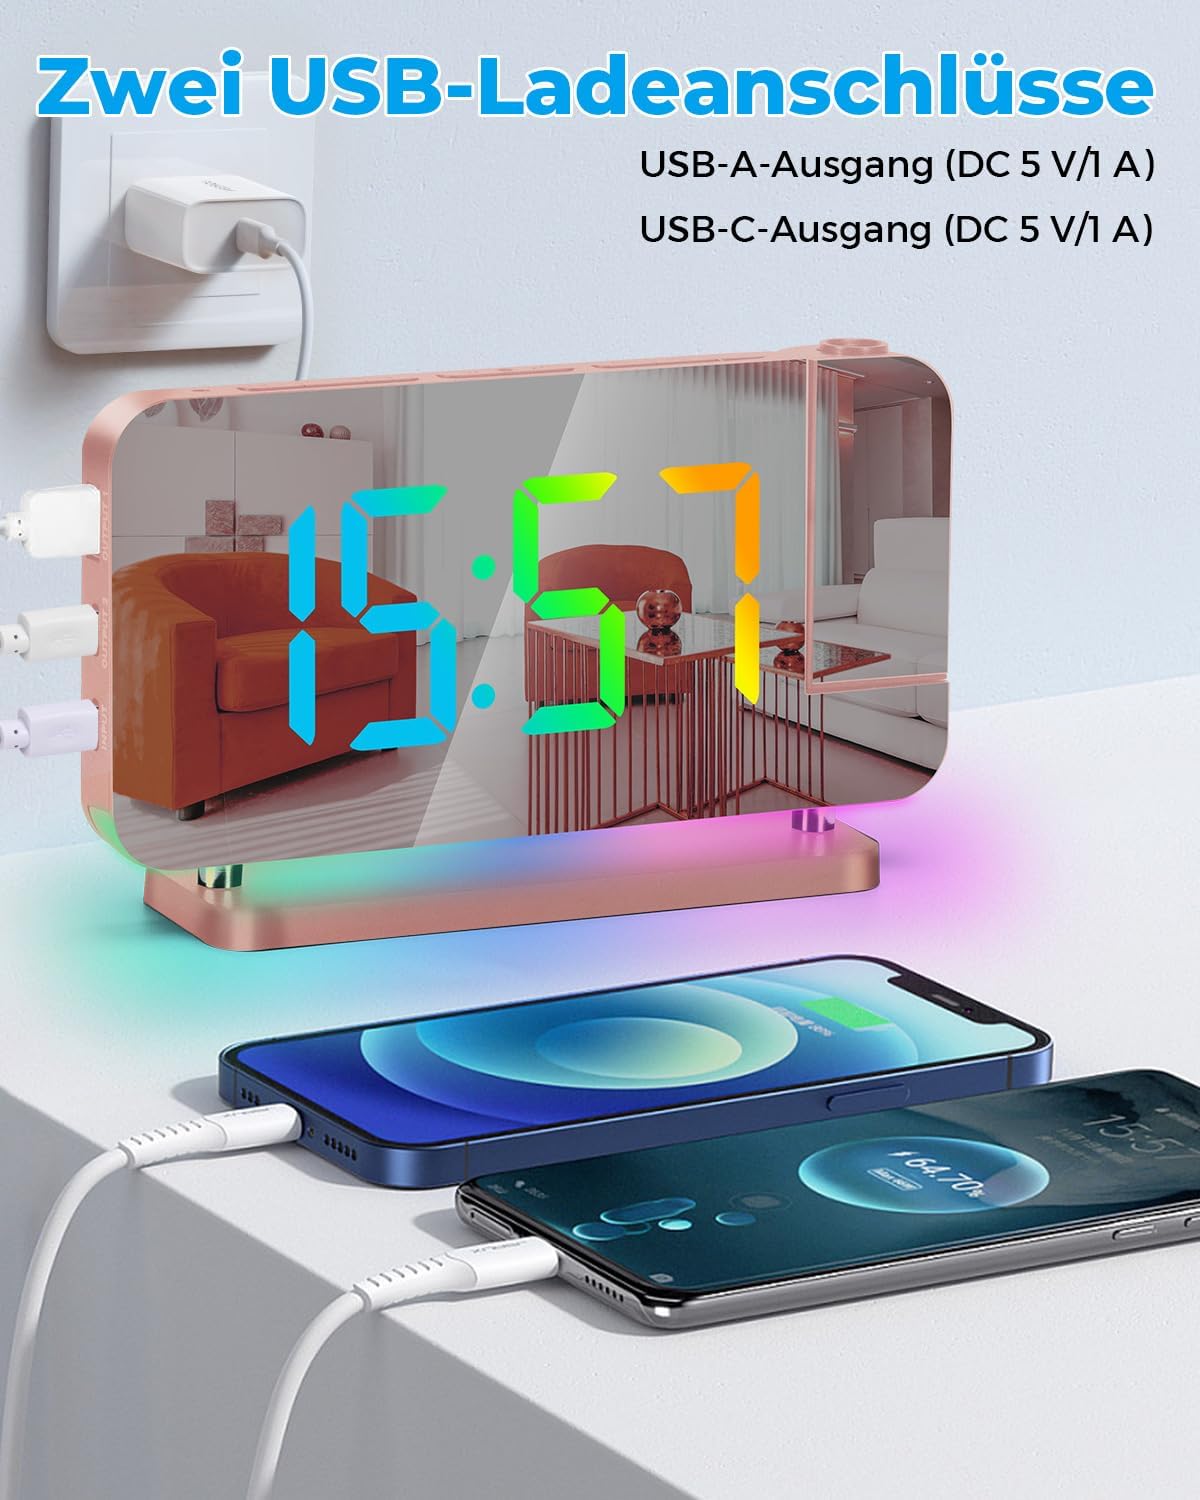
Image 5.4: The alarm clock featuring two USB charging ports, one USB-A and one USB-C, both providing 5V/1A output, shown charging two smartphones simultaneously.
- The clock includes one USB Type-C output port and one USB Type-A output port.
- Connect your electronic devices (e.g., smartphone, tablet) to these ports using their respective charging cables.
- Each port provides a 5V/1A output, allowing you to charge two devices simultaneously.
5.6 Mirror Display Function
The 7.4-inch LED display surface also functions as a mirror.

Image 5.5: The 7.4-inch LED mirror display of the alarm clock being used as a convenient makeup mirror.
- The acrylic mirror design allows the clock to double as a makeup mirror when not actively displaying time or when the display is dimmed.
6. Vedlikehold
- Rengjøring: Use a soft, dry cloth to clean the surface of the clock. For stubborn marks on the mirror display, lightly dampen the cloth with water and wipe gently. Avoid abrasive cleaners or solvents.
- Plassering: Plasser klokken på en stabil, flat overflate, unna direkte sollys, sterk varme eller fuktighet.
- Makt: Always use the provided USB cable and a compatible power adapter. Disconnect power during thunderstorms or when not in use for extended periods.
7. Feilsøking
| Problem | Mulig årsak | Løsning |
|---|---|---|
| Klokkedisplayet er av eller flimrer. | Ingen strøm eller løs kontakt. | Ensure the USB cable is securely connected and the power adapter is plugged into a working outlet. |
| Projection is blurry or too dim. | Incorrect distance or brightness setting. | Adjust the distance of the clock from the projection surface (effective distance 1.64-11.4 feet / 0.5-3m). Press the 'PROJECTOR' button to increase brightness. |
| Alarmen lyder ikke. | Alarmen er ikke aktivert eller feil innstilt. | Verify the alarm time is set correctly and the alarm icon is visible on the display. |
| USB-ladeportene fungerer ikke. | Enheten er ikke kompatibel, eller det er et problem med kabelen. | Ensure your device is compatible with 5V/1A charging. Try a different USB cable. Confirm the clock is powered on. |
| Time display colors are not changing. | Feil modus valgt. | Press the 'COLOR' button repeatedly to cycle through the available color modes. |
8. Spesifikasjoner
| Trekk | Detalj |
|---|---|
| Merke | SZELAM |
| Visningstype | Digital LED (7.4-inch) |
| Projeksjon | 180° Rotatable, 4 Brightness Levels, 0.5-3m Effective Distance |
| Time Display Colors | 11 modes (4 dynamic RGB + 7 fixed), 6 Brightness Levels + Auto Dimming |
| Nattlysfarger | 10 modes (3 dynamic RGB + 7 fixed), 5 Brightness Levels |
| Ladeporter | 1x USB-C Output (5V/1A), 1x USB-A Output (5V/1A) |
| Strømkilde | Elektrisk med ledning |
| Materiale | Akryl |
| Dimensjoner (ca.) | Se produktemballasjen for nøyaktige mål. |
| Vekt | 1 Ounce (approximate) |
| Romtype | Soverom |
9. Garanti og støtte
This product is covered by a standard manufacturer's warranty. For specific warranty details, please refer to the warranty card included with your purchase or contact SZELAM customer support. If you encounter any issues or have questions regarding your SZELAM Projection Alarm Clock, please reach out to our customer service team for assistance.
Contact information for support can typically be found on the product packaging or the official SZELAM webnettstedet.