Introduksjon
This manual provides detailed instructions for the setup, operation, and maintenance of your BUFFBEE RS11 Radio Alarm Clock. Please read this manual thoroughly before using the device to ensure proper function and to maximize your user experience. Keep this manual for future reference.
Pakkeinnhold
Ved utpakking, vennligst kontroller at alle varene som er oppført nedenfor er til stede og i god stand:
- 1 x BUFFBEE RS11 Radio Alarm Clock
- 1 x DC strømadapter
- 1 x brukerhåndbok (dette dokumentet)
- 1 x CR2032 Battery (pre-installed or included separately for backup)
Produkt overview
The BUFFBEE RS11 is a compact device combining an alarm clock, FM radio, and a 7-color night light. It features a clear digital display and intuitive controls.

Figur 1: Front view of the BUFFBEE RS11 Radio Alarm Clock, displaying the digital time and accessible control buttons on top.

Figur 2: Internal structure highlighting the 5W Hi-Fi speaker, designed for clear and authentic sound reproduction.
Oppsett
1. Strømtilkobling
- Connect the provided DC power adapter to the 'DC 5V' port on the back of the alarm clock.
- Plug the adapter into a standard wall outlet. The display will illuminate, and the clock will be ready for initial setup.
2. Installasjon av reservebatteri
The BUFFBEE RS11 includes a CR2032 battery for backup, which preserves time and alarm settings during a power outage.
- Finn batterirommet på undersiden av enheten.
- Sett inn CR2032-batteriet med den positive (+) siden opp.
- Lukk batterirommet godt.
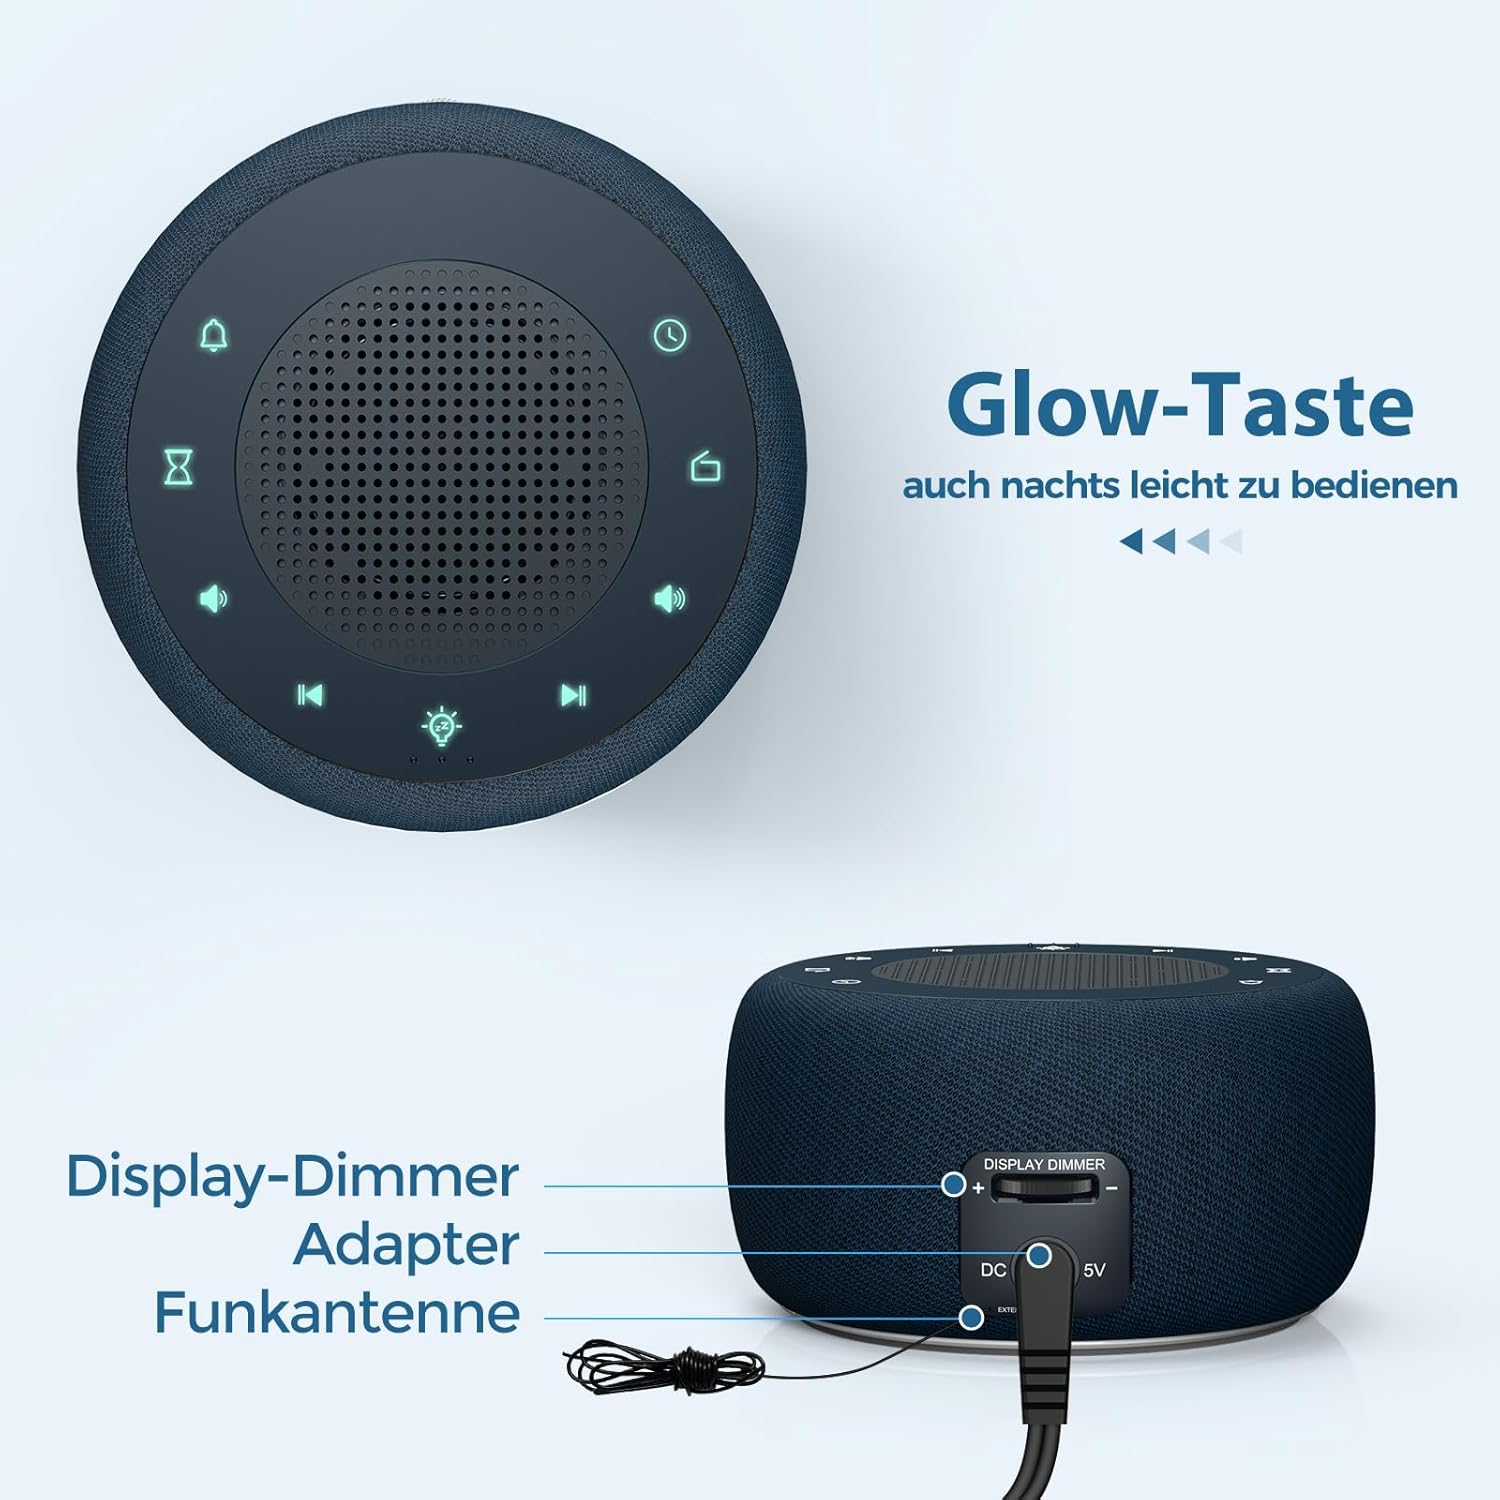
Figur 3: Rear panel connections, showing the display dimmer control, DC 5V power input, and FM antenna port.
Bruksanvisning
1. Stille inn tid
- Press and hold the 'Time Set' button (often indicated by a clock icon) until the hour digits begin to flash.
- Bruk knappene '+' og '-' for å justere timen.
- Press the 'Time Set' button again to switch to minute adjustment. Use '+' and '-' to set the minutes.
- Press 'Time Set' once more to confirm and exit time setting mode.
2. Stille inn alarmen
- Press and hold the 'Alarm Set' button (often indicated by an alarm clock icon) until the alarm hour digits flash.
- Bruk knappene '+' og '-' for å justere alarmens time.
- Press 'Alarm Set' again to switch to alarm minute adjustment. Use '+' and '-' to set the alarm minutes.
- Press 'Alarm Set' to select the alarm tone. Options include: Bird sounds, Piano, Beep, or FM Radio.
- Press 'Alarm Set' once more to confirm and exit alarm setting mode.
- To activate/deactivate the alarm, briefly press the 'Alarm Set' button. An alarm icon will appear/disappear on the display.

Figur 4: Wake-up options with four distinct alarm tones, including the option to wake to your favorite radio station.
3. Radiodrift (FM)
- Press the 'Radio' button (often indicated by a radio icon) to turn the FM radio on or off.
- Use the 'Previous Track' and 'Next Track' buttons (often indicated by ◀◀ and ▶▶ icons) to tune to different FM stations.
- Press and hold the 'Previous Track' or 'Next Track' buttons to automatically scan for the next available station.
- Adjust the volume using the 'Volume Up' and 'Volume Down' buttons (often indicated by '+' and '-' speaker icons). The volume can be adjusted in 16 levels.

Figur 5: Enjoying the radio alarm clock, featuring a 0-120 minute sleep timer and 0-30 levels of adjustable volume.
4. Nattlysfunksjon
- Press the 'Night Light' button (often indicated by a light bulb icon) to turn the night light on or off.
- Press the 'Night Light' button repeatedly to cycle through the 7 available colors.
- To activate the sleep timer for the night light (or radio), press the 'Sleep Timer' button (often indicated by an hourglass icon).
- Use the '+' and '-' buttons to set the desired duration (0-120 minutes). The night light/radio will automatically turn off after the set time.

Figur 6: The 7-color night light feature, with options to turn on/off and change colors.
5. Display Brightness Adjustment (Dimmer)
The display brightness can be adjusted from 0% to 100% to suit your preference.
- Locate the 'Display Dimmer' control on the back of the unit (refer to Figure 3).
- Slide the control to increase or decrease the display brightness.
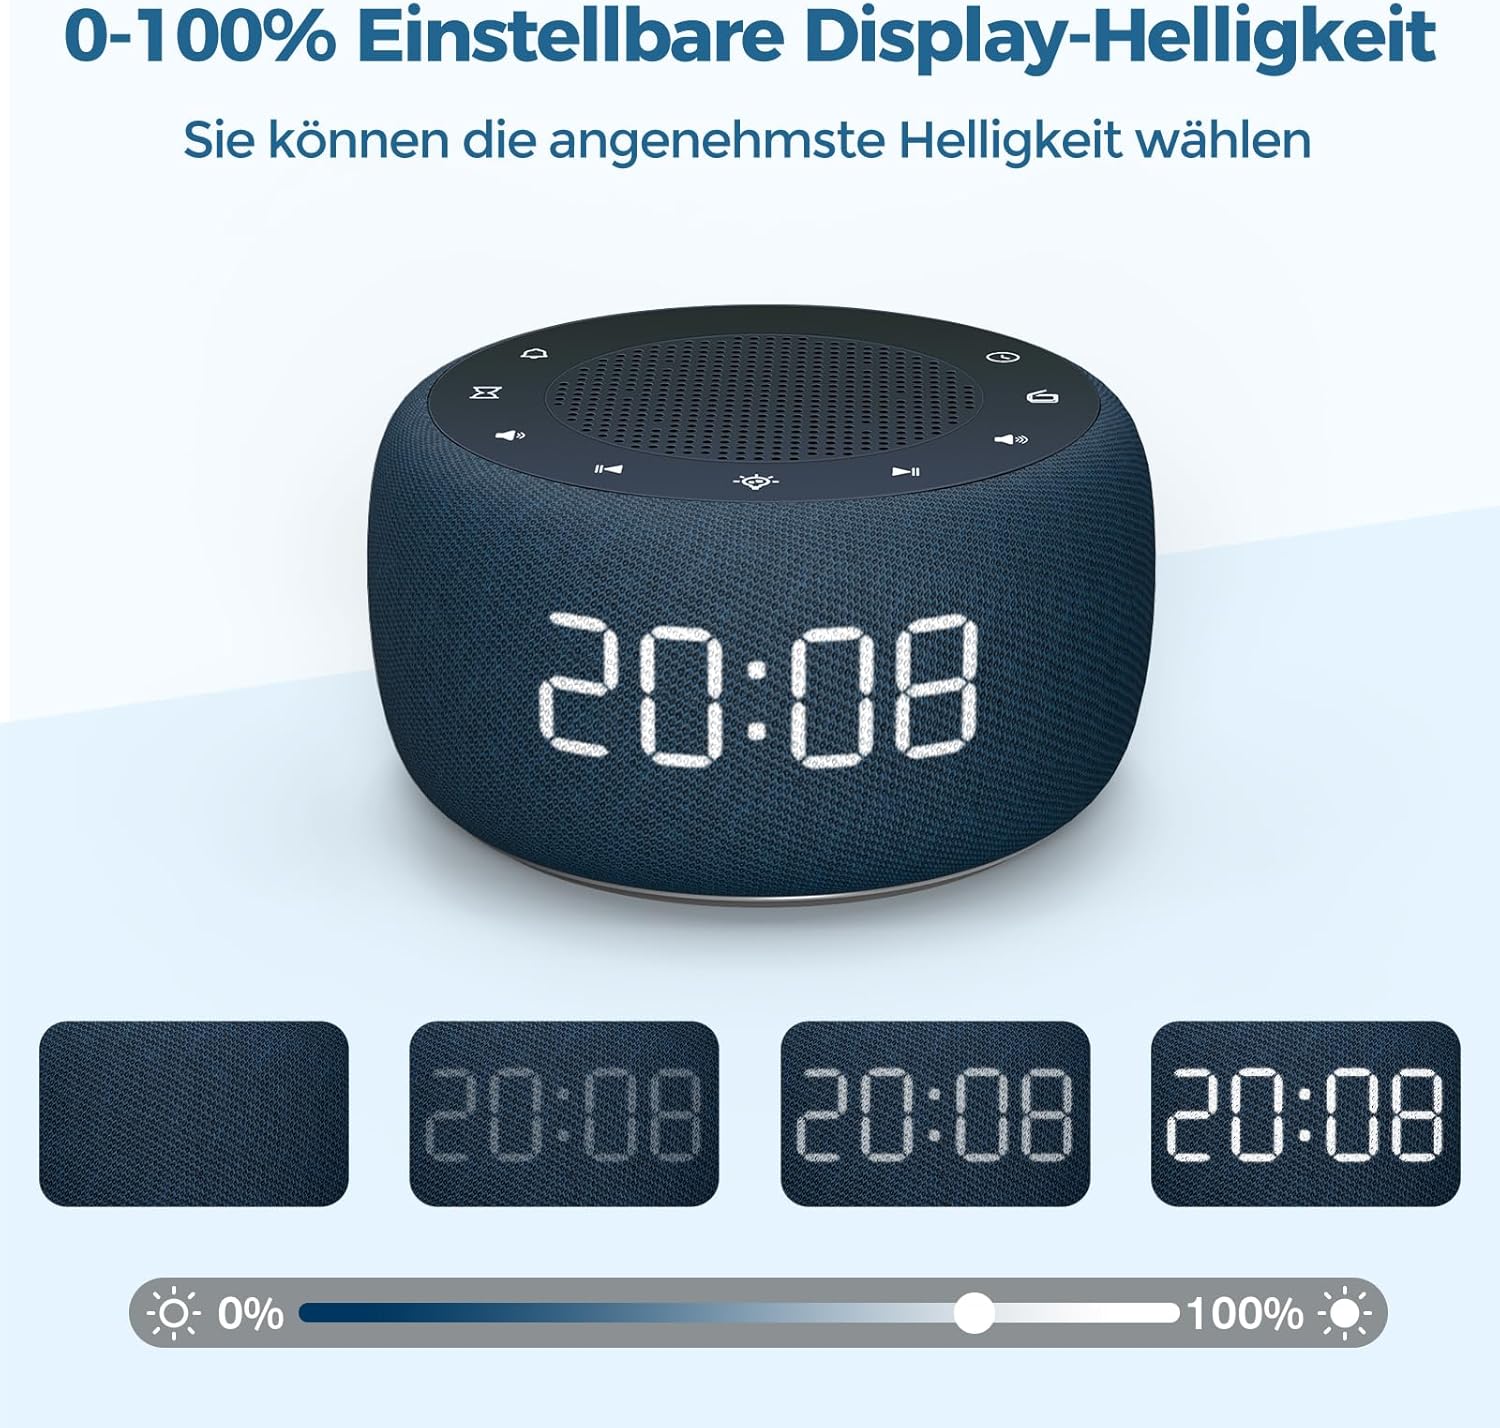
Figur 7: Demonstrating the 0-100% adjustable display brightness, allowing users to select their preferred comfort level.
6. Luminous Buttons
The control buttons on the top of the unit are designed to illuminate for 5 seconds when pressed, making operation easier in low-light conditions.
7. 12/24-timers format
To switch between 12-hour and 24-hour time formats, briefly press the '12/24H' button (if available, or often combined with the 'Time Set' button by a quick press after setting time).
Vedlikehold
- Rengjøring: Bruk en myk, tørr klut til å rengjøre overflaten på vekkerklokken. Ikke bruk flytende rengjøringsmidler eller slipende materialer.
- Lagring: Hvis du oppbevarer enheten over lengre tid, må du koble den fra strømmen og ta ut backupbatteriet. Oppbevar den på et kjølig og tørt sted.
- Batteribytte: The CR2032 backup battery should be replaced periodically (e.g., every 1-2 years) to ensure settings are retained during power outages.
Feilsøking
| Problem | Mulig årsak | Løsning |
|---|---|---|
| Displayet er tomt. | Ingen strømtilkobling. | Ensure the DC power adapter is securely plugged into the unit and a working wall outlet. |
| Alarmen lyder ikke. | Alarmen er ikke aktivert, eller volumet er for lavt. | Check if the alarm icon is visible on the display. Increase alarm volume. |
| Dårlig radiomottak. | FM antenna not extended or poor signal area. | Trekk FM-antennen helt ut. Flytt enheten for bedre mottak. |
| Tid/innstillinger tapt etter strømbruddtage. | Backupbatteriet er dødt eller ikke installert. | Installer eller bytt ut CR2032-backupbatteriet. |
Spesifikasjoner
- Modell: RS11
- Merke: BUFFBEE
- Dimensjoner (L x B x H): 9.5 x 3.81 x 6 cm (omtrent 3.74 x 1.5 x 2.36 tommer)
- Vekt: 340 gram (omtrent 0.75 lbs)
- Strømutgang: 5 watt
- FM frekvensområde: 87.5-108 MHz
- Visningstype: Digital
- Nattlysfarger: 7
- Reservebatteri: CR2032 (inkludert)
- Strømkilde: Cable Electric (DC Adapter)
Garanti og støtte
This product comes with a standard manufacturer's warranty. For specific warranty details, please refer to the documentation provided at the time of purchase or contact BUFFBEE customer support. If you encounter any issues not covered in this manual, please contact our customer service for assistance.