1. Viktig sikkerhetsinformasjon
Please read all instructions carefully before using the Inventum Mini Oven. Retain this manual for future reference.
- Plasser alltid apparatet på en stabil, varmebestandig overflate, unna vegger og andre apparater for å sikre tilstrekkelig ventilasjon.
- Do not touch hot surfaces. Use oven mitts or gloves when handling hot components or food.
- Sørg for at strømledningen ikke er skadet og at den holdes unna varme overflater.
- Ikke senk apparatet, ledningen eller pluggen i vann eller andre væsker.
- Nøye tilsyn er nødvendig når et apparat brukes av eller i nærheten av barn.
- Koble fra stikkontakten når den ikke er i bruk og før rengjøring. La avkjøle før du setter på eller tar av deler.
- Ikke bruk noe apparat med en skadet ledning eller støpsel, eller etter at apparatet ikke fungerer eller har blitt skadet på noen måte.
- Ikke bruk tilbehør eller utstyr som ikke er anbefalt av produsenten, da dette kan forårsake skader.
- Ikke legg noen av følgende materialer i ovnen: papir, papp, plast eller lignende brennbare materialer.
- Exercise extreme caution when removing trays or disposing of hot grease.
2. Produktet er overview og komponenter
The Inventum Mini Oven is designed for versatile cooking, including baking, frying, and roasting. Familiarize yourself with its components for optimal use.

Figur 2.1: The Inventum Mini Oven with its door open, displaying chicken pieces, sliced vegetables, and french fries on its internal trays.

Figur 2.2: Front view of the Inventum Mini Oven, showcasing its compact design and the food items arranged on the internal racks.
Inkluderte komponenter:
- Hovedenhet: The primary oven body with a 12-liter capacity, touch control panel, and viewvindu.

Figur 2.3: Side view of the Inventum Mini Oven, highlighting its sleek black and stainless steel exterior.
- Kontrollpanel: Touch-sensitive interface for setting temperature, time, and selecting cooking programs.
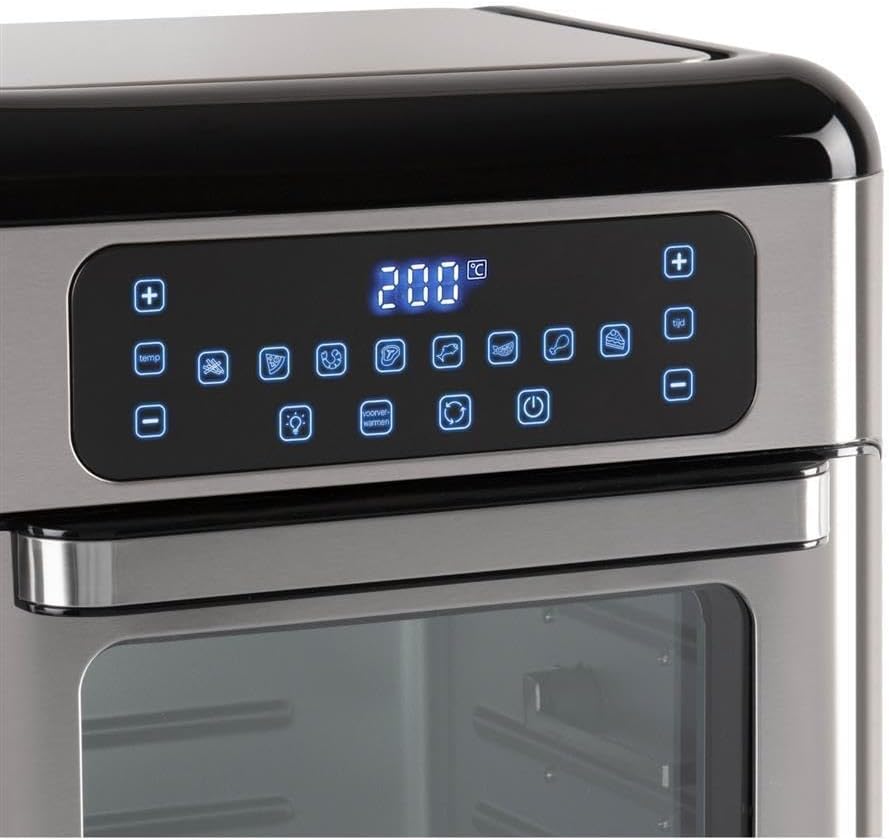
Figur 2.4: Detaljert view of the touch control panel with digital display and various function icons.
- Baking Shelves (Perforated Trays): Two perforated trays for air frying and baking, allowing for even heat circulation.

Figur 2.5: Two perforated baking trays, ideal for air frying and ensuring crispy results.
- Crumb Tray (Solid Baking Tray): A solid tray designed to catch crumbs and drips, also suitable for baking.

Figur 2.6: A solid baking tray, which also functions as a crumb tray to collect food debris.
- Rotisseriekurv: A mesh basket for tumbling smaller items like fries or nuts during rotisserie cooking.

Figur 2.7: The rotisserie mesh basket, designed for even cooking of smaller food items.
- Rotisserie Spit and Handle: For steking av hele kyllinger eller større kjøttstykker.

Figur 2.8: The rotisserie spit with forks and the removal handle for safe handling.
- Brukerhåndbok: Dette dokumentet.
3. Oppsett og første gangs bruk
3.1 Utpakking
- Fjern all emballasje, klistremerker og etiketter fra apparatet.
- Check that all listed components are present and undamaged.
3.2 Plassering
- Place the mini oven on a flat, stable, and heat-resistant surface.
- Ensure there is at least 10 cm (4 inches) of clear space on all sides of the oven for proper ventilation.
- Ikke plasser ovnen i nærheten av brennbare materialer eller under veggskap.
3.3 Rengjøring før første gangs bruk
- Tørk av utsiden av ovnen med en damp klut.
- Wash all removable accessories (baking shelves, crumb tray, rotisserie basket, spit) in warm, soapy water. Rinse thoroughly and dry completely.
- Sett smulebrettet helt nederst i ovnen.
3.4 Innledende avbrenning
Before cooking food, it is recommended to run the oven empty for approximately 15 minutes to burn off any manufacturing residues.
- Koble strømledningen til en jordet stikkontakt.
- Still temperaturen til 200 °C (390 °F) og timeren til 15 minutter.
- Det kan forekomme en svak lukt eller røyk under første gangs bruk; dette er normalt. Sørg for at området er godt ventilert.
- After 15 minutes, turn off the oven and unplug it. Allow it to cool completely before proceeding.
4. Bruksanvisning
4.1 Kontrollpanel overview
The Inventum Mini Oven features an intuitive touch control panel. Refer to Figure 2.4 for a visual guide.
- Strømknapp: Slår ovnen av/på.
- Temperaturkontroll (+/-): Justerer koketemperaturen.
- Tidskontroll (+/-): Adjusts the cooking duration.
- Programvalg: Icons representing 8 pre-set cooking programs (e.g., fries, chicken, fish, steak, cake, pizza, toast, dehydrate).
- Lysknapp: Turns the internal oven light on/off.
- Convection Fan Button: Activates/deactivates the convection fan for even cooking.
- Rotisserie-knapp: Aktiverer/deaktiverer rotisseriefunksjonen.
4.2 Grunnleggende betjening
- Lage mat: Place your food on the appropriate accessory (baking shelf, crumb tray, rotisserie basket, or spit).
- Sett inn tilbehør: Carefully slide the accessory with food into the desired rack position inside the oven. Ensure the crumb tray is always at the bottom.
- Lukk døren: Lukk ovnsdøren godt.
- Strøm på: Trykk på av/på-knappen. Skjermen vil lyse opp.
- Velg Program eller Manuelle innstillinger:
- Pre-set Program: Touch one of the 8 program icons. The oven will automatically set a recommended temperature and time.
- Manuell innstilling: Use the Temperature (+/-) buttons to set the desired temperature and the Time (+/-) buttons to set the cooking duration.
- Begynn å lage mat: The oven will typically start automatically after a few seconds of setting the time/temperature or selecting a program. Some models may require pressing the Power button again to start.
- Overvåk matlaging: Use the internal light button to check on your food without opening the door.
- Slutt på matlagingen: The oven will beep when the timer expires and automatically turn off the heating elements.
- Fjern mat: Carefully open the oven door. Using oven mitts, remove the cooked food and accessories. Be aware of hot steam.
- Slå av: Press the Power button to turn off the oven completely, then unplug it from the wall outlet.
4.3 Bruk av rotisseriefunksjonen
The rotisserie function is ideal for even cooking of whole chickens or other roasts using the rotisserie spit, or for items like fries using the rotisserie basket.
- Lage mat:
- For Spit: Skewer the food (e.g., whole chicken) onto the rotisserie spit, securing it with the forks. Ensure the food is centered and balanced.
- For Basket: Place smaller items like fries or vegetables into the rotisserie basket and secure the lid.
- Insert Rotisserie: Carefully insert the rotisserie spit or basket into the designated rotisserie slots inside the oven. Ensure it is properly seated and can rotate freely.
- Angi tilberedningsparametere: Still inn ønsket temperatur og tid ved hjelp av kontrollpanelet.
- Activate Rotisserie: Press the Rotisserie button on the control panel. The rotisserie mechanism will begin to rotate.
- Begynn å lage mat: Begin the cooking cycle as described in "4.2 Basic Operation".
- Fjern mat: Once cooking is complete, use the rotisserie handle (Figure 2.8) to carefully lift and remove the hot rotisserie assembly from the oven. Place it on a heat-resistant surface before removing the food.
5. Vedlikehold og rengjøring
Regular cleaning and maintenance will ensure the longevity and optimal performance of your Inventum Mini Oven.
5.1 Generell rengjøring
- Trekk alltid ut støpselet til ovnen og la den avkjøles helt før rengjøring.
- Do not use abrasive cleaners, scouring pads, or harsh chemicals, as these can damage surfaces.
5.2 Rengjøring av interiøret
- The oven features a stainless steel interior, which is durable and easy to clean.
- Remove the crumb tray and all other accessories. Wash them in warm, soapy water, rinse, and dry.
- Tørk av innvendige vegger med adamp cloth and a mild detergent. For stubborn stains, a non-abrasive oven cleaner designed for stainless steel can be used, following the product instructions.
- Tørk av med en ren klut.
5.3 Rengjøring utvendig
- Tørk av de utvendige overflatene med en myk, damp klut.
- For the control panel, use a slightly damp cloth and wipe gently. Do not spray water directly onto the control panel.
- Tørk grundig.
5.4 smulebrett
- Smulebrettet bør tømmes og rengjøres regelmessig for å forhindre fettopphopning og potensiell brannfare.
- Slide out the crumb tray from the bottom of the oven, discard crumbs, and wash as described above.
6. Feilsøking
If you encounter issues with your Inventum Mini Oven, consult the following table before contacting customer support.
| Problem | Mulig årsak | Løsning |
|---|---|---|
| Ovnen slår seg ikke på. | Ikke koblet til; slå av strømmentage; defekt stikkontakt. | Sørg for at strømledningen er ordentlig koblet til en stikkontakt som fungerer. Sjekk strømbryteren. |
| Maten tilberedes ikke jevnt. | Overcrowding; incorrect temperature/time; convection fan off. | Do not overcrowd the oven. Adjust temperature and time as needed. Ensure the convection fan is active for even cooking. Rotate food halfway through cooking. |
| Røyk eller brent lukt under drift. | Food residue on heating elements; crumb tray not cleaned; excessive grease. | Unplug and allow to cool. Clean the interior and crumb tray thoroughly. Ensure food is not touching heating elements. |
| Rotisseriefunksjonen fungerer ikke. | Rotisseriet er ikke riktig plassert; funksjonen er ikke aktivert. | Ensure the rotisserie spit/basket is correctly inserted into the drive slots. Press the Rotisserie button on the control panel to activate. |
| Kontrollpanelet svarer ikke. | Temporary electronic glitch; power issue. | Trekk ut støpselet til ovnen i 5 minutter, og sett den deretter inn igjen. Hvis problemet vedvarer, kontakt kundestøtte. |
7. Produktspesifikasjoner
| Trekk | Detalj |
|---|---|
| Merke | Inventum |
| Modellnavn | GF1200HLD |
| Spesialfunksjon | Kompakt størrelse |
| Kontroll Type | Trykk på Kontroll |
| Inkluderte komponenter | Baking shelves, crumb tray, user manual |
| Strømkilde | Elektrisk |
| Strømutgang | 1500W |
| Kapasitet | 12 liter |
| Interiørmateriale | Rustfritt stål |
| Varevekt | 2.2 pund |
| GTIN | 08712876094305 |
8. Garanti og kundestøtte
8.1 Garantiinformasjon
Inventum products are manufactured to high-quality standards. For specific warranty details regarding your Inventum Mini Oven (Model GF1200HLD), please refer to the warranty card included with your purchase or visit the official Inventum webnettstedet. Ta vare på kjøpsbeviset for garantikrav.
8.2 Kundestøtte
If you have any questions, require technical assistance, or need to report a problem with your appliance, please contact Inventum customer support. Contact information can typically be found on the official Inventum webnettstedet eller på produktemballasjen.
When contacting support, please have your product model number (GF1200HLD) and purchase date available.