1. Introduksjon
The ZOYI VC17B+ is a high-performance, True-RMS digital multimeter designed for accurate measurement of various electrical parameters. It features a large, backlit display for clear readings in diverse environments and a robust design suitable for electricians, students, and maintenance professionals. This manual provides essential information for the safe and effective operation of your device.
Nøkkelfunksjoner inkluderer:
- AC/DC voltage og Strømmåling
- Resistance, Capacitance, and Frequency measurement
- Continuity and Diode testing
- Temperaturmåling
- Duty Cycle
- Additional functions: True-RMS, Data Hold, Backlight, Low Battery Alert, Auto Power Off, MAX/MIN, Relative Measurement (REL)
2. Sikkerhetsinformasjon
Følg alltid sikkerhetsreglene når du bruker elektrisk testutstyr. Unnlatelse av å gjøre dette kan føre til elektrisk støt, personskade eller skade på måleren eller utstyret som testes.
- Les denne bruksanvisningen grundig før operasjon.
- The ZOYI VC17B+ is rated for KAT IV 600V og KAT III 600V. Do not exceed these voltage grenser.
- Inspiser testledningene for skader før hver bruk. Skift dem ut hvis isolasjonen er svekket.
- Do not use the meter if it appears damaged or is not operating correctly.
- Ensure the function dial is set to the correct range before making measurements.
- Unngå å jobbe alene.
- Vær forsiktig når du arbeider med voltagover 30 V AC RMS, 42 V peak eller 60 V DC, da disse utgjør en støtfare.
- Skift batteriene umiddelbart når indikatoren for lavt batteri vises.
3. Pakkens innhold
Bekreft at alle varene er til stede i pakken din:
- ZOYI VC17B+ Digital Multimeter
- Testeemner (2)
- AA -batterier (2)
- Thermocouple Probe (1)
- Brukerhåndbok (dette dokumentet)
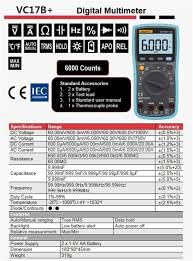
Figure 3.1: Standard Accessories included with the ZOYI VC17B+ Multimeter.
4. Produktet er overview
Familiarize yourself with the components of the ZOYI VC17B+ multimeter:
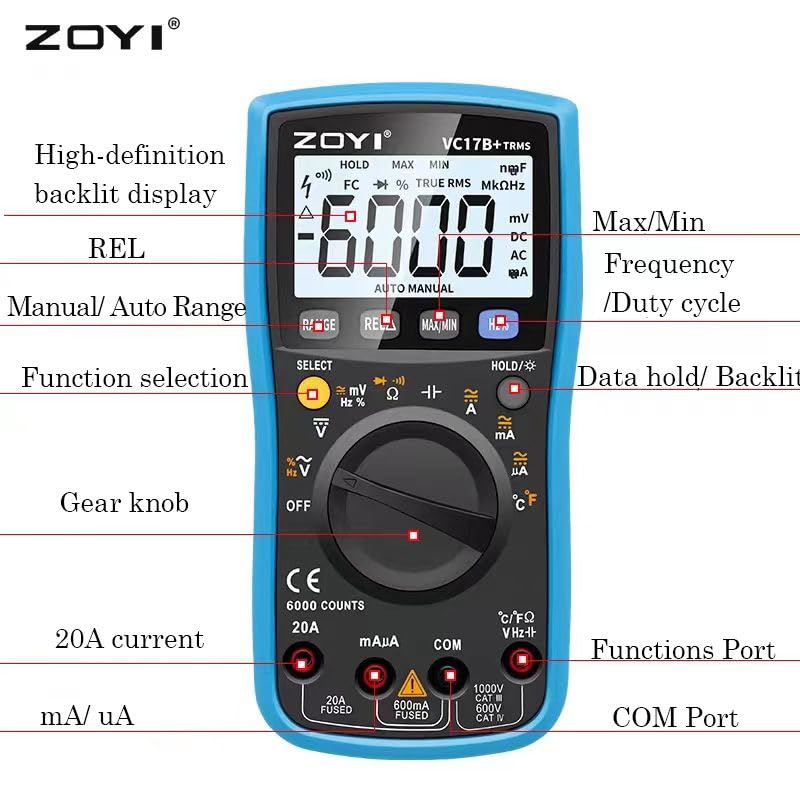
Figure 4.1: ZOYI VC17B+ Multimeter Components.
- Utstilling: Large, high-definition backlit LCD for reading measurements.
- Function Dial (Gear Knob): Brukes til å velge ønsket målefunksjon.
- Inngangskontakter:
- COM: Felles (negativ) inngang for alle målinger.
- VHzΩ: Positiv inngang for Voltage, Frequency, Resistance, Capacitance, Diode, Continuity, and Temperature measurements.
- mA/uA: Positiv inngang for milliampere og mikroampere current measurements (fused).
- 20A: Positive input for 20 Ampere current measurements (fused).
- Knapper:
- OMRÅDE: Manual/Auto Range selection.
- REL: Relativ målefunksjon.
- MAKS/MIN: Registrerer maksimums- og minimumsverdier.
- Hz %: Selects Frequency or Duty Cycle.
- HOLD/☀: Data Hold function and Backlight activation.
- VELGE: Toggles between functions on a single dial position (e.g., AC/DC, Diode/Continuity).
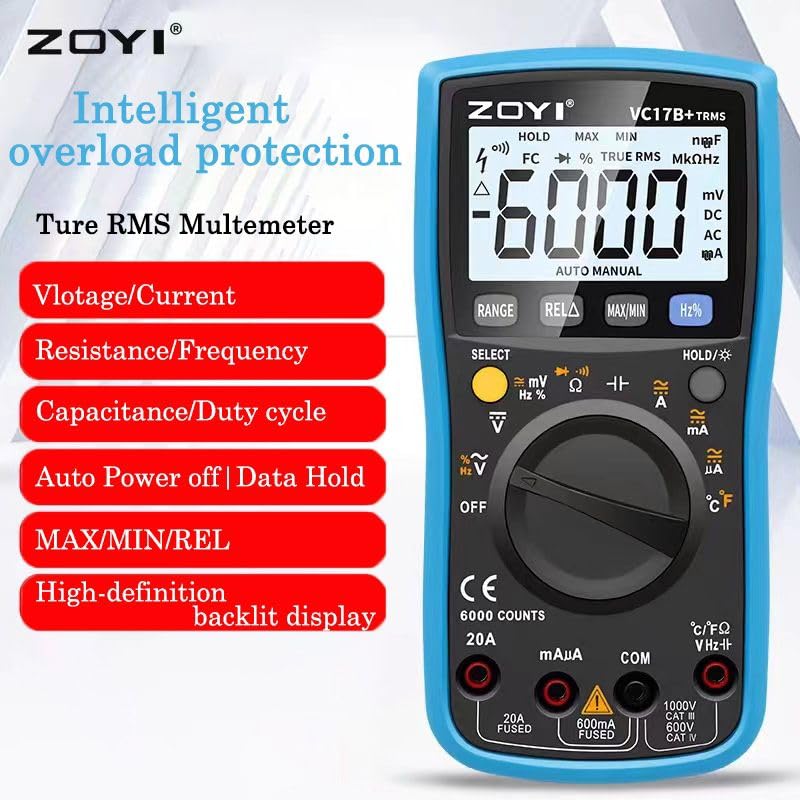
Figure 4.2: ZOYI VC17B+ Multimeter Front View.
5. Oppsett
5.1 Installasjon av batteri
- Sørg for at multimeteret er slått AV.
- Finn batterirommet på baksiden av måleren.
- Bruk en skrutrekker for å åpne batteridekselet.
- Insert two AA batteries, observing correct polarity (+/-).
- Sett på batteridekselet og fest det med skruen.
5.2 Tilkobling av testledninger
Koble alltid den svarte testledningen til COM-kontakten. Koble den røde testledningen til riktig inngangskontakt basert på måletypen:
- VHzΩ: For Voltage, Resistance, Capacitance, Frequency, Diode, Continuity, and Temperature.
- mA/uA: For small current measurements.
- 20A: For large current measurements (up to 20A).
5.3 Bruk av støtteben
The multimeter includes a built-in kickstand for convenient hands-free operation. Gently pull out the kickstand from the back of the unit to prop it up at an angle. Push it back in when not needed.


Figure 5.1: Multimeter back view (left) and with kickstand deployed (right).
6. Bruksanvisning
6.1 Generell drift
- Strøm PÅ/AV: Rotate the function dial from 'OFF' to any measurement function to turn the meter ON. Rotate back to 'OFF' to power OFF.
- Automatisk avstenging (APO): The meter will automatically power off after approximately 15 minutes of inactivity to conserve battery life. Press any button or rotate the function dial to wake it up.
- Bakgrunnsbelysning: Press and hold the 'HOLD/☀' button to turn the backlight ON or OFF.
- Data Hold: Press the 'HOLD/☀' button briefly to freeze the current reading on the display. Press again to release.
- Automatisk/manuell avstandsmåling: The meter defaults to auto-ranging. Press the 'RANGE' button to switch to manual ranging. In manual ranging, press 'RANGE' repeatedly to cycle through available ranges. Press and hold 'RANGE' to return to auto-ranging.
- SELECT -knapp: In certain dial positions (e.g., Voltage, Diode/Continuity), press 'SELECT' to toggle between AC/DC, Diode Test, or Continuity Test.
6.2 Spesifikke målefunksjoner
6.2.1 voltage-måling (AC/DC)
- Insert the black test lead into the COM jack and the red test lead into the VHzΩ jack.
- Rotate the function dial to the 'V~' (AC Voltage) eller 'V=' (DC-volumtage) position. If both are on one position, use 'SELECT' to choose.
- Koble testprobene parallelt med kretsen eller komponenten som skal måles.
- Les voltage -verdien på displayet.
6.2.2 Strømmåling (AC/DC)
FORSIKTIGHET: Koble aldri måleren parallelt med en volumregulator.tagkilden når du måler strøm. Dette kan føre til at sikringen går eller at måleren blir skadet.
- Insert the black test lead into the COM jack.
- For mA/uA measurements, insert the red test lead into the mA/uA jack. For 20A measurements, insert the red test lead into the 20A jack.
- Rotate the function dial to the appropriate 'A~' (AC Current) or 'A=' (DC Current) position (mA, uA, or 20A). Use 'SELECT' if needed.
- Open the circuit and connect the test probes in series with the load.
- Les av gjeldende verdi på displayet.
6.2.3 Motstandsmåling (Ω)
FORSIKTIGHET: Sørg for at kretsen er spenningsløs og at alle kondensatorer er utladet før du måler motstanden.
- Insert the black test lead into the COM jack and the red test lead into the VHzΩ jack.
- Drei funksjonshjulet til 'Ω'-posisjonen.
- Koble testprobene over komponenten som skal måles.
- Les motstandsverdien på skjermen.
6.2.4 Kontinuitetstest
- Insert the black test lead into the COM jack and the red test lead into the VHzΩ jack.
- Rotate the function dial to the 'Ω' position and press 'SELECT' until the continuity symbol (buzzer icon) is displayed.
- Koble testprobene over kretsen eller komponenten.
- If continuity exists (resistance below approx. 50Ω), the buzzer will sound.
6.2.5 Diodetest
- Insert the black test lead into the COM jack and the red test lead into the VHzΩ jack.
- Rotate the function dial to the 'Ω' position and press 'SELECT' until the diode symbol (->|) is displayed.
- Koble den røde proben til anoden og den svarte proben til katoden på dioden. Displayet vil vise forovervolumet.tage slipp.
- Bytt om probene. Displayet skal vise «OL» (åpen sløyfe) for en god diode.
6.2.6 Kapasitansmåling (F)
FORSIKTIGHET: Discharge capacitors completely before testing to prevent damage to the meter.
- Insert the black test lead into the COM jack and the red test lead into the VHzΩ jack.
- Rotate the function dial to the 'F' (Capacitance) position.
- Koble testprobene over kondensatoren.
- Les kapasitansverdien på displayet.
6.2.7 Frequency Measurement (Hz) and Duty Cycle (%)
- Insert the black test lead into the COM jack and the red test lead into the VHzΩ jack.
- Drei funksjonshjulet til «Hz%»-posisjonen.
- Press the 'Hz%' button to toggle between Frequency (Hz) and Duty Cycle (%).
- Connect the test probes in parallel to the signal source.
- Les av frekvens- eller driftssyklusverdien på displayet.
6.2.8 Temperaturmåling (°C/°F)
- Insert the thermocouple probe into the VHzΩ (positive) and COM (negative) jacks, observing polarity.
- Rotate the function dial to the '°C/°F' position.
- The display will show the ambient temperature. Place the thermocouple tip on or near the object whose temperature is to be measured.
- Read the temperature value. The unit can be toggled between Celsius and Fahrenheit using the 'SELECT' button if available in this mode.
6.2.9 MAX/MIN-funksjon
In any measurement mode, press the 'MAX/MIN' button to activate this function. The meter will display the maximum or minimum reading recorded since the function was activated. Press again to cycle between MAX, MIN, and current reading. Press and hold to exit.
6.2.10 REL (Relative Measurement) Function
Press the 'REL' button to store the current reading as a reference value. Subsequent measurements will be displayed as the difference from this reference value. Press 'REL' again to exit this mode.
7. Vedlikehold
7.1 Rengjøring
Tørk av måleren med annonseamp klut og mildt vaskemiddel. Ikke bruk slipemidler eller løsemidler. Sørg for at måleren er helt tørr før bruk.
7.2 Batteribytte
When the low battery indicator appears on the display, replace the batteries as described in Section 5.1. Use two new AA batteries.
7.3 Bytte av sikring
Hvis strømmålingsfunksjonen svikter, kan det hende at sikringen må byttes. Se spesifikasjonene for riktig sikringstype og -klassifisering. Sikringsskifte skal kun utføres av kvalifisert personell.
7.4 Oppbevaring
Hvis måleren ikke skal brukes over lengre tid, må du ta ut batteriene for å forhindre lekkasje. Oppbevar måleren på et kjølig og tørt sted, unna direkte sollys og ekstreme temperaturer.
8. Feilsøking
| Problem | Mulig årsak | Løsning |
|---|---|---|
| Ingen skjerm eller svak skjerm | Døde eller lave batterier; Feil batteriinstallasjon. | Skift batterier; sjekk batteripolariteten. |
| Ingen strømmåling | Blown fuse; Incorrect input jack used. | Replace fuse (if qualified); Ensure red lead is in mA/uA or 20A jack. |
| 'OL' (Overbelastning) vises | Målingen overskrider det valgte området eller målerens maksimale kapasitet. | Switch to a higher range (if in manual mode); Ensure measurement is within meter's limits. |
| Unøyaktige avlesninger | Poor test lead connection; External interference; Damaged meter. | Check connections; Move away from strong electromagnetic fields; Contact support if meter is damaged. |
9. Spesifikasjoner
Detailed technical specifications for the ZOYI VC17B+ Digital Multimeter:
9.1 Generelle spesifikasjoner
- Merke: ZOYI
- Modellnummer: VC17B+
- Utstilling: 6000 Counts, Large Backlit LCD
- Sann RMS: Ja
- Strømkilde: 2 x AA batterier
- Sikkerhetsvurdering: CAT IV 600V, CAT III 600V
- Dimensjoner (L x B x H): 180 x 90 x 45 mm (ca.)
- Vekt: Omtrent 310g (uten batterier)
- Automatisk avslåing: Ja
- Data Hold: Ja
- Varsel om lavt batteri: Ja

Figure 9.1: Physical Dimensions of the Multimeter.
9.2 Elektriske spesifikasjoner
Figure 9.2: Detailed Electrical Specifications.
| Funksjon | Spekter | Nøyaktighet |
|---|---|---|
| DC Voltage | 60.00mV/600.0mV/6.000V/60.00V/600.0V/1000V | ±(0.5 %+3) |
| AC Voltage | 60.00mV/600.0mV/6.000V/60.00V/600.0V/750V | ±(1.0 %+3) |
| DC strøm | 600.0uA/6000uA/60.00mA/600.0mA/6.000A/20.00A | ±(1.2 %+3) |
| AC strøm | 600.0uA/6000uA/60.00mA/600.0mA/6.000A/20.00A | ±(1.5 %+3) |
| Motstand | 600.0Ω/6.000kΩ/60.00kΩ/600.0kΩ/6.000MΩ/60.00MΩ | ±(1.0 %+3) |
| Kapasitans | 9.999nF/99.99nF/999.9nF/9.999uF/99.99uF/999.9uF/9.999mF | ±(5.0 %+20) |
| Hyppighet | 9.999Hz/99.99Hz/999.9Hz/9.999kHz/99.99kHz/999.9kHz/9.999MHz | ±(0.1 %+2) |
| Temperatur | -20°C ~ 1000°C / -4°F ~ 1832°F | ±(2.5 %+5) |
| Diode/kontinuitet | Ja | Ja |
10. Garanti og støtte
For warranty information, please refer to the warranty card included with your product or visit the official ZOYI website. For technical support or service inquiries, please contact your retailer or the manufacturer directly.
- Produsent: ZOYI & ZOTEK Instruments
- Packer Contact Information: Skyking Instruments, Mumbai, INDIA