KEENSTAR ST-265TC
KEENSTAR ST-265TC Touch Screen 2-Slice Toaster
Model: ST-265TC
1. Viktige sikkerhetstiltak
Når du bruker elektriske apparater, bør grunnleggende sikkerhetstiltak alltid følges, inkludert følgende:
- Les alle instruksjonene før du bruker brødristeren.
- Ikke berør varme overflater. Bruk håndtak eller knotter.
- For å beskytte mot elektrisk støt må du ikke dyppe ledningen, støpselet eller brødristeren i vann eller annen væske.
- Nøye tilsyn er nødvendig når et apparat brukes av eller i nærheten av barn.
- Koble fra stikkontakten når den ikke er i bruk og før rengjøring. La avkjøle før du setter på eller tar av deler.
- Ikke bruk noe apparat med en skadet ledning eller støpsel, eller etter at apparatet ikke fungerer eller har blitt skadet på noen måte.
- Ikke la ledningen henge over kanten av bordet eller benken, eller berør varme overflater.
- Ikke plasser på eller i nærheten av en varm gass- eller elektrisk brenner, eller i en oppvarmet ovn.
- Ikke bruk brødristeren til annet enn tiltenkt bruk.
- Overdimensjonert mat, metallfoliepakker eller bestikk må ikke settes i en brødrister, da dette kan medføre fare for brann eller elektrisk støt.
- Det kan oppstå brann hvis brødristere dekkes eller berører brennbart materiale, inkludert gardiner, draperier, vegger og lignende, når de er i drift.
- Ikke forsøk å løsne maten når brødristeren er koblet til.
- Dette apparatet er kun til husholdningsbruk.
2. Produktet er overview
The KEENSTAR ST-265TC is a modern 2-slice toaster featuring a touch screen interface for precise control over your toasting preferences. It includes wide slots to accommodate various bread types and a removable crumb tray for easy cleaning.
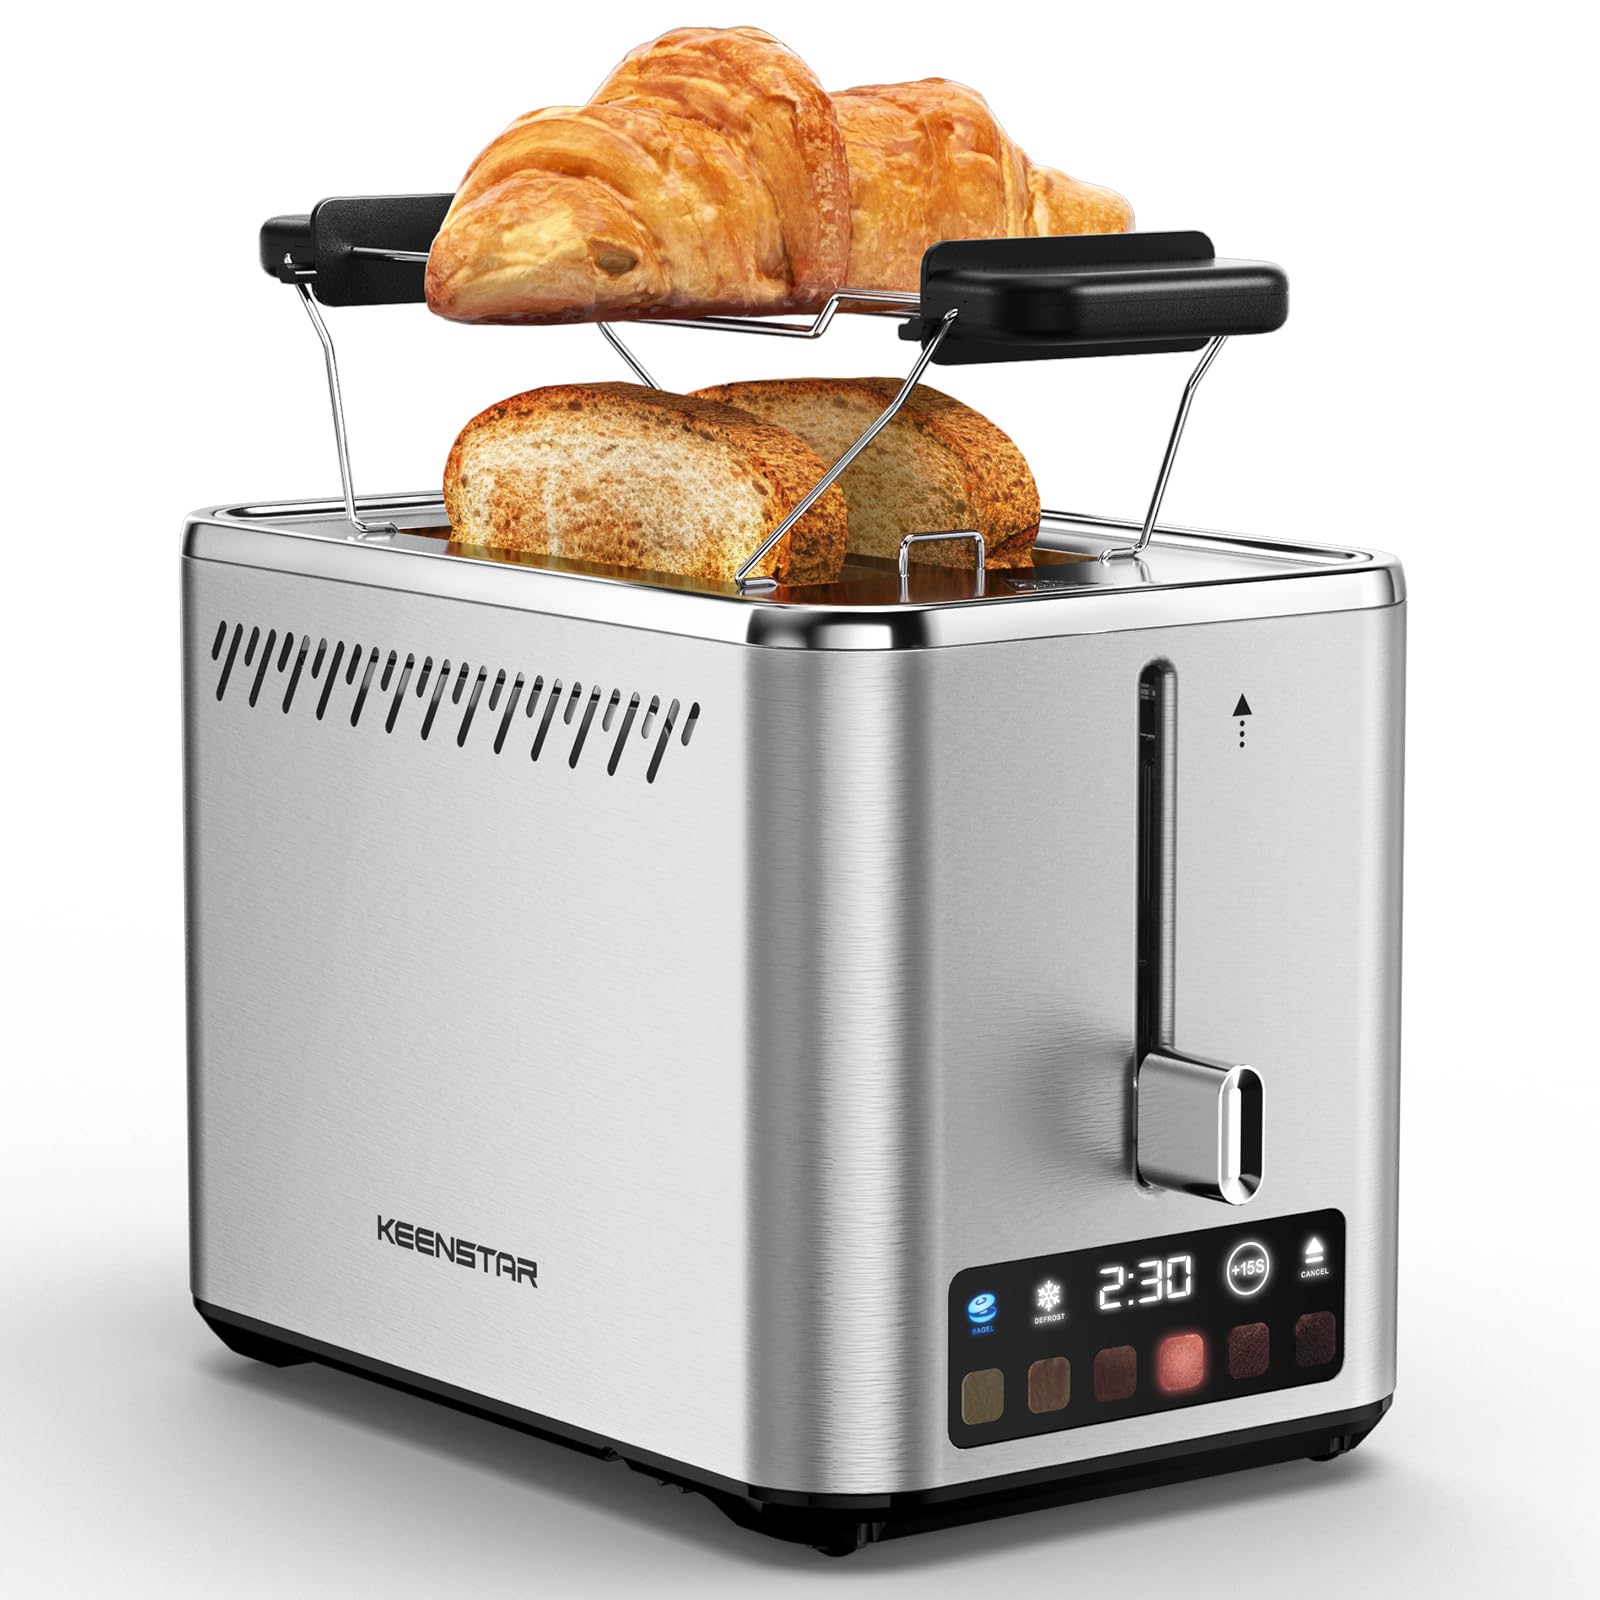
Image: KEENSTAR ST-265TC 2-Slice Toaster in silver stainless steel.
3. Oppsett
Pakker ut
Carefully remove the toaster and all packaging materials from the box. Ensure all accessories, including the warming rack, are present.
Plassering
Plasser brødristeren på en stabil, flat og varmebestandig overflate, unna brennbare materialer som gardiner eller vegger. Sørg for tilstrekkelig ventilasjon rundt apparatet.
Første bruk
Before toasting food for the first time, operate the toaster without bread on the highest browning setting (level 6) to burn off any manufacturing residues. A slight odor or smoke may be present; this is normal and will dissipate.
4. Bruksanvisning
Kontrollpanel overview

Image: The toaster's smart touch control display showing 6 browning levels and extra functions like Bagel, Defrost, +15S, and Cancel.
Grunnleggende risting
- Insert up to two slices of bread into the wide 1.5-inch slots.
- Select your desired browning level (1-6) by touching the corresponding icon on the display. Level 1 is the lightest, and Level 6 is the darkest.
- Press the lever down until it locks into place. The digital display will show a countdown timer.
- The toast will automatically pop up when the cycle is complete.

Image: Visual guide showing the steps for easy toaster operation: 1. Put bread in slots, 2. Select browning level and function, 3. Press the lever down, 4. Enjoy delicious bread.
Bagel -funksjon
This function is designed to toast the cut side of bagels while gently warming the outer side.
- Insert bagel halves into the slots with the cut side facing outwards.
- Velg ønsket bruningsnivå.
- Trykk på BAGEL button on the display. It will illuminate.
- Press the lever down until it locks.

Image: The toaster's display showing the illuminated BAGEL mode. BAGEL mode toasts one side only; place the cut side facing outward.
Avrimingsfunksjon
Use this function to toast frozen bread without pre-thawing.
- Sett frossent brød inn i sporene.
- Velg ønsket bruningsnivå.
- Trykk på TINE button on the display. It will illuminate.
- Press the lever down until it locks.

Image: The toaster's display showing the illuminated DEFROST mode. This mode allows you to cook frozen breads easily without guesswork.
+15S Function
If your toast is not quite browned enough after a cycle, you can add an additional 15 seconds of toasting time.
- After a toasting cycle, if more browning is desired, touch the +15S knapp.
- The toaster will initiate a 15-second toasting cycle.
Avbryt funksjon
To stop the toasting cycle at any time, simply touch the KANSELLERE button. The lever will automatically raise, and the heating elements will turn off.

Image: The toaster's display highlighting the +15S button to increase baking time by 15 seconds, and the Cancel button to stop heating.
Varmestativ
The included warming rack can be used to warm pastries, croissants, or other items that cannot be placed directly into the toaster slots.
- Place the warming rack securely on top of the toaster, aligning it over the slots.
- Place the item to be warmed on the rack.
- Start a toasting cycle (without bread in the slots) to generate heat. The heat rising from the toaster will warm the item on the rack.
- Monitor the item closely to prevent over-warming or burning.

Image: The removable warming rack attached to the toaster, with a croissant placed on it for warming.
Produktvideoer
Video: Demonstrates the touchscreen and warming tray features of the KEENSTAR toaster.
Video: En detaljert beskrivelseview of the KEENSTAR Smart 2-Slice Toaster, highlighting its touch screen and various functions.
Video: Explores the key features and functionalities of the KEENSTAR toaster.
5. Vedlikehold og rengjøring
Generell rengjøring
Always unplug the toaster from the power outlet and allow it to cool completely before cleaning. Wipe the exterior with a soft, damp Ikke bruk slipende rengjøringsmidler eller skuresvamper av metall, da disse kan ripe opp overflaten på rustfritt stål.
Smulebrett
The removable crumb tray collects crumbs during toasting and should be emptied regularly to prevent fire hazards.
- Sørg for at brødristeren er koblet fra strømnettet og at den er helt avkjølt.
- Trekk ut smulebrettet som er plassert nederst bak på brødristeren.
- Kast smulene og tørk av brettet med enamp klut.
- Skyv smulebrettet tilbake på plass til det klikker ordentlig.

Image: The toaster's convenient design showing the removable crumb tray being pulled out and the cord storage area on the bottom.
Oppbevaring av ledning
For neat storage, the power cord can be wrapped around the designated area on the underside of the toaster.
6. Feilsøking
- Brødristeren slår seg ikke på: Ensure the power cord is securely plugged into a working electrical outlet. Make sure the toast lever is fully pressed down.
- Uneven toasting: Ensure bread slices are centered in the slots. Try adjusting the browning level. Different types of bread may require different settings.
- Bread stuck in slots: Unplug the toaster immediately and allow it to cool. Gently remove the bread using non-metallic tongs. Never use metal utensils.
- Røyk fra brødristeren: Unplug the toaster immediately. Remove any food particles or crumbs that may be lodged inside the slots or on the heating elements. Ensure the crumb tray is clean.
7. Spesifikasjoner
| Merke | KEENSTAR |
| Modell | ST-265TC |
| Makt | 900 watt |
| Voltage | 120 volt (AC) |
| Antall skiver | 2 |
| Materiale | Rustfritt stål |
| Produktdimensjoner (D x B x H) | 10.39 cm x 7.1 cm x 6.1 cm |
| Sporbredde | 1.5 tommer |
| Spesielle funksjoner | Cancel Function, LED Indicator, Removable Crumb Tray, Touchscreen, Warming Rack |

Image: Diagram showing the dimensions of the KEENSTAR ST-265TC toaster: 9.4 inches (24cm) length, 6.1 inches (15.6cm) width, 7 inches (18cm) height, and 1.5 inch (3.8cm) wide slots.
8. Garanti og støtte
Garanti
This KEENSTAR toaster comes with a 2-year warranty. Please refer to the warranty card included in the product packaging for detailed terms and conditions.
Kundestøtte
For any questions, technical assistance, or warranty claims, please contact KEENSTAR customer support. Contact information can typically be found on the warranty card or the official KEENSTAR webnettstedet.