1. Introduksjon
The Waveshare RP2350 MCU Board is a high-performance microcontroller unit featuring a 1.28-inch capacitive touch display. This board integrates a Li-ion battery recharge manager and a 6-axis sensor (3-axis accelerometer and 3-axis gyroscope), making it suitable for various embedded applications. It is based on the Raspberry Pi RP2350 microcontroller chip, which utilizes a unique dual-core and dual-architecture design.
This manual provides essential information for setting up, operating, and maintaining your RP2350 MCU Board.
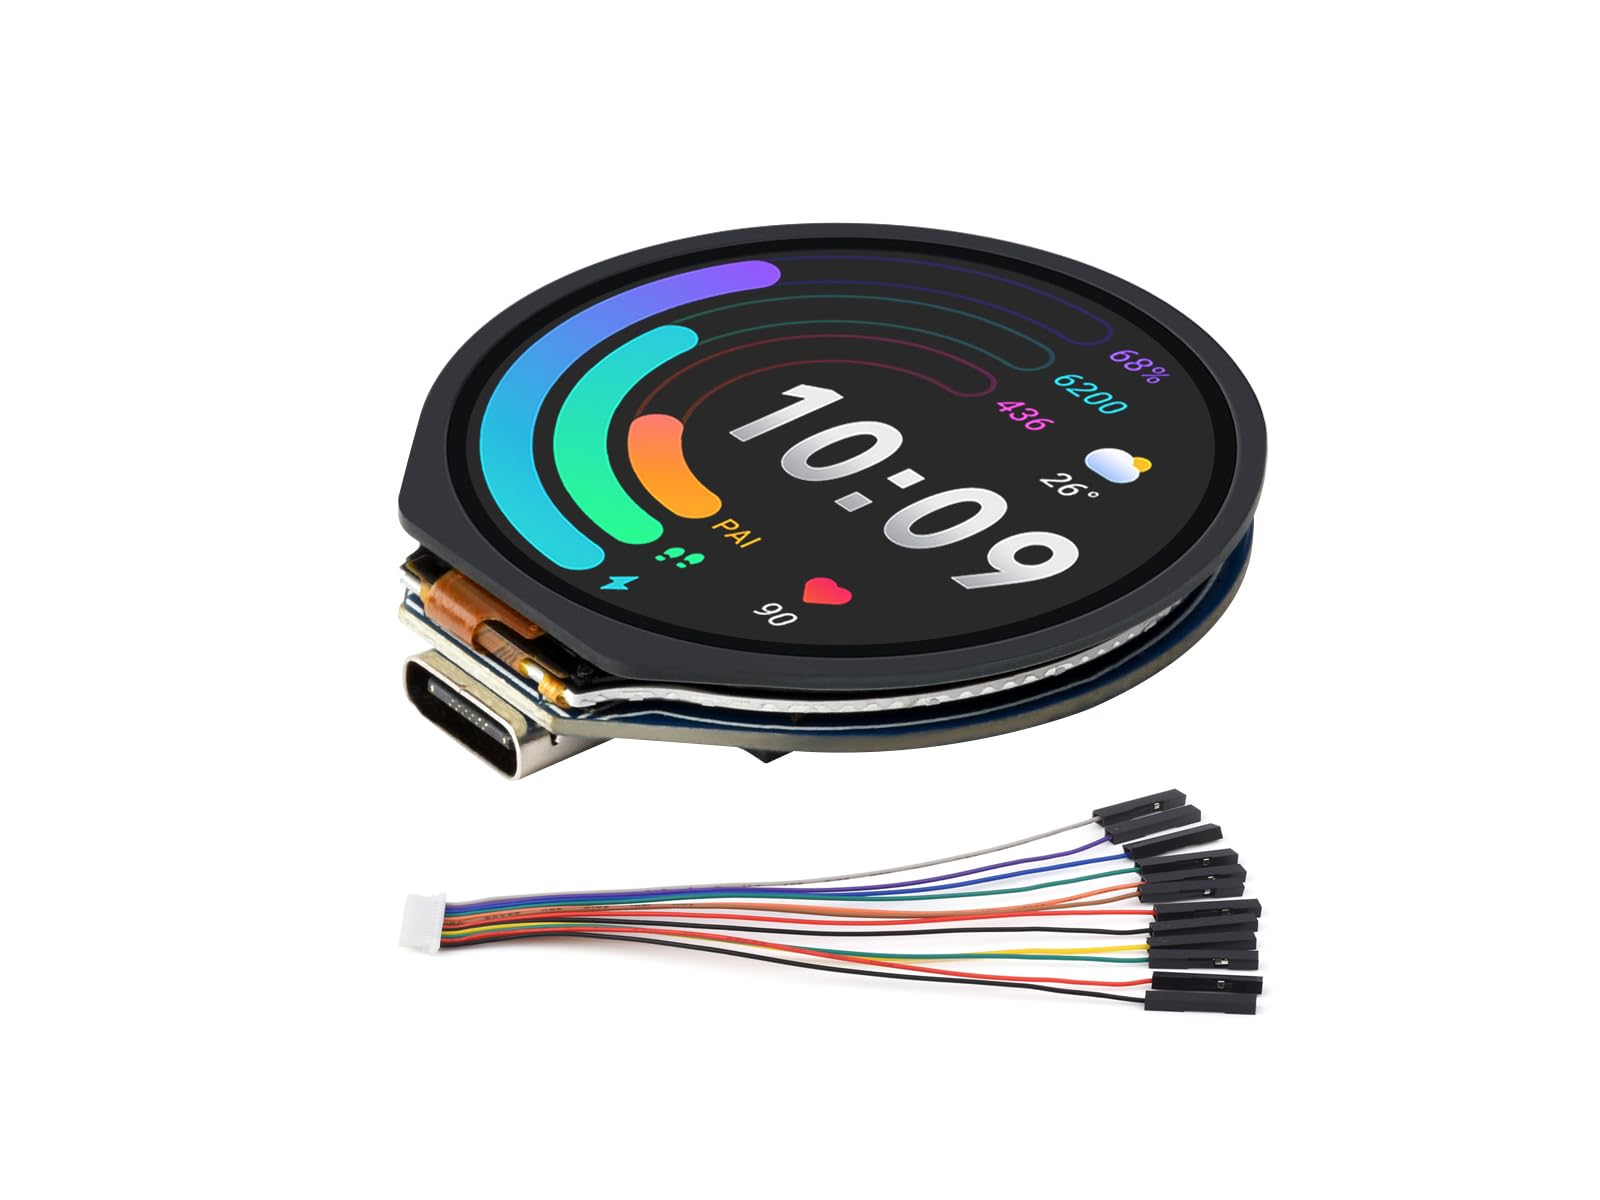
Image: The Waveshare RP2350 MCU Board, highlighting its 1.28-inch touch display, Type-C port, dual-core architecture, and 65K color support.
2. Nøkkelfunksjoner
- Mikrokontroller: Based on Raspberry Pi RP2350 chip with dual-core Arm Cortex-M33 and dual-core Hazard3 RISC-V processors, clock up to 150 MHz.
- Hukommelse: 520KB SRAM and 16MB onboard Flash memory.
- Utstilling: Integrated 1.28-inch capacitive touch LCD with 240×240 pixels and 65K color support.
- Tilkobling: Type-C USB 1.1 connector with device and host support.
- Strømstyring: Lithium battery recharge/discharge header for mobile applications.
- Sensorer: Onboard 6-axis sensor (3-axis accelerometer and 3-axis gyroscope).
- GPIO: 6 × GPIO pins available via SH1.0 connector.
- Programmering: Supports drag-and-drop programming via USB mass storage, C/C++, MicroPython, and Arduino.
- Ytterligere funksjoner: Low-power sleep and dormant modes, accurate clock and timer, temperature sensor.
3. Pakkens innhold
Bekreft at alle varene som er oppført nedenfor er inkludert i pakken din:
- RP2350-Touch-LCD-1.28 Board x1
- SH1.0 12PIN-kabel x1
4. Maskinvare overview
The following diagram illustrates the main components and interfaces of the RP2350 MCU Board.
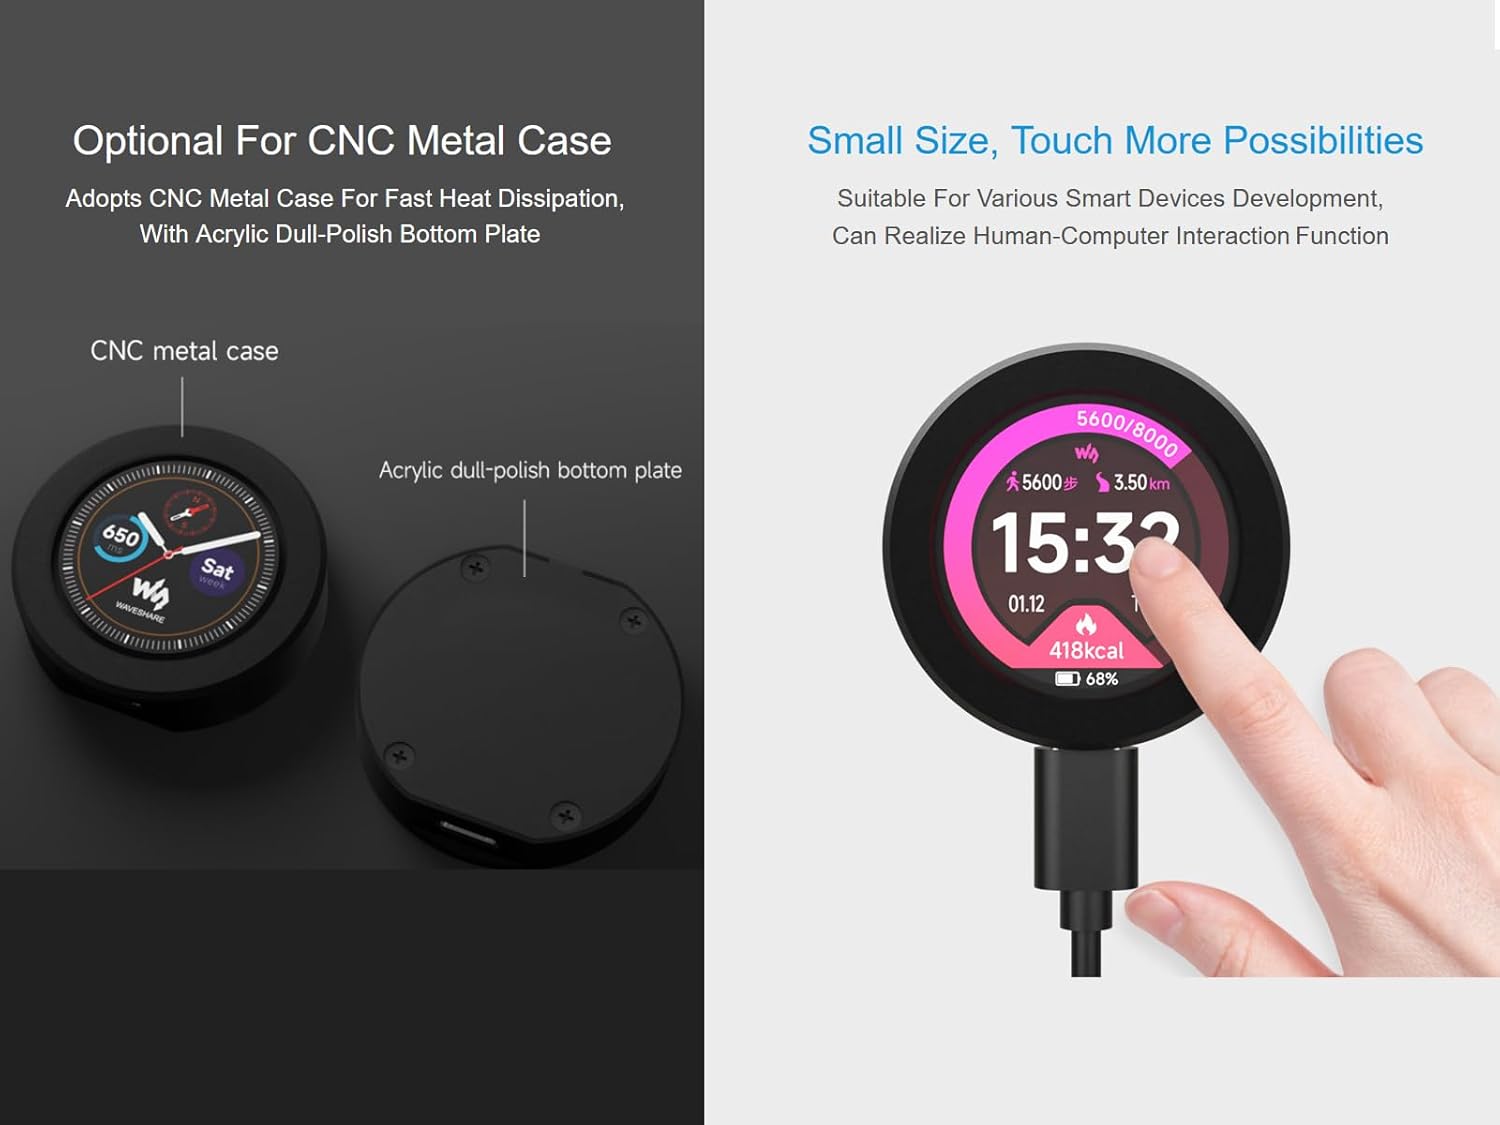
Image: RP2350 MCU Board with key components labeled for identification.
- USB Type-C connector: For program burning and USB 1.1 communication (device and host support).
- ETA6098: High-efficiency Lithium battery recharge manager.
- RT9193-33PB: 300mA low dropout, low noise, ultra-fast LDO.
- W25Q128JVSIQ: 16MB NOR-Flash memory.
- RP2350: Dual-core and dual-architecture design, up to 150 MHz operating frequency.
- QMI8658: 6-axis IMU (3-axis gyroscope and 3-axis accelerometer).
- BOOT button: Press when resetting to enter download mode.
- Nullstillknapp: Tilbakestiller brettet.
- MX1.25 2P battery header: For 3.7V Lithium battery, supports charging and discharging.
5. Pin-definisjon
Understanding the pinout is crucial for connecting peripherals and developing applications. The following diagram details the pin assignments for the RP2350 MCU Board.

Image: Pinout diagram for the RP2350 MCU Board, showing GPIO, power, and system control pins.
Key pin categories include:
- Makt: VBUS, 3V3, 3V3_EN, VSYS
- Bakke: GND
- GPIO, PIO and PWM: GPIO0-GPIO29 (specific pins are highlighted in the diagram)
- Systemkontroll: RUN, BOOT, RESET
6. Installasjonsinstruksjoner
6.1 Første tilkobling
- Connect the RP2350 MCU Board to your computer using a Type-C USB cable.
- Ensure the board powers on. The integrated display should illuminate.
- For initial programming, you may need to press and hold the STØVEL button while connecting the USB cable, then release it. This will put the board into USB mass storage mode, allowing you to drag-and-drop firmware files.
6.2 Driverinstallasjon
Typically, the RP2350 board will be recognized as a mass storage device or a serial port without requiring specific drivers on most modern operating systems (Windows, macOS, Linux). If issues arise, refer to the official Raspberry Pi Pico 2 documentation for driver information.
6.3 Powering the Board
- USB-strøm: The board can be powered directly via the Type-C USB port.
- Batteristrøm: Connect a 3.7V Lithium battery to the MX1.25 2P battery header. The onboard ETA6098 chip manages battery charging and discharging.
7. Bruksanvisning
7.1 Programming the Board
The RP2350 MCU Board supports multiple programming methods:
- Drag-and-Drop (UF2): When the board is in bootloader mode (hold BOOT, then connect USB), it appears as a USB mass storage device. You can drag and drop UF2 firmware files directly onto this drive to program the board.
- SDKs: Utilize the official C/C++ SDK, MicroPython, or Arduino IDE for more advanced development. Refer to the respective documentation for detailed instructions on setting up your development environment.
7.2 Bruk av berøringsskjermen
The 1.28-inch capacitive touch display allows for interactive applications. Your custom firmware will define the display's content and touch response. Example code and libraries are typically available in the Waveshare development resources to assist with display initialization and graphic rendering.

Image: The RP2350 MCU Board's 1.28-inch touch display showing a graphical user interface, demonstrating its interactive capabilities.
7.3 Bruk av innebygde sensorer
The integrated 6-axis IMU (accelerometer and gyroscope) can be accessed via I2C or SPI interfaces, depending on the specific sensor and library used. Consult the Waveshare documentation or sensor datasheet for programming examples to read sensor data.
8. Development Environment Support
The RP2350 MCU Board offers broad compatibility with popular development tools:

Bilde: Overview of supported development environments: Pico C/C++ SDK, MicroPython, and Arduino IDE.
8.1 Pico C/C++ SDK
The official Raspberry Pi C/C++ SDK can be used for bare-metal programming. It supports command-line compilation and integration with popular IDEs like Visual Studio Code and Eclipse.
8.2 MicroPython
MicroPython provides a Python 3 implementation optimized for embedded hardware. It allows for rapid development and prototyping on the RP2350 board.
8.3 Arduino IDE
The Arduino IDE offers a user-friendly environment for programming. With the appropriate board package installed, you can leverage Arduino's extensive libraries and community support.
9. Tekniske spesifikasjoner
| mikrokontrollere | Raspberry Pi RP2350 (Dual-core Arm Cortex-M33 & Dual-core Hazard3 RISC-V) |
| Klokkehastighet | Opp til 150 MHz |
| SRAM | 520 KB |
| Flash-minne | 16 MB (onboard) |
| Utstilling | 1.28-inch Capacitive Touch LCD, 240×240 pixels, 65K colors |
| USB-grensesnitt | Type-C, USB 1.1 (device and host support) |
| Sensorer | 6-axis IMU (3-axis accelerometer, 3-axis gyroscope) |
| batteristøtte | 3.7V Lithium battery (recharge/discharge manager onboard) |
| GPIO-pinner | 6 × GPIO via SH1.0 connector |
| Operativsystemstøtte | Linux (as per product data, likely referring to development host OS) |
| Tilkoblingsteknologi | USB |
| Kompatible enheter | USB devices (e.g., keyboards, mice, storage devices), Arduino, Raspberry Pi models, SH1.0 compatible devices |
10. Omrissdimensjoner
The physical dimensions of the RP2350 MCU Board are provided below for integration into projects and enclosures.

Image: Detailed outline dimensions of the RP2350 MCU Board, including measurements for the board itself and with an optional metal case (units in millimeters).
Alle dimensjoner er i millimeter (mm).
- Board Diameter: Omtrent 38.51 mm
- Skjermdiameter: Approximately 33.40 mm (VA area)
- Bretttykkelse: Approximately 7.48 mm (excluding connectors)
- With Metal Case: Diameter approximately 48.0 mm, Thickness approximately 9.5 mm
11. Feilsøking
If you encounter issues with your RP2350 MCU Board, consider the following troubleshooting steps:
- Kortet slår seg ikke på:
- Ensure the USB cable is securely connected to both the board and the power source/computer.
- Try a different USB cable or USB port.
- If using battery power, verify the battery is charged and correctly connected to the MX1.25 2P header.
- Brettet gjenkjennes ikke av datamaskinen:
- Try connecting the board while holding the STØVEL button to enter mass storage mode.
- Sørg for at USB-driverne til operativsystemet ditt er oppdaterte.
- Start datamaskinen på nytt.
- Skjermen fungerer ikke:
- Check for any visible damage to the display or its connector.
- Verify that your firmware includes the necessary display initialization code.
- Ensure sufficient power is supplied to the board.
- Programmeringsfeil:
- Double-check your code for syntax errors or logical flaws.
- Ensure the correct board and port are selected in your IDE (if applicable).
- Refer to the specific SDK or IDE documentation for common programming issues.
- Uventet oppførsel:
- Perform a hard reset using the TILBAKESTILL knapp.
- Re-flash a known working firmware to rule out software issues.
- Check for short circuits or incorrect wiring if external components are connected.
12. Vedlikehold
To ensure the longevity and optimal performance of your RP2350 MCU Board, follow these maintenance guidelines:
- Lagring: Oppbevar brettet på et tørt, antistatisk sted, unna direkte sollys og ekstreme temperaturer.
- Rengjøring: Use a soft, dry brush or compressed air to remove dust. For stubborn dirt, use a lint-free cloth lightly dampened with isopropyl alcohol. Ensure the board is powered off and completely dry before re-applying power.
- Håndtering: Håndter alltid brettet etter kantene for å unngå å berøre sensitive komponenter. Bruk antistatiske forholdsregler når du arbeider med brettet.
- Fastvareoppdateringer: Regularly check the Waveshare official website or relevant community forums for firmware updates and bug fixes to ensure your board runs with the latest improvements.
13. Technical Support and Resources
For further assistance, development resources, and technical support, please refer to the official Waveshare documentation and support channels. Online development resources and tutorials are available to help you get started and resolve any issues.
You can typically find detailed guides, example code, and community forums on the Waveshare official webnettstedet.