Flylinktech BD10
FLYLINKTECH 5000A Jump Starter User Manual
Model: BD10 | Brand: Flylinktech
1. Introduksjon
Thank you for choosing the FLYLINKTECH 5000A Jump Starter. This portable device is designed to provide instant power to jump-start 12V vehicles, charge electronic devices, and offer emergency lighting. Please read this manual thoroughly before use to ensure safe and optimal performance.
2. Viktig sikkerhetsinformasjon
- Always ensure the jump starter is fully charged before use.
- Ikke forsøk å starte et frossent batteri med startkabler.
- Koble til clamps correctly: red to positive (+), black to negative (-). Reverse polarity can cause damage.
- Ikke koble den røde og svarte clamps sammen.
- Oppbevares utilgjengelig for barn.
- Brukes i et godt ventilert område.
- Unngå å utsette enheten for ekstreme temperaturer eller direkte sollys i lengre perioder.
- Hvis enheten blir for varm under bruk, må du koble den fra umiddelbart.
- Se bilens brukerhåndbok for spesifikke startprosedyrer.
3. Pakkens innhold
Bekreft at alle varene er til stede i pakken din:
- FLYLINKTECH 5000A Jump Starter (Model BD10)
- Smarte startkabler
- USB-C ladekabel
- EVA oppbevaringsetui
- Brukerhåndbok

Image: Contents of the FLYLINKTECH 5000A Jump Starter package, including the jump starter unit, smart jumper cables, USB-C charging cable, and EVA storage case.
4. Produktet er overview
Familiarize yourself with the components and ports of your jump starter:
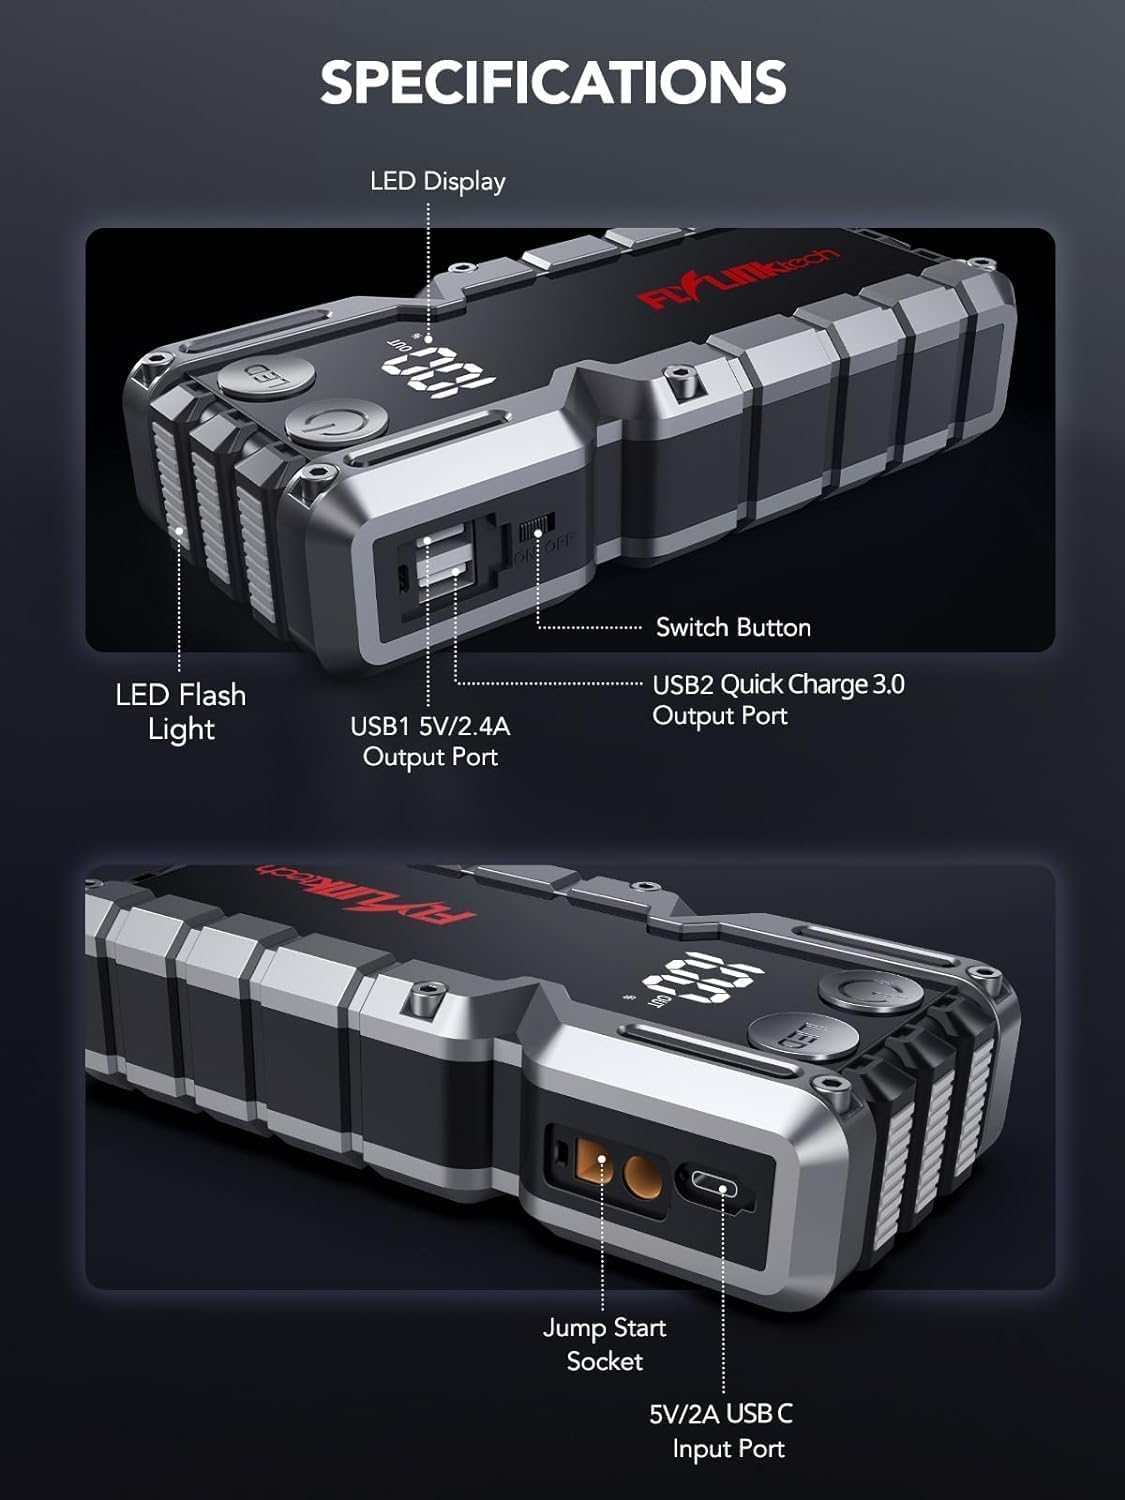
Bilde: Detaljert view of the jump starter showing the LED display, LED flashlight, power button, switch button, USB1 5V/2.4A output port, USB2 Quick Charge 3.0 output port, Jump Start Socket, and 5V/2A USB-C input port.
- LED display: Viser batteriprosenttage.
- LED lommelykt: Gir belysning med flere moduser.
- Strømknapp: Aktiverer enheten og styrer lommelyktmoduser.
- Bytteknapp: Hovedstrømkontroll.
- USB1-utgang (5V/2.4A): Standard USB-ladeport.
- USB2 Output (QC3.0): Quick Charge 3.0 port for faster charging.
- Jump Start Socket: Kobles til de smarte jumperkablene.
- USB-C-inngang (5V/2A): Used to recharge the jump starter.
5. Lading av starthjelpen
Lad opp starthjelpen helt før første gangs bruk. Det anbefales å lade enheten hver 3.–6. måned for å opprettholde batteristatus.
- Koble den medfølgende USB-C-ladekabelen til USB-C-inngangsporten på jumpstarteren.
- Connect the other end of the USB-C cable to a 5V/2A USB wall adapter (not included) or a car charger.
- LED-displayet viser ladeprosessen. Enheten er fulladet når displayet viser 100 %.

Image: The jump starter connected via USB to charge a smartphone and a tablet, demonstrating its power bank functionality.
6. Jump Starting Your Vehicle
Follow these steps carefully to safely jump-start your 12V vehicle:
- Klargjør starthjelpen: Ensure the jump starter is at least 50% charged. Turn off your vehicle's ignition and all accessories (headlights, radio, etc.).
- Koble til smarte jumperkabler: Insert the blue plug of the smart jumper cables into the Jump Start Socket on the jump starter. Ensure a firm connection. The indicator light on the smart clamp will flash red and green.
- Koble til bilbatteri:
- Fest rød (+) clamp til den positive polen på kjøretøyets batteri.
- Fest svart (-) clamp til den negative polen på kjøretøyets batteri.
Once connected correctly, the indicator light on the smart clamp vil bli fast grønt.
- Start kjøretøyet: Go into your vehicle and start the engine. If the vehicle does not start immediately, wait 30 seconds and try again. If it still doesn't start, press the "BOOST" button on the smart clamp for 3 seconds until the green light turns solid, then try starting the car again within 30 seconds.
- Fjern kablene: Once the engine starts, immediately remove the smart jumper cables from the vehicle battery, then disconnect them from the jump starter.

Image: Visual guide for jump-starting: 1. Insert jump clamp into booster. 2. Connect clamps to car battery. 3. Start your car. 4. Remove clamps.

Image: The smart clamps connected to the jump starter, illustrating the 10-layer safety protections including short circuit, reverse charge, over charge, reverse polarity, over discharge, over current, reverse connection, and high temperature protection.
7. Bruk som powerbank
The jump starter can also be used to charge your electronic devices.
- Connect your device's USB charging cable to either the USB1 (5V/2.4A) or USB2 (QC3.0) output port on the jump starter.
- Hjelpestarteren vil automatisk begynne å lade enheten din.
- The LED display will show the remaining battery capacity of the jump starter.

Image: The jump starter functioning as a portable power bank, with two USB output ports (5V/2.4A and Quick Charge 3.0) actively charging a smartphone and a tablet.
8. Bruk av LED-lommelykten
The built-in 600-lumen LED flashlight has three modes for various situations:
- Slik slår du på/av: Press and hold the LED button for 3 seconds.
- For å veksle mellom moduser: Once the light is on, short press the LED button to switch between:
- Konstant på: For generell belysning.
- SOS-modus: Flashes the international SOS signal for emergencies.
- Strobemodus: Rapid flashing for warning or signaling.

Image: The jump starter with its LED flashlight active, illustrating the three available modes: standard flashlight, SOS signal, and strobe light for emergencies.
9. Vedlikehold
- Rengjøring: Wipe the unit with a soft, dry cloth. Do not use harsh chemicals or abrasive materials.
- Lagring: Store the jump starter in its EVA case in a cool, dry place away from direct sunlight. Ensure it is charged to at least 50% before storing for extended periods. Recharge every 3-6 months.
- Batteripleie: The internal lithium-ion battery is designed for long life. Avoid fully discharging the unit frequently.

Water-resistant design.

Rugged ABS shell for drop resistance.

Operates in extreme temperatures (-4°F to 140°F).
10. Feilsøking
| Problem | Mulig årsak | Løsning |
|---|---|---|
| Vehicle won't start after connecting. | Jump starter battery too low; incorrect clamp connection; vehicle battery completely dead. | Sørg for at starthjelpen er fulladet. Sjekk spenningenamp connections (red to +, black to -). Press the "BOOST" button on the smart clamp for 3 seconds and try again. |
| Smart klamp indicator light is red/flashing. | Omvendt polaritet; kortslutning; overtemperatur. | Koble fra clamps and re-connect correctly. Check for any short circuits. Allow unit to cool down if overheated. |
| Starthjelpen lader ikke. | Faulty charging cable or adapter; loose connection. | Ensure USB-C cable and adapter are working and connected securely. Try a different cable or adapter. |
| LED flashlight not working. | Not activated correctly; low battery. | Press and hold the LED button for 3 seconds to activate. Ensure the jump starter has sufficient charge. |
11. Spesifikasjoner
| Trekk | Detalj |
|---|---|
| Toppstrøm | 5000A |
| Batterikapasitet | 18000mAh (66.6Wh) |
| Start Voltage | 12V |
| Motorkompatibilitet | Opptil 9.0 l bensin / 8.0 l diesel |
| USB-utgang 1 | 5V/2.4A |
| USB-utgang 2 | QC3.0 |
| USB-C-inngang | 5V/2A |
| LED lommelykt | 600-Lumen (Constant, SOS, Strobe) |
| Driftstemperatur | -4 °F til 140 °F (-20 °C til 60 °C) |
| Dimensjoner | 4.2 x 9 x 19 cm |
| Vekt | 540 g (1.19 lbs) |
| Sikkerhetsbeskyttelse | 10-Layer (Short Circuit, Reverse Polarity, Over-Current, etc.) |
12. Garanti og støtte
The FLYLINKTECH 5000A Jump Starter comes with an industry-leading 3 års garanti fra kjøpsdatoen. Denne garantien dekker produksjonsfeil og sikrer pålitelig ytelse.
For technical support, warranty claims, or any questions regarding your product, please contact FLYLINKTECH customer service through the retailer's platform or visit our official webnettstedet.
Vennligst ta vare på kjøpsbeviset for garantivalidering.
Ask a question about this manual
Ask about setup, troubleshooting, compatibility, parts, safety, or missing instructions. Manuals+ will review the question and use this page’s manual context to help answer it.