1. Introduksjon
The OWON HDS241 is a versatile 3-in-1 handheld device that integrates a single-channel oscilloscope, a 24,000-count digital multimeter, and a 100KHz signal generator. Designed for portability and efficiency, it is suitable for various electrical testing and measurement applications. This manual provides detailed instructions for safe and effective use of your device.
Sikkerhetsregler: Always observe general safety rules when operating electrical equipment. Ensure proper connections and use appropriate probes for the measurement task. Do not exceed the maximum input ratings of the device.
2. Produktet er overview
The HDS241 combines three essential functions into one compact unit:
- Oscilloskop: Features a 40 MHz bandwidth, 250 MSa/s real-time sampling rate, and a waveform refresh rate of up to 10,000 wfms/s. It supports auto-setup, multiple measurement functions, cursor measurement, and a slow sweep mode for long-term signal monitoring.
- Digitalt multimeter: A 4½-digit True RMS multimeter with 24,000 counts. It can measure AC/DC voltage, AC/DC current, resistance, diode, capacitance, and perform continuity tests. Maximum input voltage is AC 750V and DC 1000V.
- Signalgenerator: A single-channel generator with a frequency range of up to 100 kHz. It supports sine, square, ramp, and pulse waveform outputs with a maximum amplitude of 2.5 Vpp.
The device features a 3.5-inch high-definition color LCD screen for clear display of waveforms and measurement data. Its robust design includes a rubber coating for durability and improved grip.

Figur 2.1: The OWON HDS241 device, showcasing its 3-in-1 functionality as an oscilloscope, multimeter, and signal generator. Key specifications for each mode are listed alongside the device.

Figur 2.2: A comprehensive diagram illustrating the various buttons, ports, and display areas of the OWON HDS241, including the viewing area, multi-function keys, channel key, mode change key, system configuration, save button, power button, multimeter input port, horizontal adjustment, measurement range switch, arrow keys, auto range key, hold/run key, signal input connector, probe compensation output, and USB charge/communication interface.
3. Oppsett
3.1 Batteriinstallasjon og lading
The HDS241 is powered by a high-capacity 2000 mAh lithium battery. The device features a low-power consumption design for extended operation.
- Lader: Connect the device to a power source using the standard USB Type-C port. You can use a compatible adapter or a power bank.
- Batterilevetid: The battery provides long-lasting performance. Actual usage time may vary based on operating conditions.

Figur 3.1: This image shows the internal battery compartment of the OWON HDS241, revealing two 18650 lithium batteries, and highlights the USB Type-C port for charging and PC connection.
3.2 Tilkobling av prober
For oscilloscope measurements, connect the probe to the BNC connector. For multimeter functions, use the provided test leads with the multimeter input ports.
- BNC-kontakt: The BNC connector features an external rubber coating to enhance safety and prevent external interference. It supports high-voltage probes for accurate and reliable signal capture.
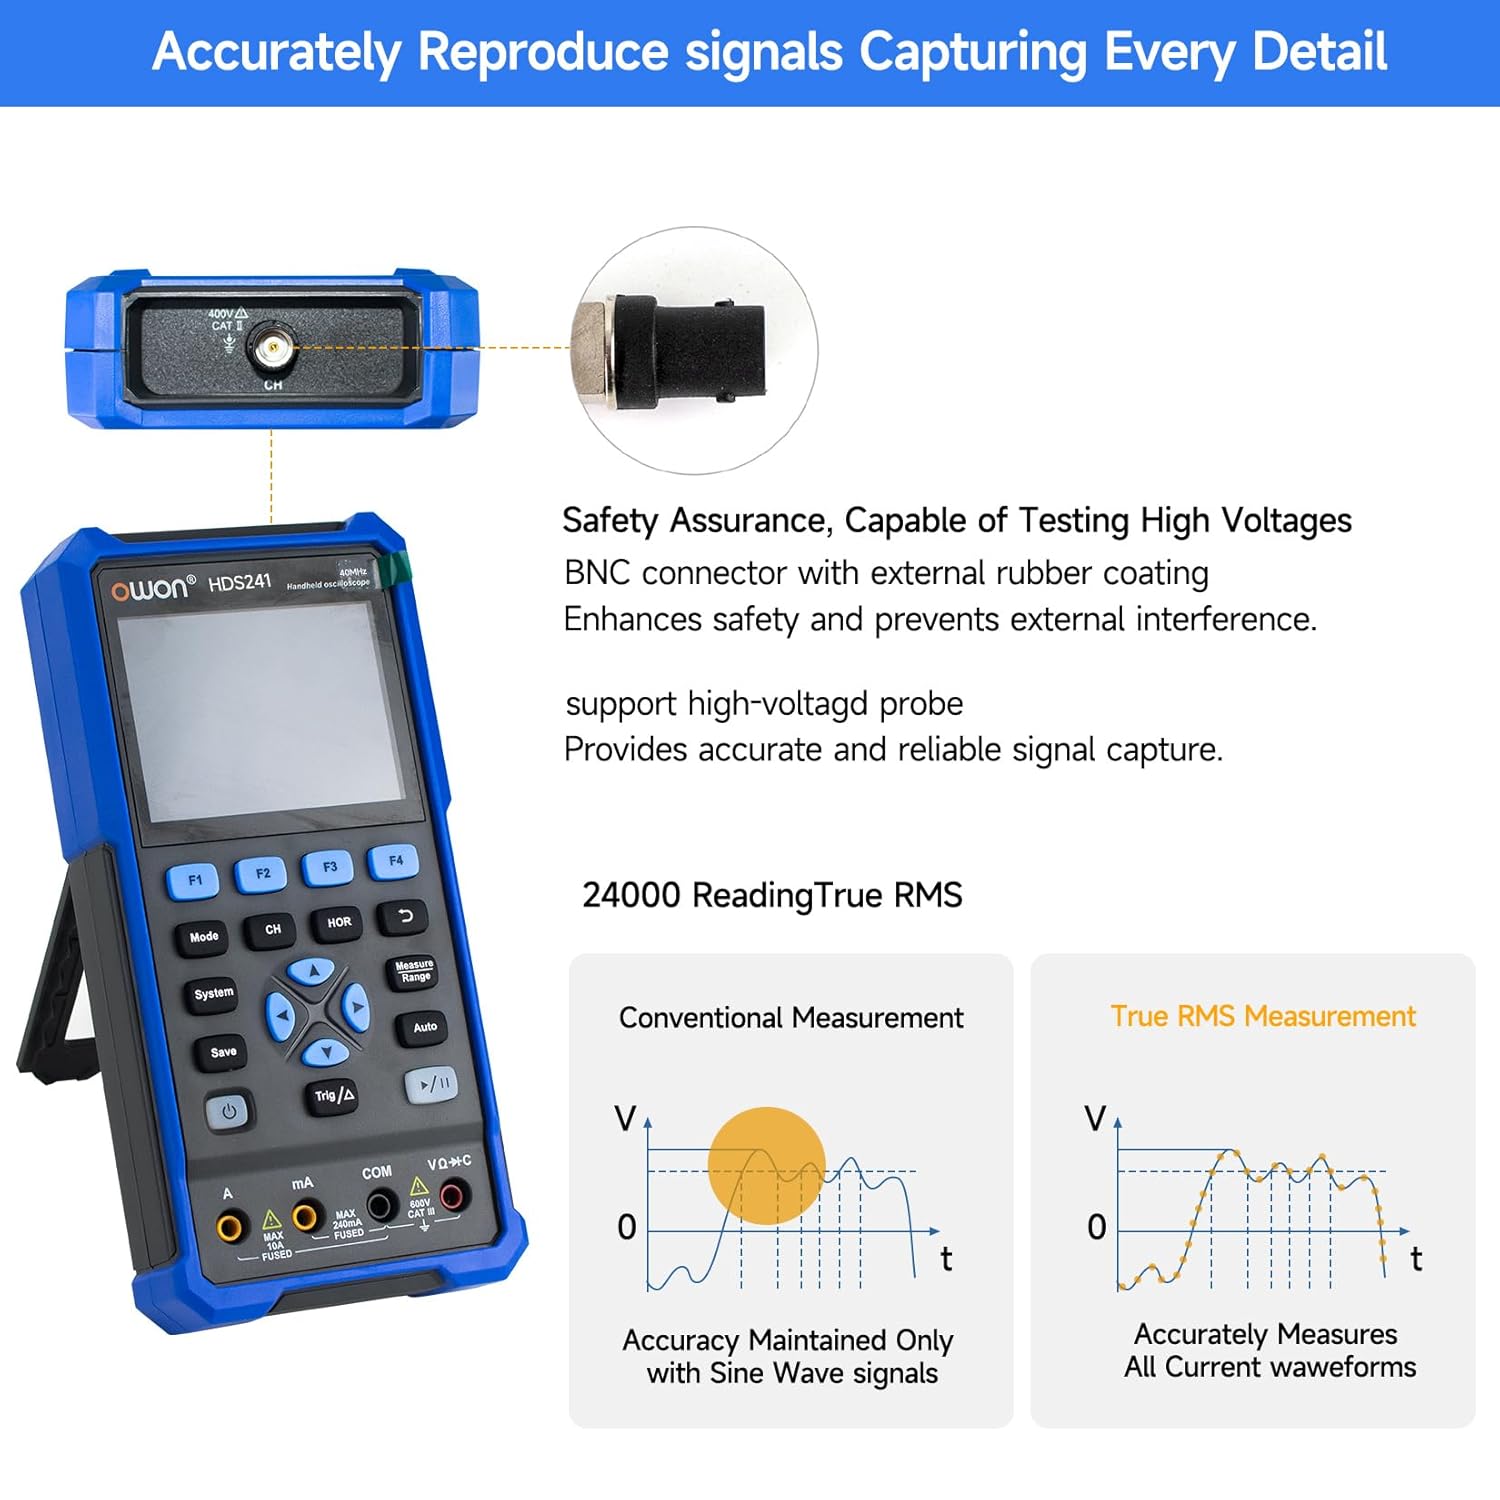
Figur 3.2: This image highlights the BNC connector with external rubber coating for safety and interference prevention. It also illustrates the difference between conventional measurement (accurate only for sine waves) and True RMS measurement (accurately measures all current waveforms).
3.3 Slå på/av
Press and hold the power button (refer to Figure 2.2 for location) to turn the device on or off.
4. Bruksanvisning
4.1 Oscilloskopmodus
To enter Oscilloscope mode, press the 'Mode' button until the oscilloscope interface is displayed.
- Basic Waveform Display: Connect the probe to the signal source. The waveform will be displayed on the screen.
- Auto-Setup: Press the 'Auto' button for automatic adjustment of vertical, horizontal, and trigger settings to quickly display a stable waveform.
- Målefunksjoner: The HDS241 offers various measurement capabilities:
- Automatiske målinger: Includes Period, Frequency, Mean, PK-PK, Max, Min, Amplitude, and RMS.
- Markørmåling: Use the cursor function to measure voltage difference (ΔV) and time difference (ΔT) between two points on the waveform.
- Lagre data: Connect the device to a computer via the USB Type-C port. The included PC software allows you to save waveform images and data for further analysis.

Figur 4.1: This image details the oscilloscope's advanced features, including Dual Sampling Mode for interference detection, High Refresh Rate (10,000 wfms/s) and Deep Storage (8K record length), 8 Types of AutoMeasurements (Frequency, Period, Amplitude, Max, Min, Mean, PK-PK, RMS), and Cursor Measurement for ΔV and ΔT. It also shows the Save Function for reference waveforms.

Figur 4.2: This image displays four examples of waveforms captured by the OWON HDS241: a Mains Waveform with peak highlighted, a TV Signal Wave, a PLC Pulse Wave, and a Multi-Audio Frequency Response Signal, demonstrating its versatility in signal analysis.
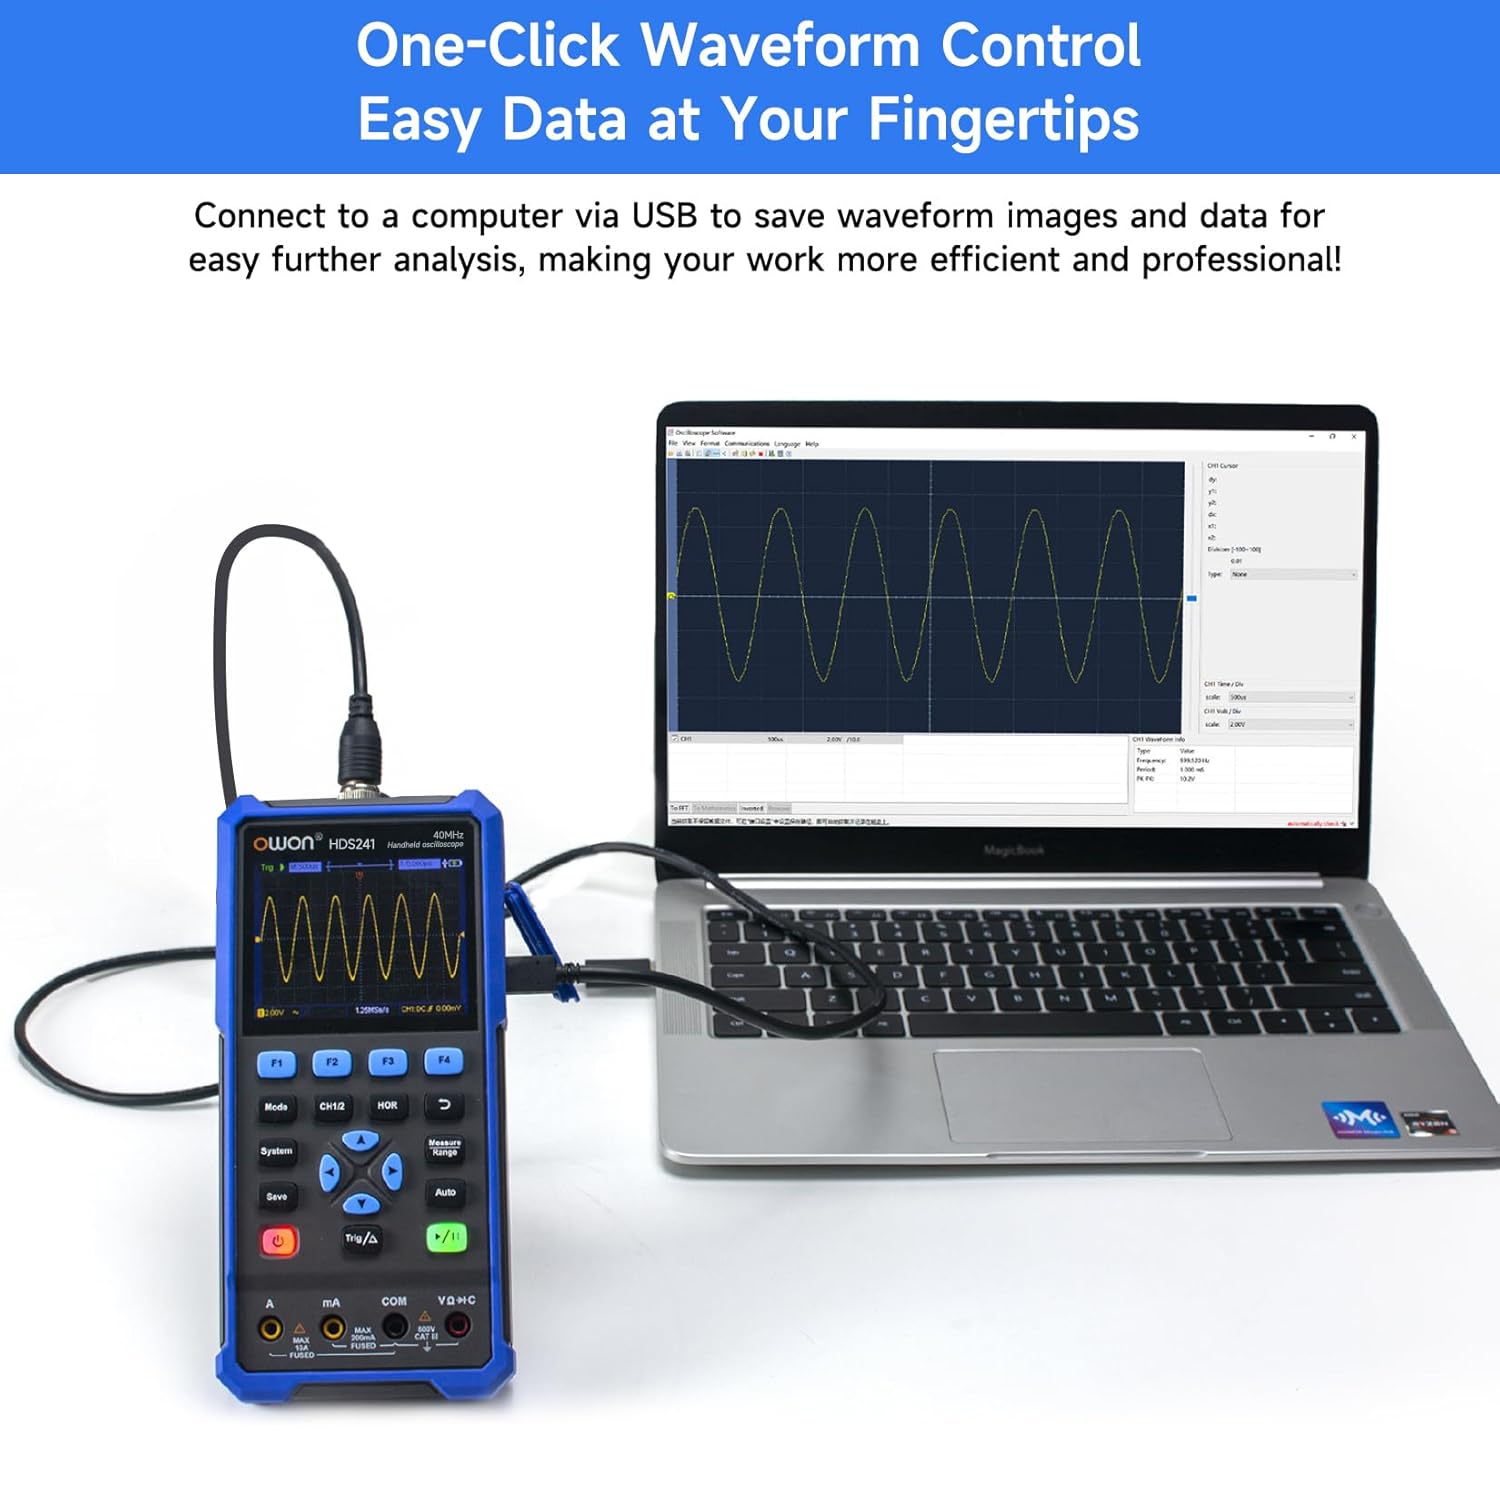
Figur 4.3: The OWON HDS241 is shown connected to a laptop via a USB cable, demonstrating its capability to save waveform images and data for further analysis on a computer.
4.2 Multimetermodus
To enter Multimeter mode, press the 'Mode' button until the multimeter interface is displayed.
- Mål: The multimeter supports measuring AC/DC voltage, AC/DC current, resistance, diode, capacitance, and continuity. Select the desired measurement function using the appropriate buttons.
- Ekte RMS: The HDS241 features True RMS measurement, which is essential for accurately measuring non-sinusoidal AC waveforms.
- Automatisk rekkevidde: The device automatically selects the appropriate measurement range for convenience.

Figur 4.4: The OWON HDS241 is depicted in an outdoor setting, connected to a car battery with multimeter probes, illustrating its practical application for electrical measurements.
4.3 Signalgeneratormodus
To enter Signal Generator mode, press the 'Mode' button until the signal generator interface is displayed.
- Valg av bølgeform: Choose from sine, square, ramp, or pulse waveforms.
- Frekvens og Amplitude: Adjust the output frequency (up to 100 kHz) and amplitude (up to 2.5 Vpp) as required for your testing needs.
5. Vedlikehold
- Rengjøring: Bruk en myk, tørr klut til å rengjøre enheten. Ikke bruk slipende rengjøringsmidler eller løsemidler.
- Batteripleie: For å forlenge batterilevetiden, unngå å utlade batteriet helt ofte. Lad enheten regelmessig, spesielt hvis den skal lagres over lengre tid.
- Lagring: Oppbevar enheten på et kjølig og tørt sted, unna direkte sollys og ekstreme temperaturer.
6. Feilsøking
If you encounter issues with your OWON HDS241, consider the following basic troubleshooting steps:
- Enheten slås ikke på: Ensure the battery is charged. Connect the device to a power source using the USB Type-C cable and try again.
- No waveform displayed: Check that the probe is correctly connected to both the device and the signal source. Verify the signal source is active. Try using the 'Auto' button to adjust settings.
- Feil multimeteravlesninger: Ensure the test leads are properly inserted into the correct input jacks for the measurement type (e.g., voltage, current, resistance). Check the integrity of the test leads.
- Ustabile avlesninger: Ensure connections are secure and there is no external interference.
For further assistance, please contact OWON customer support.
7. Spesifikasjoner

Figur 7.1: This image presents a detailed table of technical specifications for the OWON HDS241, covering its oscilloscope, digital multimeter, and waveform generator functions.
7.1 Spesifikasjoner for oscilloskop
| Trekk | Spesifikasjon |
|---|---|
| Båndbredde | 40 MHz |
| Kanal | 1 |
| Sampling Frekvens | 250 MSa/s |
| Acquisition Model | Sample, Peak detection |
| Rekordlengde | Max. 8K |
| Utstilling | 3.5 tommers LCD |
| Oppdateringsfrekvens for bølgeform | 10,000 XNUMX wfms/s |
| Inngangskobling | DC, AC, Ground |
| Inngangsimpedans | 1 MΩ±2%, in parallel with 16 pF±10 pF |
| Sondedemping | 1x, 10x, 100x, 1000x |
| Maks. Inngang Voltage | 400V (DC+AC, PK-PK) |
| Sensitivity Resolution | 10mV/div-10V/div |
| Vertikal oppløsning | 8 bit |
| Horisontal skala | 5ns/div-1000s/div, Step 1-2-5 |
| Trigger Type | Kant |
| Utløsermodus | Auto, Normal, Single |
| Automatisk måling | Period, Frequency, Mean, PK-PK, Max, Min, Amplitude, RMS |
| Markørmåling | ΔV, ΔT |
7.2 Digital Multimeter Specifications
| Trekk | Spesifikasjon |
|---|---|
| Full Scale Reading | 4½ digits (max. 24000 counts) |
| Testmoduser | Voltage, current, resistance, capacitance, diode, continuity |
| Max Input Voltage | AC 750V, DC 1000V |
| Maks inngangsstrøm | AC 10A, DC 10A |
| Auto rekkevidde | Ja |
| Ekte RMS | Ja |
7.3 Waveform Generator Specifications
| Bølgeform type | Utgangsfrekvens |
|---|---|
| Sinus | 10Hz-100KHz |
| Kvadrat | 10Hz-100KHz |
| Ramp | 10Hz-100KHz |
| Puls | 10Hz-10KHz |
| Amplitude | 2Vpp-2.5Vpp |
7.4 Generelle spesifikasjoner
- Dimensjoner: 9.6 x 3.8 x 19.8 cm
- Vekt: 1.2 kg
- Batteri: 2000 mAh litiumbatteri
- Ladegrensesnitt: USB Type-C
8. Garanti og støtte
For warranty information, technical support, or service inquiries, please refer to the warranty card included with your product or contact OWON customer service directly. Keep your purchase receipt as proof of purchase.