1. Introduksjon
This user manual provides comprehensive instructions for the ASRock B860M-X Micro ATX motherboard. It covers installation, configuration, operation, and troubleshooting to ensure optimal performance and longevity of your system. The ASRock B860M-X is designed to support Intel Core Ultra processors with an LGA1851 socket, offering advanced features for a powerful computing experience.
2. Sikkerhetsinformasjon
Følg alltid følgende sikkerhetsregler under installasjon og drift:
- Trekk ut strømledningen fra stikkontakten før du berører noen komponenter.
- Bruk en antistatisk håndleddsstropp for å forhindre skade på komponenter som følge av elektrostatisk utladning (ESD).
- Håndter komponentene i kantene for å unngå å berøre sensitive deler.
- Sørg for tilstrekkelig ventilasjon i PC-kabinettet for å forhindre overoppheting.
- Ikke utsett hovedkortet for fuktighet eller ekstreme temperaturer.
3. Pakkens innhold
Kontroller at alle elementene er tilstede i hovedkortpakken din:
- ASRock B860M-X Micro ATX Motherboard
- Hurtiginstallasjonsveiledning
- Merknad om forskrifter
- SATA-datakabler
- I / O-skjold
- M.2-skruer/avstandsstykker

Image: ASRock B860M-X Motherboard and included accessories.
4. Hovedkortoppsett
Familiarize yourself with the key components and connectors on your ASRock B860M-X motherboard.

Bilde: Ovenfra og ned view of the ASRock B860M-X Micro ATX Motherboard, highlighting the CPU socket, RAM slots, and various connectors.
Bakre I/O-panel
The rear I/O panel provides various ports for connecting peripherals.
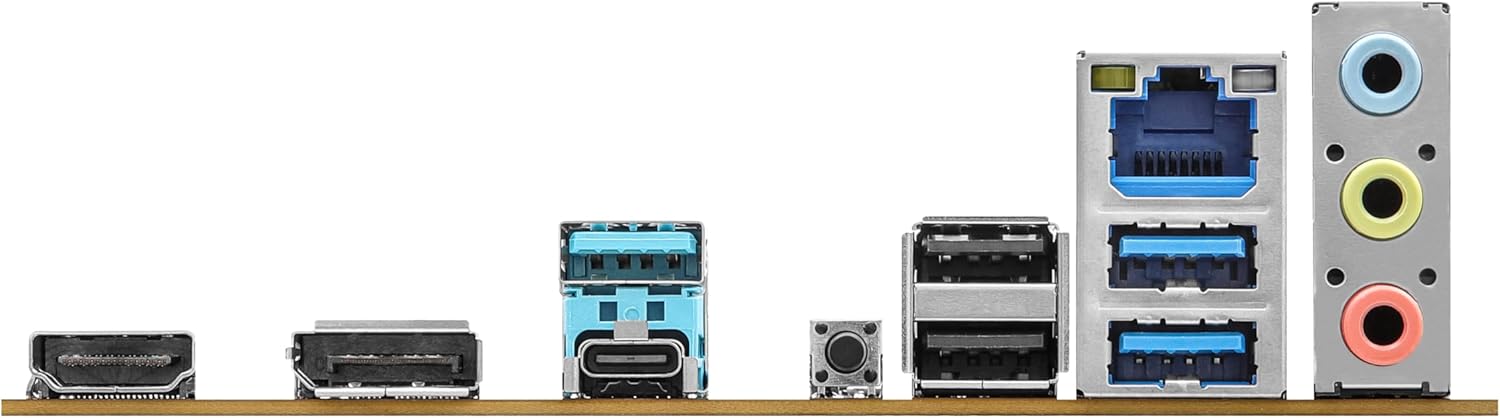
Image: Close-up of the rear I/O panel, showing USB ports, HDMI, DisplayPort, Ethernet, and audio jacks.
5. Oppsett og installasjon
Følg disse trinnene for riktig installasjon av hovedkortet og komponentene.
5.1 CPU-installasjon (LGA1851)
- Åpne spaken på CPU-sokkelen.
- Carefully align the CPU with the socket, ensuring the notches match.
- Plasser CPU-en forsiktig i sokkelen uten å tvinge den.
- Lukk sokkelspaken for å feste CPU-en.
5.2 Installasjon av minne (RAM)
The ASRock B860M-X supports 2 x DDR5 DIMMs for dual-channel memory up to 9066+ MHz (OC).
- Åpne klipsene i begge ender av DIMM-sporet.
- Align the memory module with the slot, ensuring the notch on the module matches the slot key.
- Trykk godt ned på begge ender av minnemodulen til klipsene klikker på plass.
5.3 Lagringsinstallasjon (M.2 og SATA)
The motherboard supports M.2 drives and up to 4 SATA3 6.0 Gb/s devices.
- M.2 SSD: Locate the M.2 slot(s). Insert the M.2 SSD into the slot at an angle and secure it with the provided screw/standoff.
- SATA-disker: Connect SATA data cables from your storage devices (HDDs/SSDs) to the SATA3 ports on the motherboard. Connect power cables from your power supply to the SATA devices.
5.4 Installasjon av utvidelseskort (PCIe)
The motherboard features PCIe slots for graphics cards and other expansion cards.
- Align your graphics card or other PCIe card with the appropriate slot.
- Press down firmly until the card is seated correctly and the retention clip locks.
- Fest kortet til PC-kabinettet med en skrue.
5.5 Strømforsyningstilkoblinger
Koble 24-pinners ATX-strømkontakten og 8-pinners CPU-strømkontakten fra strømforsyningen til de tilsvarende portene på hovedkortet.
5.6 Frontpaneltilkoblinger
Connect the front panel cables (power button, reset button, USB ports, audio jacks, etc.) to their respective headers on the motherboard. Refer to the motherboard diagram for exact locations.
6. Bruksanvisning
6.1 Første oppstart
After assembling your system, connect your monitor, keyboard, and mouse. Power on your system. The system should display the ASRock logo and enter the BIOS setup or begin the operating system installation process.
6.2 BIOS/UEFI-oppsett
For å åpne BIOS-oppsettverktøyet, trykk på Slett or F2 key during the Power-On Self-Test (POST) screen. Here you can configure various system settings, including boot order, CPU settings, memory timings, and fan speeds.
6.3 Driverinstallasjon
After installing your operating system, install the necessary drivers for your motherboard components (chipset, audio, LAN, graphics, etc.) from the ASRock website or the included driver CD/USB drive.
7. Vedlikehold
7.1 BIOS-oppdatering
Keeping your BIOS updated ensures compatibility with new hardware and improves system stability. ASRock provides two methods for BIOS updates: USB BIOS Flashback and Instant Flash.
Video: ASRock Motherboard BIOS Update Tutorial. This video demonstrates two methods for updating your ASRock motherboard's BIOS: USB BIOS Flashback and Instant Flash.
7.2 Rengjøring
Rengjør PC-kabinettet og hovedkortet regelmessig for å forhindre støvoppbygging, som kan føre til overoppheting og komponentfeil. Bruk trykkluft til å fjerne støv fra vifter, kjøleribber og andre komponenter. Sørg for at systemet er slått av og koblet fra strømnettet før rengjøring.
8. Feilsøking
If you encounter issues, refer to these common troubleshooting tips:
- Ingen strøm: Check all power connections (24-pin ATX, 8-pin CPU, GPU, SATA). Ensure the power supply switch is on.
- Ingen visning: Verify monitor connection and input source. Reseat the graphics card and memory modules.
- Systemustabilitet: Check memory compatibility and seating. Ensure CPU cooler is properly installed. Update BIOS and drivers.
- Oppstartsproblemer: Check boot order in BIOS. Verify storage device connections.
9. Spesifikasjoner
Key technical specifications for the ASRock B860M-X Micro ATX Motherboard:
| Trekk | Spesifikasjon |
|---|---|
| Merke | ASRock |
| Modellnavn | B860M-X |
| CPU-sokkel | LGA 1851 |
| Kompatible prosessorer | Intel Core Ultra |
| Brikkesetttype | Intel B860 |
| RAM-minneteknologi | DDR5 |
| Minne klokkehastighet | 9066 MHz (OC) |
| Maksimal minnelagringskapasitet | 128 GB |
| Minnespor tilgjengelig | 2 |
| Total SATA Ports | 4 |
| Total PCIe Ports | 3 |
| Grafikkutdataalternativer | 1 HDMI, 1 DisplayPort |
| Antall Ethernet-porter | 1 |
| Lydkodek | Realtek ALC1220 7.1 CH HD Audio Codec |
| Power Phase Design | 7+1+1+1+1 |
| RGB belysning | Polychrome RGB |
Video: Overview of Intel B860 Series Motherboards. This video highlights key features and design aspects of the ASRock B860 motherboard series.
10. Garanti og støtte
ASRock provides a 3-year warranty for this product. For technical support, driver downloads, and further information, please visit the official ASRock website. You can also find additional support resources and FAQs there.
For warranty claims or service, please contact your retailer or authorized ASRock service center with your proof of purchase.