1. Introduksjon
This manual provides essential information for the safe and effective operation of your ION Audio Retro Glow Boombox. This device combines classic audio playback with modern connectivity, featuring an AM/FM radio, cassette player/recorder, Bluetooth 5.3, USB, and SD card playback capabilities. Please read this manual thoroughly before use and retain it for future reference.
2. Sikkerhetsinformasjon
- Ikke utsett enheten for vann eller fuktighet.
- Unngå å plassere enheten i nærheten av varmekilder eller i direkte sollys.
- Sørg for tilstrekkelig ventilasjon; ikke blokker noen ventilasjonsåpninger.
- Bruk kun tilbehør/tilbehør spesifisert av produsenten.
- Koble fra enheten under tordenvær eller når den ikke skal brukes i lengre perioder.
- Overlat all service til kvalifisert servicepersonell.
3. Hva er inkludert
Ved utpakking, sørg for at alle varene som er oppført nedenfor er til stede og i god stand:
- ION Audio Retro Glow Boombox
- Strømkabel
- Hurtigstartveiledning
4. Produktet er overview
The Retro Glow Boombox features a translucent housing with multi-colored LED lights that synchronize with music. It includes dual full-range speakers for robust audio output.
Frontpanel

Figur 1: Foran view of the Retro Glow Boombox, showcasing the cassette deck, radio tuner, and illuminated dual speakers.
Toppkontroller

Figur 2: Detaljert view of the top panel, including volume, bass, treble controls, cassette function buttons (Pause, Stop/Eject, F.FWD, REW, Play, REC), and mode selectors (Tape, Aux, Radio, Bluetooth/USB/SD).
Side Panel and Rear
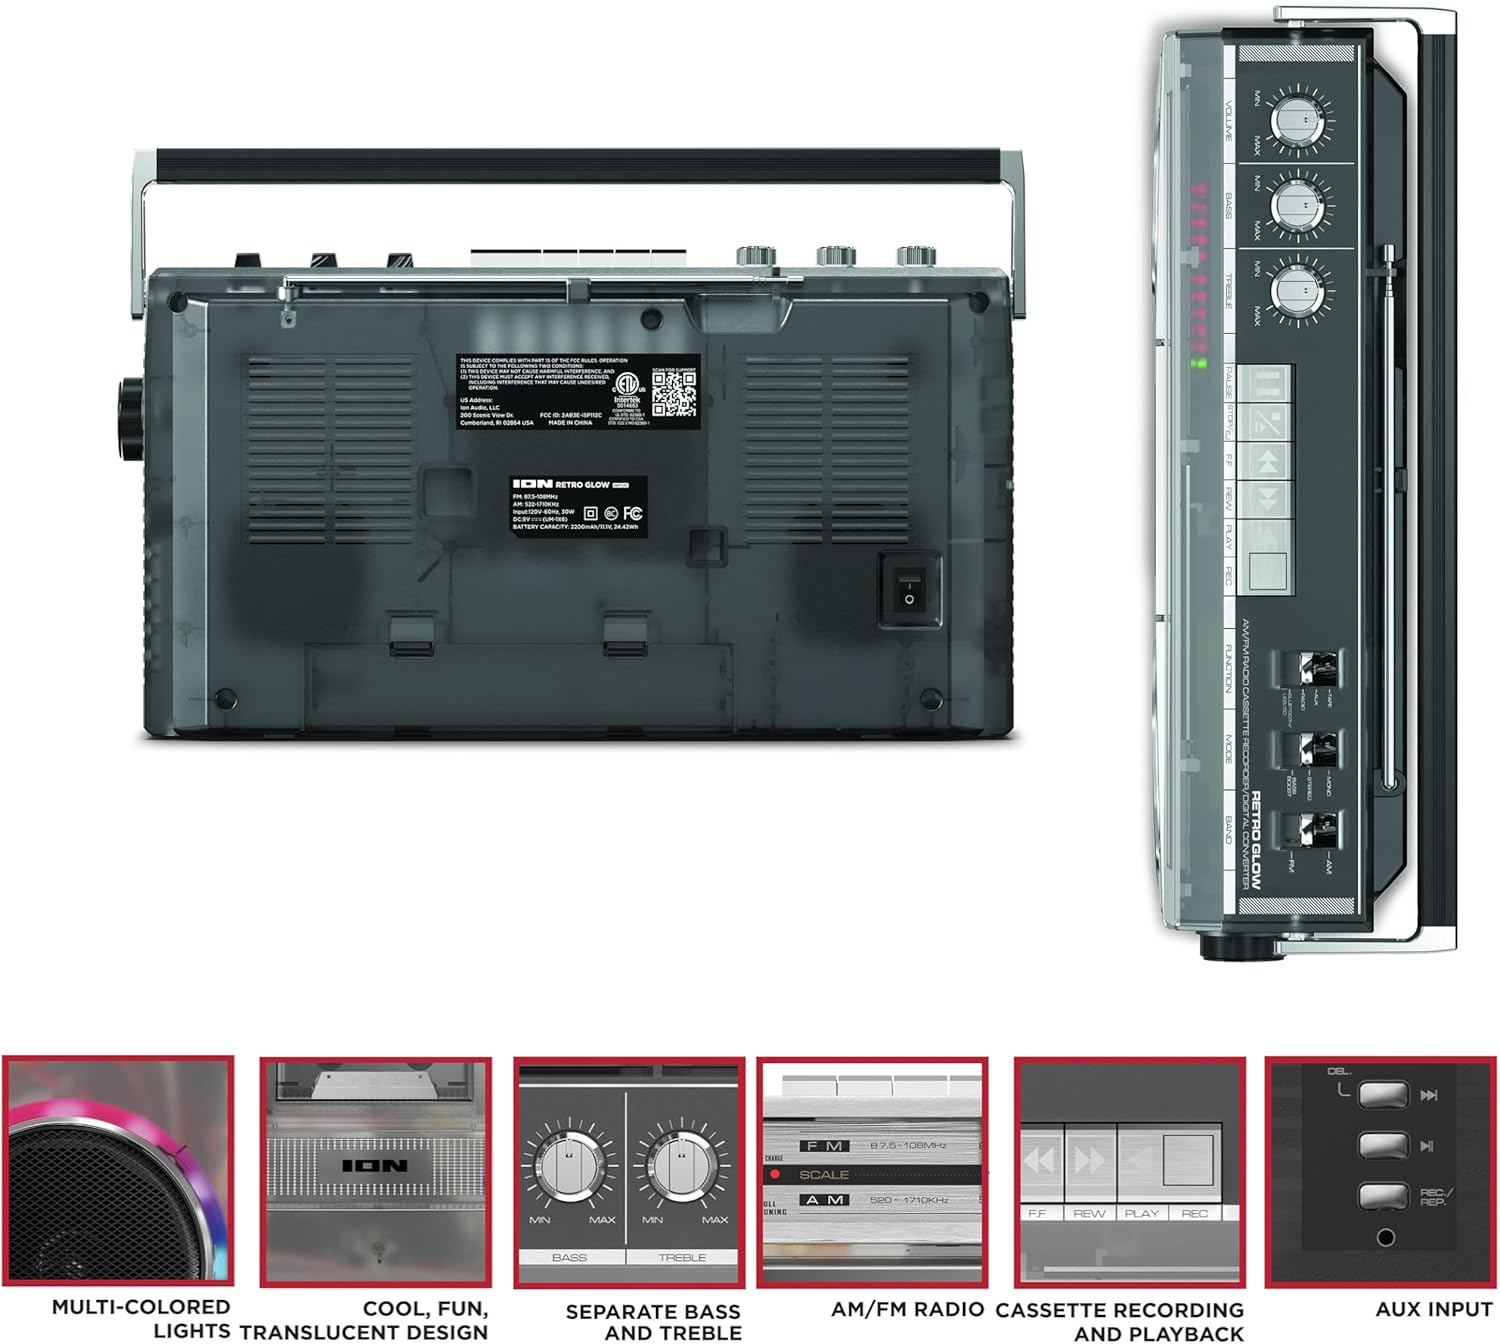
Figure 3: Side panel illustrating the USB port, SD card slot, and playback control buttons. The rear panel includes the power input and battery compartment.
5. Oppsett
Powering the Boombox
The Retro Glow Boombox can be powered via the included AC power cable or by batteries for portable use.
- Vekselstrøm: Connect the power cable to the AC input on the rear of the unit and then to a wall outlet.
- Batteristrøm: Open the battery compartment on the rear and insert the required batteries (type and quantity specified in specifications).

Figur 4: Bak view of the boombox, highlighting the power input and the battery compartment for portable operation.
6. Bruksanvisning
Generell drift
- Slå på/av: Use the power switch to turn the unit on or off.
- Volumkontroll: Adjust the 'VOLUME' knob on the top panel to increase or decrease the sound level.
- Tone Control: Use the 'BASS' and 'TREBLE' knobs to customize the audio output to your preference.
- LED-lys: The multi-colored LED lights around the speakers dance in sync with the music. Refer to the Quickstart Guide for specific controls to change light modes or turn them off.
Radio Functionality
- Switch the 'FUNCTION' selector to 'RADIO'.
- Select 'AM' or 'FM' using the 'BAND' switch.
- Trekk ut teleskopantennen for optimalt FM-mottak. For AM, roter enheten for best mottak.
- Use the 'TUNING' knob to scan for stations.
Cassette Player/Recorder
- Avspilling: Press the 'STOP/EJ' button to open the cassette door. Insert a cassette tape and close the door. Press 'PLAY' to begin playback.
- Innspilling: To record from the radio, built-in microphone, or an external source (via Aux input), ensure a blank cassette is inserted. Select the desired source using the 'FUNCTION' switch. Press the 'REC' button (often simultaneously with 'PLAY') to start recording.
- Spol fremover/bakover: Use the 'F.FWD' and 'REW' buttons for tape navigation.
Bluetooth-tilkobling
- Switch the 'FUNCTION' selector to 'BLUETOOTH/USB/SD'. The unit will enter pairing mode.
- On your Bluetooth-enabled device, search for 'Retro Glow Boombox' and select it to pair.
- Once paired, you can stream audio wirelessly to the boombox.
USB- og SD-kortavspilling
- Insert a USB drive or SD card into the respective slot on the side panel.
- Switch the 'FUNCTION' selector to 'BLUETOOTH/USB/SD'. The unit should automatically detect and begin playing audio files fra det innsatte mediet.
- Use the playback control buttons (play/pause, skip forward/backward) on the side panel to manage your audio.
Hjelpeinngang
- Connect an external audio device (e.g., smartphone, MP3 player) to the 'AUX' input using a 3.5mm audio cable (not included).
- Switch the 'FUNCTION' selector to 'AUX'. Audio from your external device will play through the boombox speakers.
7. Vedlikehold
- Rengjøring: Bruk en myk, tørr klut til å rengjøre utsiden av enheten. Ikke bruk slipende rengjøringsmidler eller løsemidler.
- Stell av kassettspiller: Regularly clean the tape heads and pinch rollers with a cotton swab lightly dampenn med isopropylalkohol for å sikre optimal lydkvalitet og forhindre skade på båndet.
- Lagring: When not in use, store the boombox in a cool, dry place away from direct sunlight and extreme temperatures.
8. Feilsøking
Ingen strøm
- Sørg for at strømkabelen er ordentlig koblet til både enheten og en fungerende stikkontakt.
- If using batteries, check if they are inserted correctly and are not depleted.
Ingen lyd
- Check the volume level on the boombox and the connected audio source (if applicable).
- Ensure the correct function mode (Radio, Tape, Bluetooth, USB/SD, Aux) is selected.
- For cassette playback, verify the tape is inserted correctly and the heads are clean.
Problemer med Bluetooth-paring
- Make sure the boombox is in Bluetooth pairing mode.
- Ensure your Bluetooth device is within range (typically 30 feet or 10 meters).
- Prøv å oppheve paringen og pare enheten på nytt.
9. Spesifikasjoner
| Produktdimensjoner | 9.25 x 16.25 x 5.25 tommer |
| Varevekt | 8.93 pund |
| Tilkoblingsteknologi | Bluetooth 5.3, USB, SD Card, Aux Input |
| Høyttalertype | Stereo, Full-Range |
| Strømkilde | AC Power Cable, Rechargeable Battery (approx. 10-hour life) |
| Spesielle funksjoner | AM/FM Radio, Cassette Player/Recorder, Multi-colored LED Lights, Retro VU Meters, Separate Bass and Treble Controls |
10. Garanti og støtte
For warranty information or technical support, please refer to the Quickstart Guide included with your product or visit the official ION Audio webnettstedet. Ta vare på kjøpskvitteringen, da kjøpsbevis kan være nødvendig for garantikrav.