
1. Introduksjon
This manual provides essential instructions for the safe and effective use of your AM ARROWMAX Smart Mini Electric Engraving Pen and its accompanying carving bits. Please read this manual thoroughly before operating the device to ensure proper function and to prevent damage or injury. Keep this manual for future reference.
2. Produktet er overview
2.1 Pakkeinnhold
- AM ARROWMAX Smart Mini Electric Engraving Pen (SGS PRO)
- Magnetisk ladekabel
- 30 Engraving Bits
- 12 Polishing Bits
- Oppbevaringsboks
- Brukerhåndbok

This image displays the complete AM ARROWMAX Smart Mini Electric Engraving Pen kit, including the pen, its protective case, a USB charging cable, a variety of engraving and polishing bits, and an illustration of its smart app connectivity.
2.2 Nøkkelkomponenter

Dette bildet gir en detaljert view of the SGS MAX engraving pen, labeling its key components: the Magnetic Charging Port for easy charging, the Status Display showing battery, mode, and rotation direction, the Power Button for control, the durable Aluminium Alloy Body, and the Chuck for bit changes.
- Magnetisk ladeport: For convenient and secure charging of the device.
- Statusvisning: Shows battery level, selected speed mode, and rotation direction.
- Strømknapp: Controls power on/off and mode selection.
- Aluminiumslegeringshus: Provides durability and a comfortable grip.
- chuck: Securely holds engraving and polishing bits.
2.3 Engraving and Polishing Bits
The kit includes a comprehensive set of 30 engraving bits and 12 polishing bits, designed for various materials and applications. These bits feature a 2.35mm shank for compatibility.
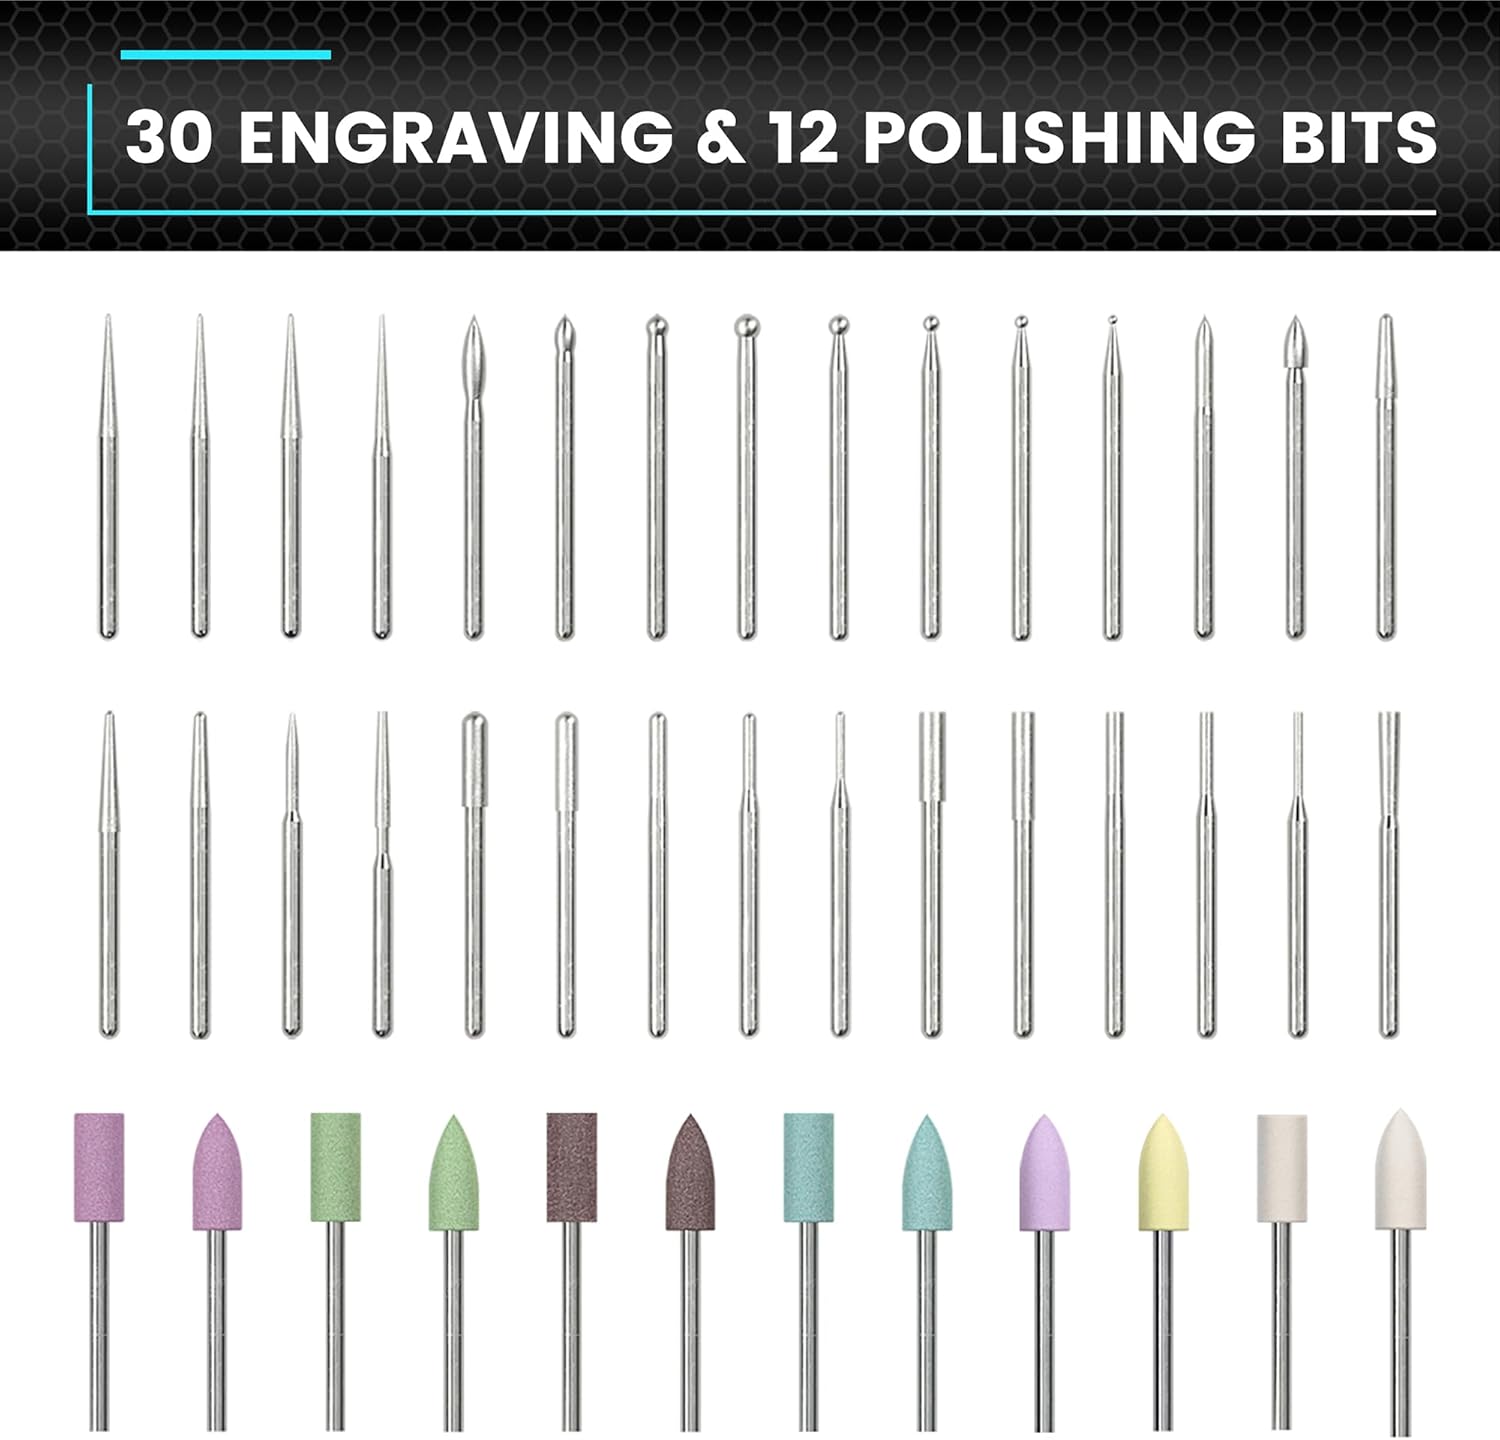
This image showcases the comprehensive set of 30 engraving bits and 12 polishing bits that come with the ARROWMAX engraving pen, designed for various crafting tasks.
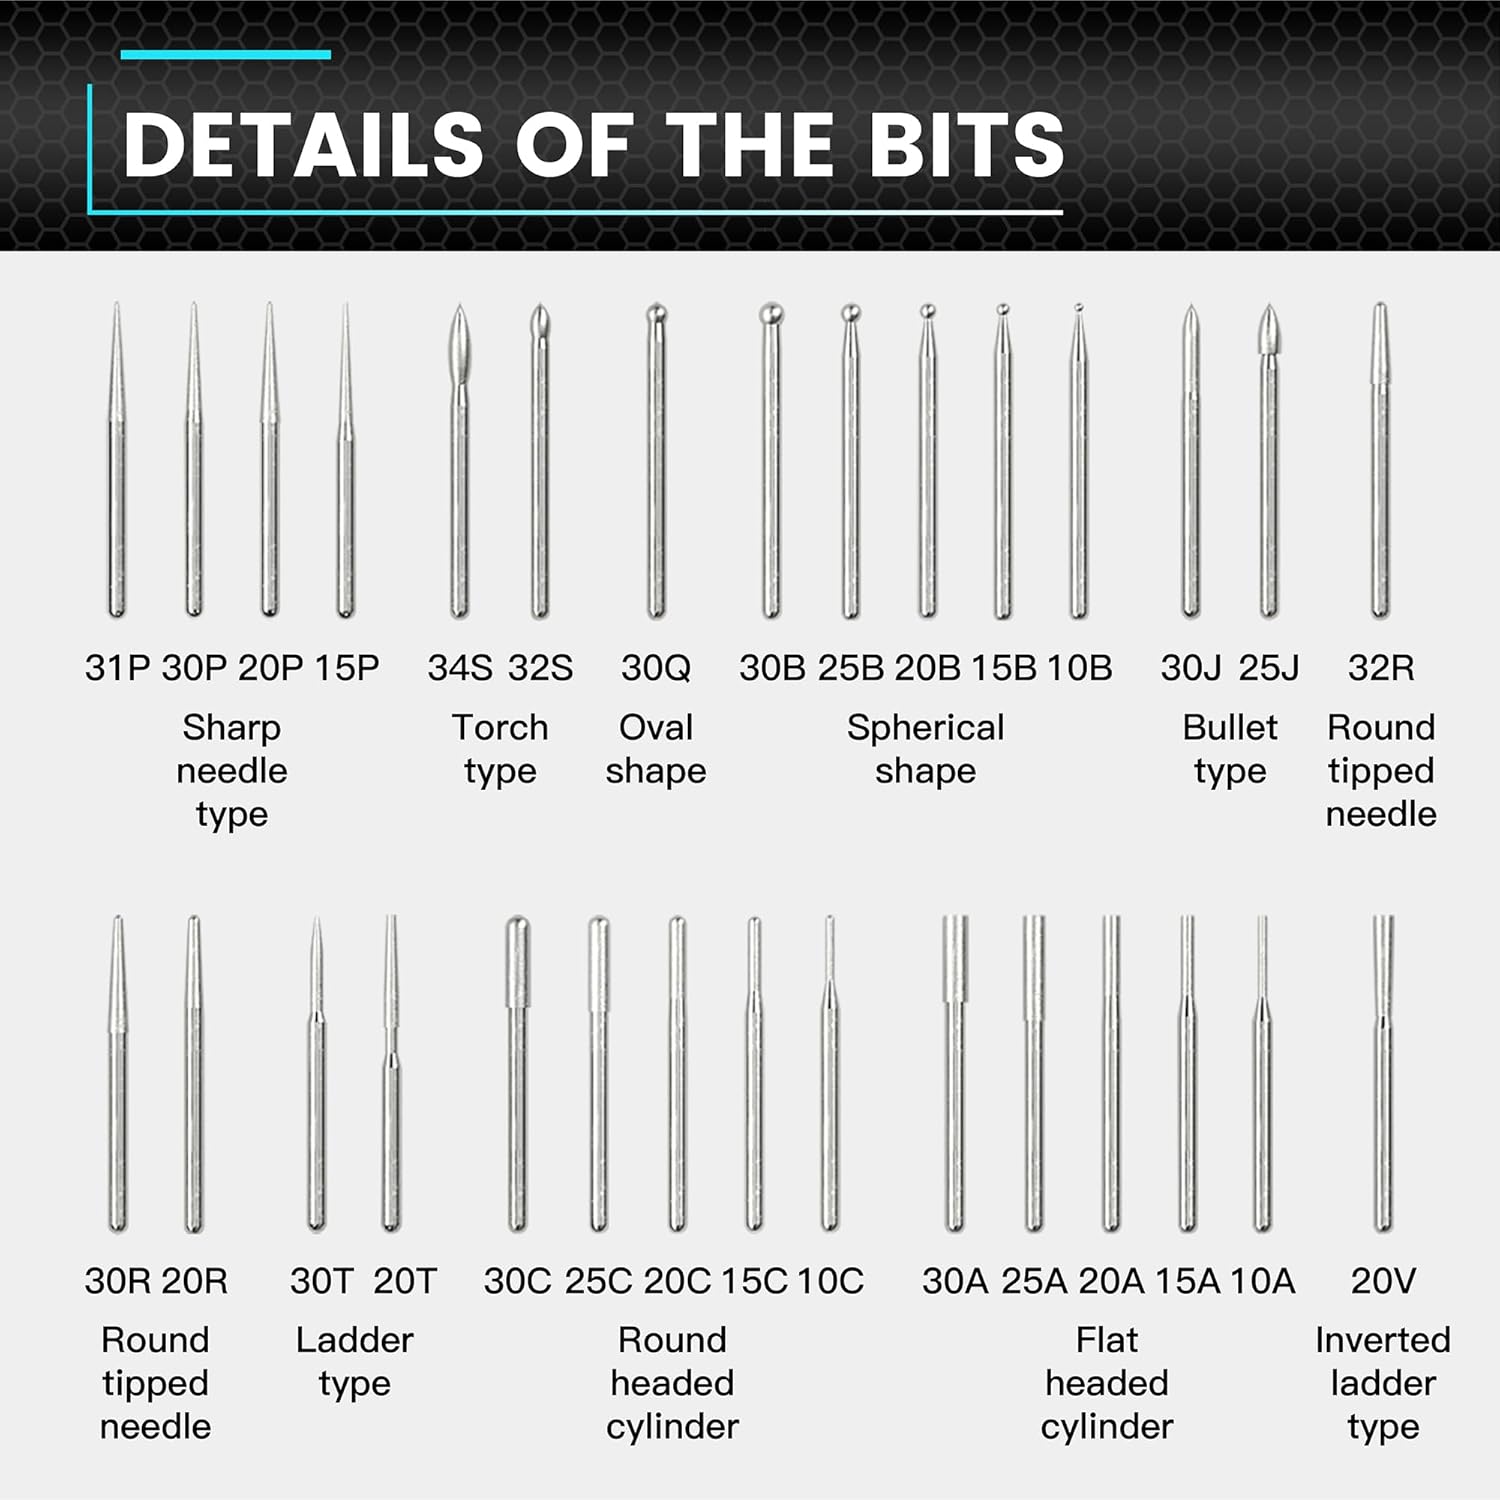
This detailed diagram categorizes and names various engraving bit types, including sharp needle, torch, oval, spherical, bullet, round tipped needle, ladder, round headed cylinder, flat headed cylinder, and inverted ladder types, providing clarity on their specific uses.

This image focuses on the construction of an engraving bit, emphasizing its Diamond Steel material for long life and precise cuts, and its 2.35mm shank with surface blasting for compatibility with most rotary tools.
3. Oppsett
3.1 Lading av enheten
- Connect the magnetic charging cable to the charging port on the engraving pen.
- Connect the other end of the USB cable to a compatible 5V USB power adapter (not included).
- The status display will indicate the charging progress. Ensure the device is fully charged before first use.
3.2 Attaching/Changing Bits
- Ensure the engraving pen is powered off.
- Gently insert the desired engraving or polishing bit into the chuck until it is seated firmly.
- To remove a bit, pull it straight out from the chuck. No additional tools are required.
4. Bruksanvisning
4.1 Strøm på/av
Press and hold the Power Button for a few seconds to turn the device on or off.
4.2 Adjusting Speed Modes
The engraving pen features 5 RPM modes for precise control:

This diagram illustrates the five adjustable speed modes of the engraving pen: 'A' for Auto Sensing (10000-30000 RPM), '1' for Low (15000 RPM), '2' for Medium (20000 RPM), '3' for High (25000 RPM), and '4' for Maximum (30000 RPM).
- Mode A (Auto Sensing): Automatically adjusts speed between 10,000-30,000 RPM based on your twist angle.
- Modus 1 (Lav): 15,000 RPM
- Modus 2 (Middels): 20,000 RPM
- Modus 3 (Høy): 25,000 RPM
- Mode 4 (Maximum): 30,000 RPM
To change the speed mode, short press the Power Button while the device is on. The status display will show the current mode.
4.3 Endre rotasjonsretning
The device supports both forward and reverse rotation. To toggle the direction, press the dedicated direction button (if available, otherwise refer to the specific model's controls) or follow the instructions on the status display. This allows for greater flexibility in engraving and polishing tasks.
4.4 Engraving and Polishing Tips
- Bruk alltid passende øyevern under drift.
- Select the correct bit for your material and desired effect.
- Start with a lower speed setting and gradually increase as needed.
- Apply light, consistent pressure. Excessive force can damage the bit or the workpiece.
- Practice on scrap material before working on your final project.
- Ensure your workpiece is securely held to prevent movement during operation.
5. Vedlikehold
5.1 Rengjøre enheten
- Ensure the device is powered off and disconnected from the charger before cleaning.
- Wipe the body of the engraving pen with a soft, dry cloth.
- Use a small brush or compressed air to remove dust and debris from the chuck area.
- Ikke bruk sterke kjemikalier eller slipende rengjøringsmidler.
5.2 Bit Care
- Clean bits after each use to remove material residue.
- Store bits in their designated case to prevent damage and loss.
- Replace worn or damaged bits to maintain optimal performance and safety.
5.3 Batteristell
- Unngå å utlade batteriet helt ofte.
- Oppbevar enheten på et kjølig, tørt sted når den ikke er i bruk.
- Hvis du oppbevarer batteriet over lengre tid, bør du lade det til omtrent 50 % med noen få måneders mellomrom.
6. Feilsøking
6.1 Enheten slår seg ikke på
- Ensure the battery is charged. Connect the device to the charger and check the status display.
- Press and hold the Power Button firmly for a few seconds.
6.2 Bit Not Holding Securely
- Ensure the bit is fully inserted into the chuck.
- Check if the bit shank is damaged or bent. Use only bits with a 2.35mm shank.
6.3 Poor Engraving/Polishing Performance
- Verify that the correct speed mode is selected for the material.
- Check if the bit is worn or dull. Replace if necessary.
- Ensure you are applying appropriate pressure; too much or too little can affect results.
7. Spesifikasjoner
| Trekk | Spesifikasjon |
|---|---|
| Modell | SGS PRO |
| ASIN | B0F6378SSB |
| Hastighetsmodus | 5 (Auto Sensing, 15000, 20000, 25000, 30000 RPM) |
| RPM-rekkevidde | 10,000–30,000 o/min |
| Batteri | 5V oppladbar |
| Lader | Magnetic USB Charging |
| Bit Shank Diameter | 2.35 mm |
| Inkluderte biter | 30 Engraving Bits, 12 Polishing Bits (Total 42) |
| Kroppsmateriale | Aluminiumslegering |
8. Sikkerhetsinformasjon
Always adhere to the following safety guidelines when using the engraving pen:
- Øyebeskyttelse: Bruk alltid vernebriller eller vernebriller for å beskytte øynene mot flygende gjenstander.
- Arbeidsområde: Ensure your work area is well-lit and well-ventilated. Keep it clean and free of clutter.
- Sikkert arbeidsstykke: Always secure the material you are working on to prevent it from moving unexpectedly.
- Proper Bits: Use only bits designed for the specific task and material.
- Unngå vann: Do not operate the device near water or in damp forhold.
- Barn og kjæledyr: Oppbevar enheten og alt tilbehør utilgjengelig for barn og kjæledyr.
- Unplug Before Changing: Always ensure the device is powered off and disconnected from the charger before changing bits or performing maintenance.
- Unngå overoppheting: If the device feels excessively hot, stop use and allow it to cool down.
9. Garanti og støtte
For warranty information, technical support, or service inquiries, please refer to the product packaging or contact ARROWMAX customer service directly. Keep your purchase receipt as proof of purchase.