Neoteck TL338
Neoteck Digital Thickness Gauge TL338 User Manual
Model: TL338 | Brand: Neoteck
1. Sikkerhetsinformasjon
Please read and understand all instructions before operating this device. Keep this manual for future reference.
- Handle the gauge with care to avoid damage to the measuring surfaces or internal components.
- Ikke utsett enheten for ekstreme temperaturer, fuktighet eller direkte sollys.
- Unngå å miste enheten eller utsette den for sterke støt.
- Keep the device clean and free from dust, oil, and other contaminants.
- Ikke forsøk å demontere eller modifisere enheten, da dette vil ugyldiggjøre garantien og kan forårsake skade.
- Kast batterier i henhold til lokale forskrifter.
2. Produktet er overview
The Neoteck Digital Thickness Gauge TL338 is a precision instrument designed for accurate measurement of various materials. It features a high-resolution LCD display and a durable construction for reliable performance.
Nøkkelfunksjoner:
- Ultra-Precise Measurements: 0.00005inch (0.001mm) resolution across a 0-1inch (0-25.4mm) range.
- 10mm Aluminum Alloy Measuring Surface: Ensures wear resistance and long-term stability.
- Effortless One-Handed Operation: Constant-force press lever and ergonomic handle for swift measurements.
- User-Friendly Smart Design: One-touch ZERO, instant mm/inch unit switching, backlit LCD, and auto power-off.
- Durable Construction: Aluminum Alloy/Iron body for demanding environments.
- Versatile Application: Suitable for paper, leather, plastic, metal sheets, film, and more.
Komponenter:
The package includes the Digital Thickness Gauge, one 1.5V LR44 battery, and this instruction manual.
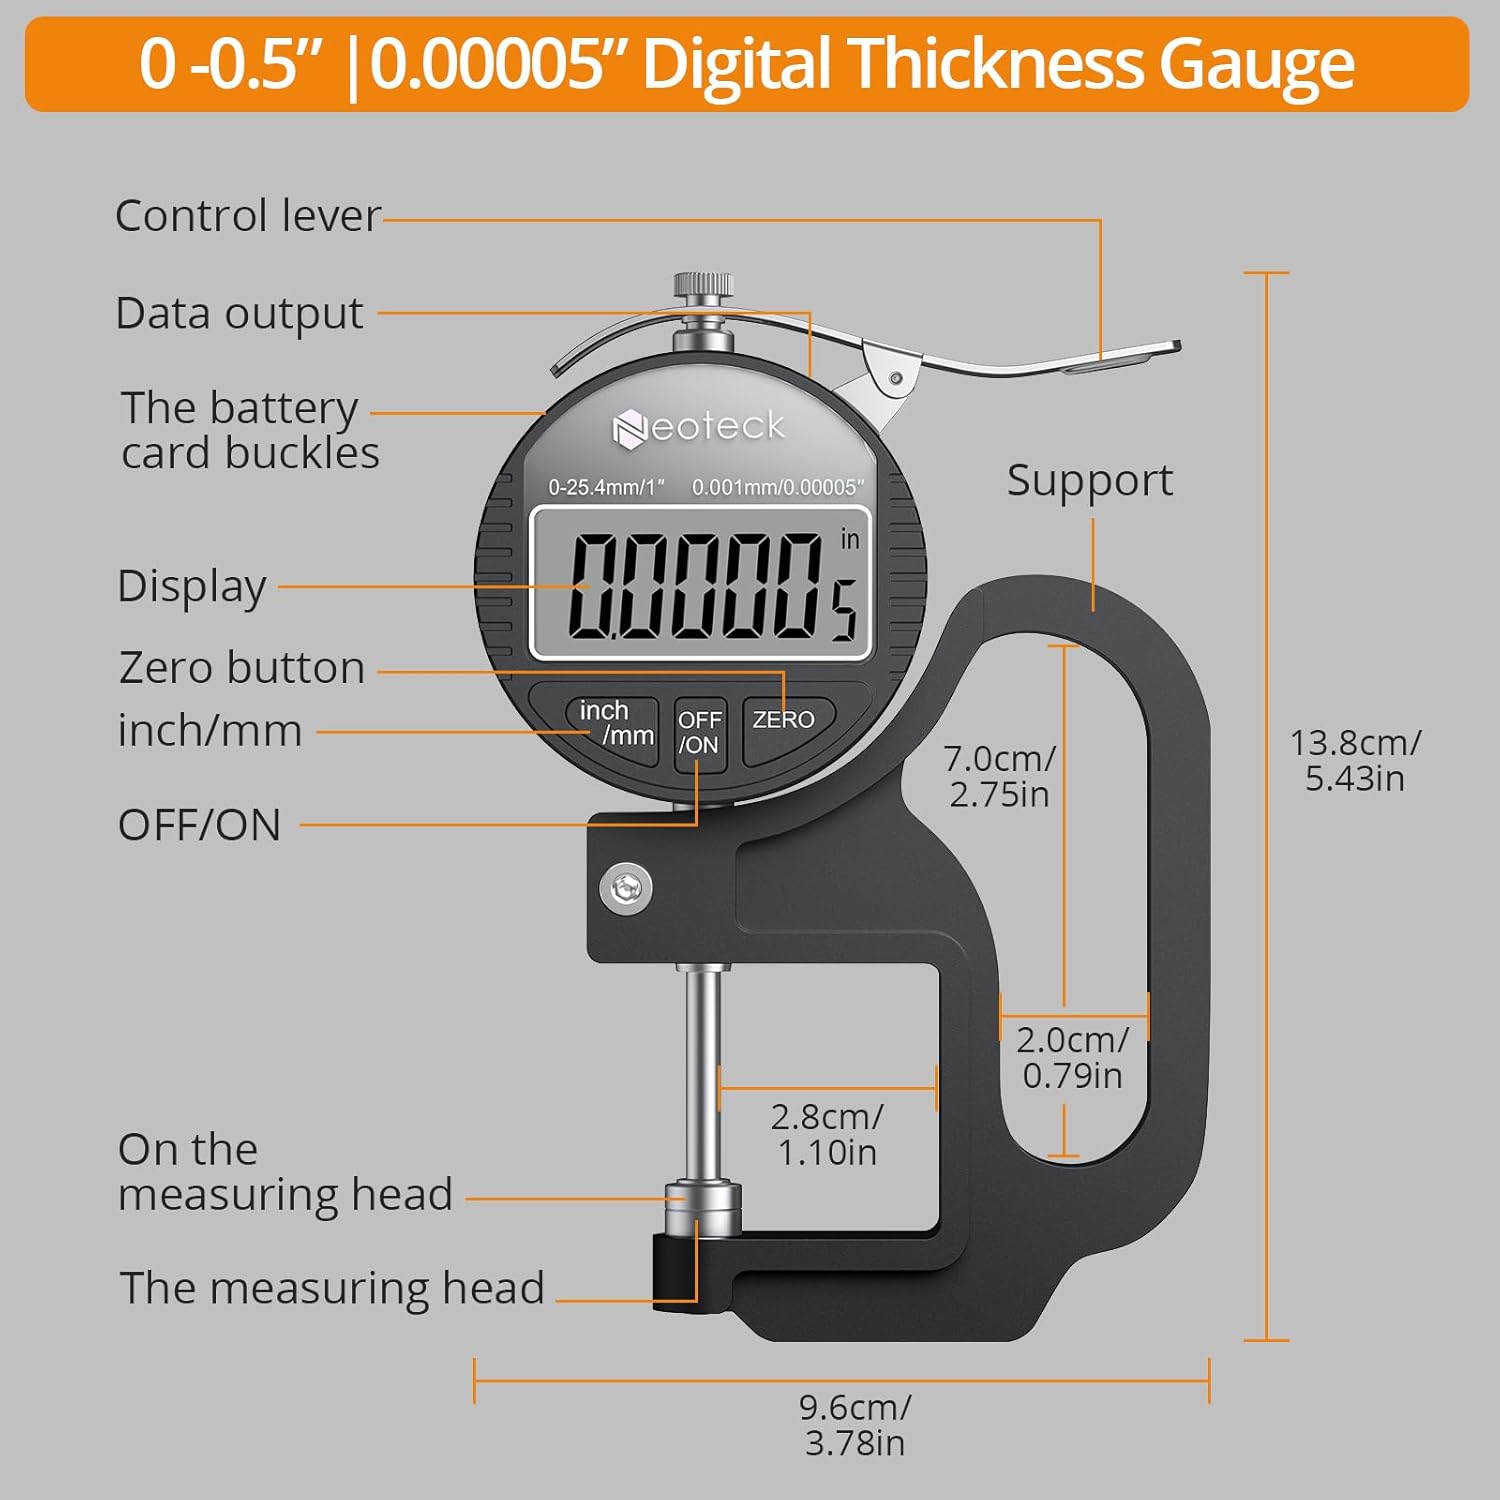
Figur 1: Detaljert view of the Neoteck Digital Thickness Gauge components and dimensions.
3. Oppsett
Batteriinstallasjon:
- Locate the battery compartment on the back of the gauge.
- Åpne batteridekselet.
- Insert one 1.5V LR44 battery, ensuring correct polarity (+/-).
- Lukk batteridekselet godt.
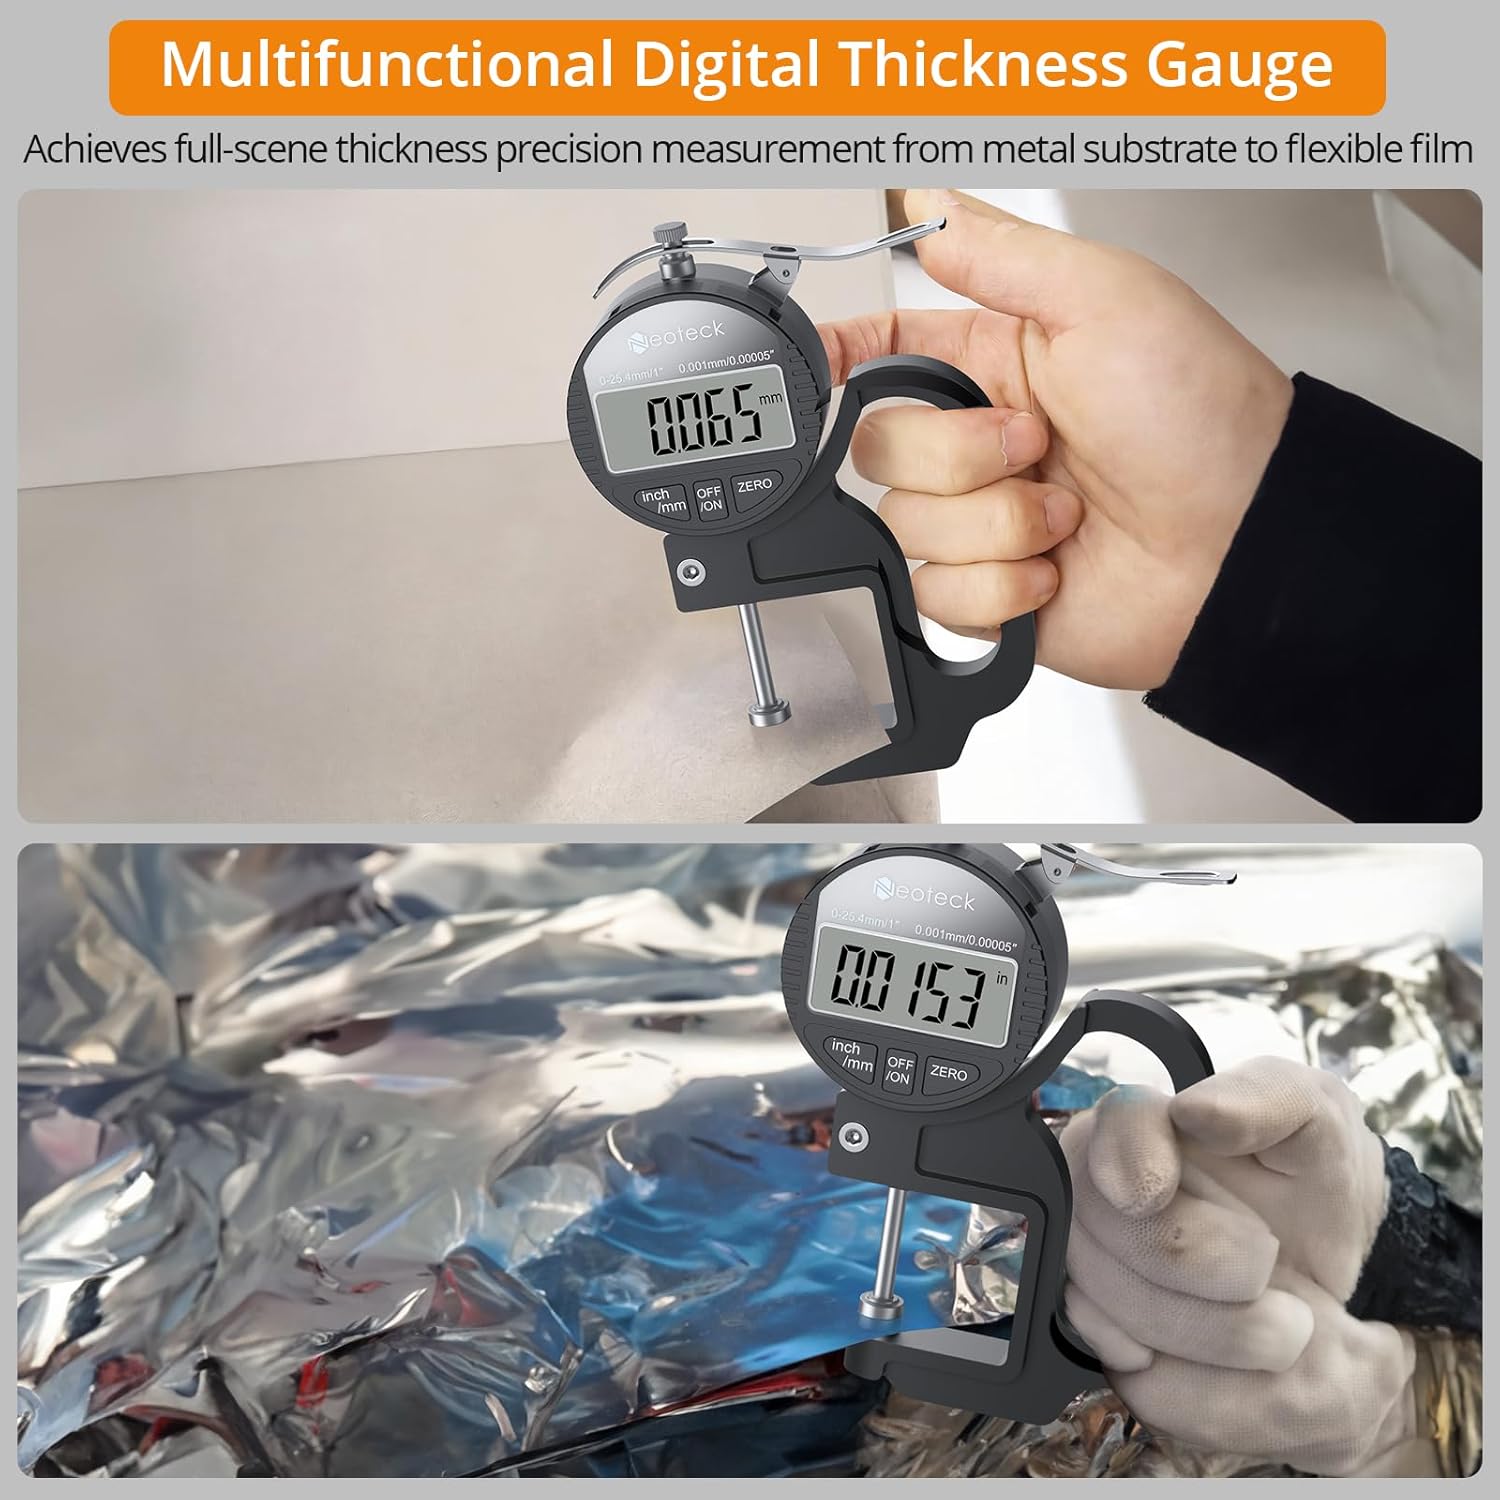
Figure 2: Contents of the Neoteck Digital Thickness Gauge package, including the gauge, battery, and manual.
4. Bruksanvisning
Slå på/av:
Press the 'OFF/ON' button to turn the device on or off. The device will automatically power off after 5 minutes of inactivity to conserve battery life.
Inch/MM Unit Conversion:
Press the 'inch/mm' button to switch between imperial (inches) and metric (millimeters) units. The selected unit will be displayed on the LCD screen.

Figure 3: The large LCD display and unit conversion buttons.
Nullinnstilling:
Before taking a measurement, ensure the measuring surfaces are clean and then press the measuring rod to the bottom. Press the 'ZERO' button to set the display to zero. This calibrates the gauge for accurate readings.
Ta en måling:
- Ensure the gauge is powered on and zeroed.
- Hold the gauge comfortably with one hand using the ergonomic grip.
- Press the control lever to open the measuring jaws.
- Carefully place the material to be measured between the measuring surfaces.
- Release the control lever slowly, allowing the measuring surfaces to gently contact the material.
- Read the thickness value directly from the LCD display.

Figure 4: One-hand operation for quick and easy measurements.

Figure 5: Measuring various materials with the alloy measuring surface.
Important Measurement Notes:
- The thickness gauge should be placed vertically during measurement, as gravity can affect data.
- For optimal accuracy, take multiple measurements and calculate the average value.
- Avoid applying excessive pressure when closing the measuring surfaces on the material.
Videodemonstrasjon:
Video 1: A demonstration of the Neoteck Digital Thickness Meter in use, showcasing its features and measurement process.
5. Vedlikehold
Rengjøring:
Regularly clean the measuring surfaces with a soft, dry cloth. For stubborn dirt, a slightly damp klut kan brukes, etterfulgt av umiddelbar tørking. Ikke bruk løsemidler eller slipende rengjøringsmidler.
Lagring:
When not in use, store the thickness gauge in its protective case in a dry, cool place, away from direct sunlight and extreme temperatures. Remove the battery if the device will not be used for an extended period.
Batteribytte:
If the display becomes dim or unresponsive, replace the LR44 battery as described in the 'Battery Installation' section.
6. Feilsøking
| Problem | Mulig årsak | Løsning |
|---|---|---|
| Skjermen er tom eller svak | Lavt batteri eller feil batteriinstallasjon. | Replace the LR44 battery, ensuring correct polarity. |
| Unøyaktige avlesninger | Measuring surfaces are dirty or not zeroed correctly. | Clean measuring surfaces and perform zero setting. Ensure the gauge is held vertically. |
| Knapper reagerer ikke | Enhetsfeil eller lavt batteri. | Bytt batteri. Hvis problemet vedvarer, kontakt kundestøtte. |
7. Spesifikasjoner
| Trekk | Spesifikasjon |
|---|---|
| Merke | neotech |
| Modell | TL338 |
| Måleområde | 0–1 tommer (0–25.4 mm) |
| Oppløsning | 0.00005 mm |
| Målenøyaktighet | 0.0005"/0.00005" |
| Materiale | Aluminum Alloy/Iron |
| Batteritype | 1 x 1.5V LR44 (included) |
| Driftstemperatur | 0 °C til 40 °C (32 °F til 104 °F) |
| Inkluderte komponenter | Thickness Gauge, 1.5V Battery, Instruction Manual |
8. Garanti og støtte
Garanti:
This Neoteck Digital Thickness Gauge is covered by an 18-month warranty from the date of purchase. The warranty covers manufacturing defects and material faults under normal use. It does not cover damage caused by misuse, accidents, unauthorized modifications, or improper maintenance.
Kundestøtte:
For technical assistance, warranty claims, or any questions regarding your Neoteck Digital Thickness Gauge, please contact our customer support team. Refer to the contact information provided on the product packaging or our official webnettstedet.
Ask a question about this manual
Ask about setup, troubleshooting, compatibility, parts, safety, or missing instructions. Manuals+ will review the question and use this page’s manual context to help answer it.