1. Viktig sikkerhetsinformasjon
Please read all instructions carefully before beginning installation and save these instructions for future reference. Incorrect installation can lead to electric shock, fire, or personal injury.
- Koble alltid fra strømmen ved hovedsikringen før installasjon eller service.
- All kabling må være i samsvar med nasjonale og lokale elektriske forskrifter. Hvis du ikke er kjent med kabling, bør du kontakte en kvalifisert elektriker.
- The mounting bracket must be securely fastened to the building structure and capable of supporting the full weight of the fan.
- Ensure the installation location does not allow the fan blades to strike any objects or walls.
- Ikke bruk viften hvis noen av delene er skadet.
2. Pakkens innhold
Carefully unpack your ceiling fan and check that all contents are present and undamaged. Refer to the diagram below for a visual representation of the components.

Image: All components of the NKPU 60 Inch Ceiling Fan with Lights, including blades, motor housing, light panel, remote control, and downrods, laid out for inspection.
- Motorhus
- Fan Blades (6 double-sided)
- Bladbraketter
- LED lyspanel
- Lett deksel
- Fjernkontroll med veggfeste
- Mottaker
- Nedstenger (6-tommers og 8-tommers alternativer)
- Monteringsbrakett
- Maskinvarepakke (skruer, skiver, trådmuttere)
- Brukerhåndbok
3. Spesifikasjoner
| Trekk | Spesifikasjon |
|---|---|
| Merke | NKPU |
| Modellnavn | Ceiling fan with light (SY12) |
| Størrelse | 60 tommer |
| Farge | Svart |
| Antall kniver | 6 |
| Motortype | DC motor |
| Hastighetsinnstillinger | 6 |
| Luftstrømskapasitet | 8577 CFM |
| Støynivå | ≤35 desibel |
| Lys type | Dimmable LED (10%-100%) |
| Fargetemperatur | 3000K (varm), 4500K (naturlig), 6000K (kald hvit) |
| Kontrollmetode | Remote Control, Smart App ("Fan Lamp Pro") |
| Timerfunksjoner | 1H, 2H, 4H, 8H |
| Innendørs/utendørs bruk | Indoor, Outdoor (not directly exposed to rain) |
| Lengder på nedstang | 6 tommer, 8 tommer |
4. Installasjonsveiledning
This section provides step-by-step instructions for installing your NKPU 60 Inch Ceiling Fan. For a visual guide, please refer to the installation video below.
Video: NKPU 60 inch ceiling fan with lights installation video. This video demonstrates the complete assembly and mounting process for the ceiling fan.
4.1 Bladmontering
- Attach each fan blade to a blade bracket using the provided screws and washers. Ensure they are securely tightened.

Bilde: Nærbilde view of the double-sided fan blades, showing one side in classic black and the other in warm wood grain, allowing for versatile aesthetic choices.
4.2 Motor and Downrod Assembly
- Secure the assembled blades to the motor housing.
- Select the appropriate downrod (6-inch or 8-inch) for your ceiling height.
- Feed the motor wires through the chosen downrod.
- Attach the downrod to the motor housing, securing it with the provided pin and screws.
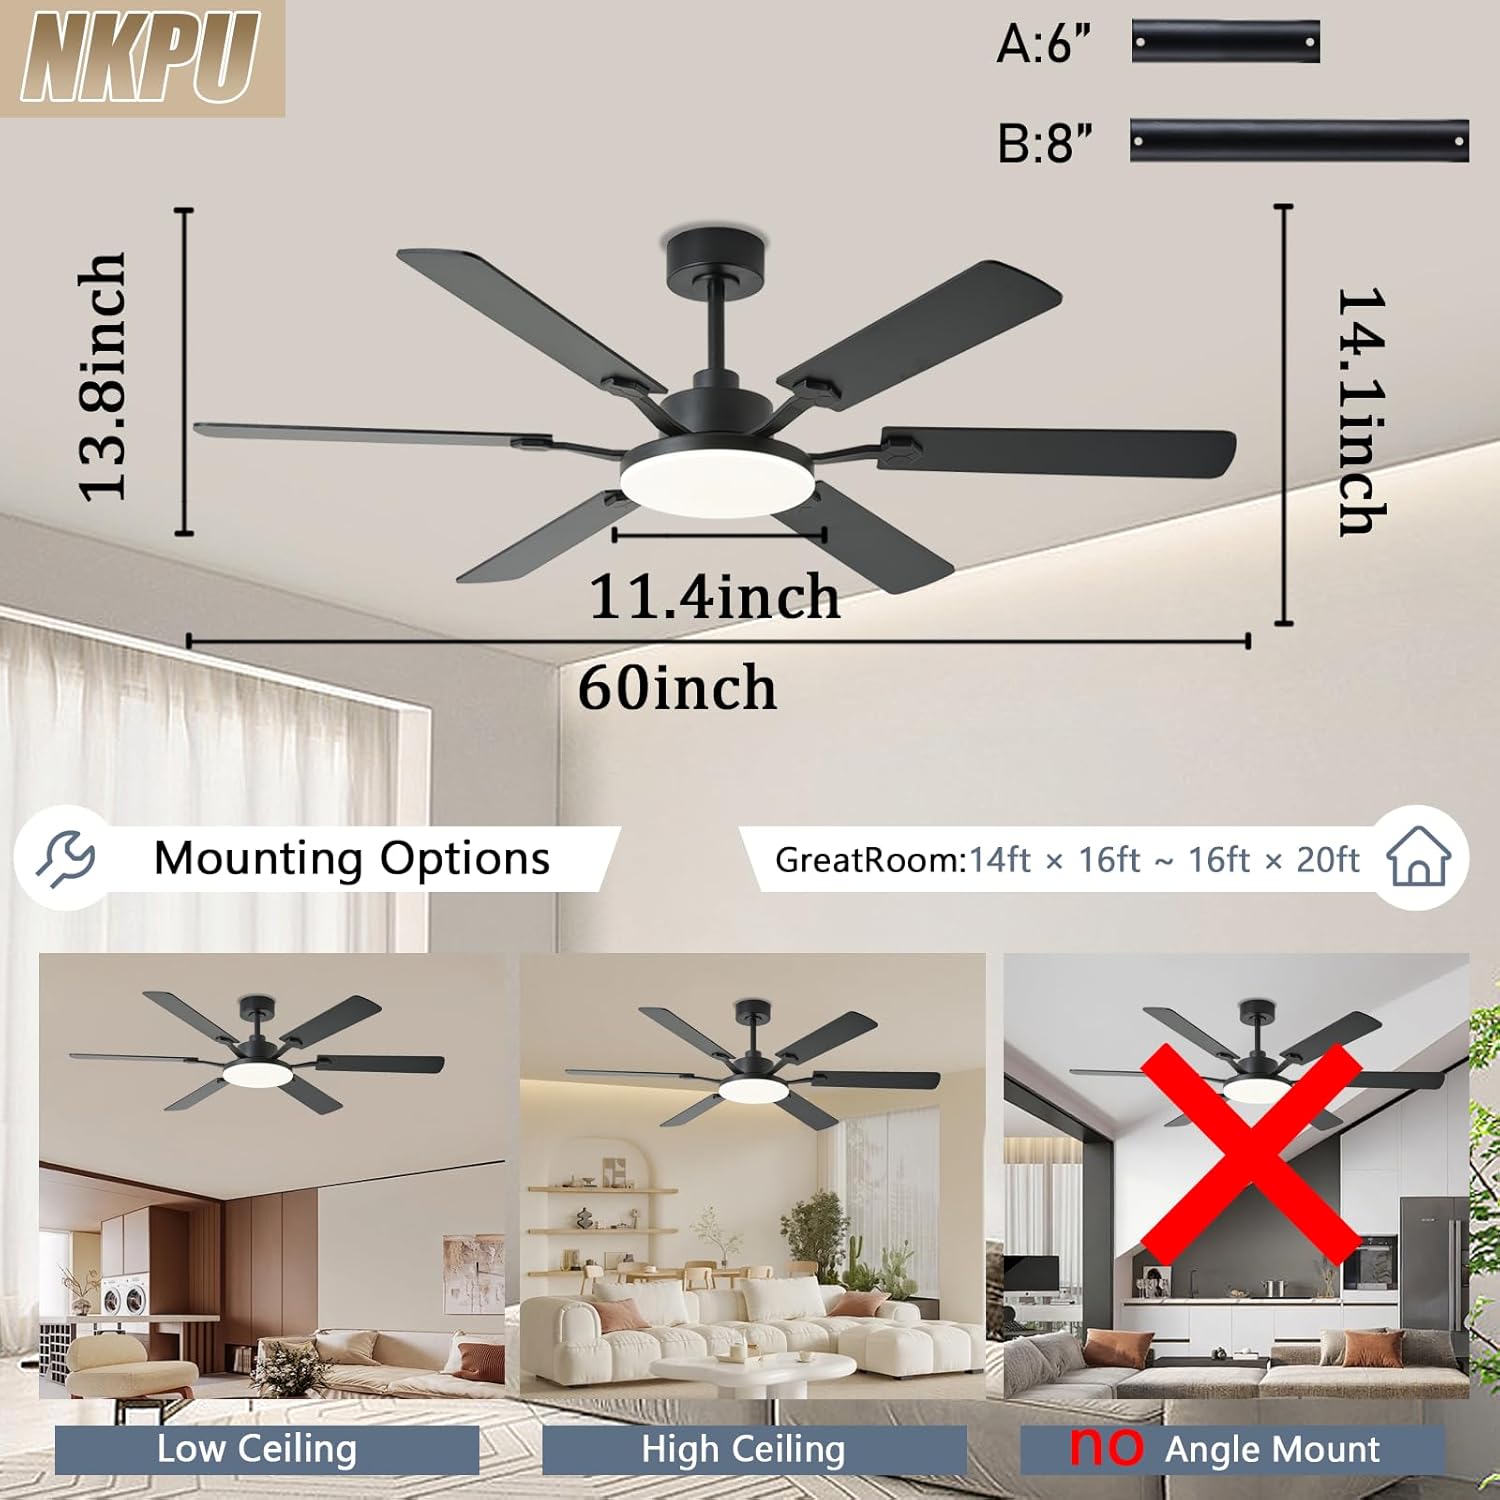
Image: Diagram illustrating the dimensions of the 60-inch ceiling fan and various mounting options for low and high ceilings, noting that it is not suitable for angled ceilings.
4.3 Mounting to Ceiling
- Install the mounting bracket to your ceiling junction box. Ensure it is firmly secured.
- Løft vifteenheten forsiktig opp og heng den på monteringsbraketten.
- Connect the electrical wires from the fan to the house wiring according to the wiring diagram in the full manual. Ensure all connections are secure.
- Tuck the wires neatly into the junction box and secure the canopy to the mounting bracket.
4.4 Light Panel Installation
- Connect the LED light panel wires to the corresponding wires from the motor.
- Secure the LED light panel to the motor housing with screws.
- Attach the light cover by twisting it into place.

Image: A person wearing gloves is shown using a screwdriver to install the ceiling fan, highlighting the ease of installation.
5. Bruksanvisning
Your NKPU ceiling fan can be controlled via the included remote control or the "Fan Lamp Pro" smartphone application.
Video: NKPU 60 inch ceilings fan with lights function display video. This video demonstrates the various operational features of the ceiling fan, including speed, light, and direction controls.
5.1 Fjernkontrollfunksjoner
The remote control allows for convenient adjustment of fan and light settings.

Image: Diagram of the remote control with labels for each button, including fan on/off, speed control, light brightness, color temperature, timer, and reverse function.
- Vifte på/av: Slår viften på eller av.
- Viftehastighet: Justerer mellom 6 hastighetsinnstillinger.
- Lys på/av: Slår lyset på eller av.
- Justering av lysstyrke: Dims the light from 10% to 100%.
- Fargetemperatur: Cycles through Warm (3000K), Natural (4500K), and Cool White (6000K).
- Timer: Sets the fan to turn off after 1, 2, 4, or 8 hours.
- Forover/bakover: Changes the direction of blade rotation for summer (downward airflow) or winter (upward airflow).
5.2 Smart App Control ("Fan Lamp Pro")
Download the "Fan Lamp Pro" app from your smartphone's app store. Ensure your phone's Bluetooth is enabled for pairing.

Image: Screenshots of the "Fan Lamp Pro" app interface on a smartphone, showing controls for fan speed, light settings, and timer functions.
- Scan the QR code in the manual or search for "Fan Lamp Pro" in your app store to download.
- Open the app and ensure your phone's Bluetooth is turned on.
- Power on the fan. Within 5 seconds, tap the pairing button in the app. The fan light will flash twice to confirm successful pairing.
- Once paired, you can control all fan and light functions via the app, similar to the remote control.
5.3 Reversibel motorfunksjon
Viften har en reversibel likestrømsmotor for komfort året rundt.
- Sommermodus: Blades rotate counter-clockwise to push cool air downwards, creating a cooling effect.
- Vintermodus: Blades rotate clockwise to draw cool air up towards the ceiling, circulating warm air trapped near the ceiling.

Image: A diagram illustrating the airflow patterns for the reversible DC motor, showing downward airflow for summer cooling and upward airflow for winter heat circulation.
6. Vedlikehold
Regelmessig vedlikehold sikrer optimal ytelse og levetid for takviften din.
- Rengjøring: Rengjør viftebladene og motorhuset med jevne mellomrom med en myk klut.amp klut. Ikke bruk skurende rengjøringsmidler eller løsemidler.
- Stramskruer: Check all screws, especially those on the blade attachments and mounting bracket, at least twice a year. Tighten any loose screws.
- Bladbalansering: If the fan wobbles, ensure all blades are securely attached and balanced. A balancing kit (not included) can be used if necessary.
- Lysdeksel: Clean the light cover with a soft, lint-free cloth.
7. Feilsøking
Hvis du opplever problemer med takviften, kan du se følgende vanlige feilsøkingstrinn:
- Viften starter ikke:
- Sjekk at strømmen er på ved sikringsbryteren.
- Sørg for at alle elektriske tilkoblinger er sikre.
- Verify remote control batteries are installed correctly and are not depleted.
- Lyset virker ikke:
- Check light wiring connections.
- Ensure the light is turned on via remote or app.
- Viften svinger:
- Sørg for at alle bladskruene er strammet.
- Check that the mounting bracket is securely fastened.
- Verify blades are not bent or damaged.
- Fjernkontrollen fungerer ikke:
- Bytt batterier i fjernkontrollen.
- Ensure the remote is paired with the fan (refer to pairing instructions).
8. Garanti og støtte
NKPU offers a 30-day no-hassle return policy and a 2-year after-sales service for your peace of mind. If you encounter any problems during installation or use, our dedicated customer service team is ready to assist you.
For support, please contact us via the email provided in your product packaging or on the product page. We welcome your ideas and feedback to help us improve our products and services.