1. Introduksjon
This manual provides detailed instructions for the safe and effective use of your Proster Electrical Tools Set, which includes a 6000 Count Clamp Meter and a Non-Contact Voltage Tester Pen. Please read this manual thoroughly before operation and retain it for future reference.
2. Sikkerhetsinformasjon
WARNING: Electrical testing can be hazardous. Always exercise extreme caution and follow all safety guidelines to prevent electric shock or injury.
- Kontroller alltid fraværet av voltage before touching any circuit.
- Do not use the devices if they appear damaged or are operating abnormally.
- Sørg for riktig batteriinstallasjon og -utskifting.
- Bruk passende personlig verneutstyr (PPE), som isolerte hansker og vernebriller.
- Ikke overskrid de maksimale inngangsverdiene som er angitt for hver funksjon.
- Keep hands and fingers away from the probe tips when testing live circuits.
3. Pakkens innhold
Your Proster Electrical Tools Set (Model PST088c-PST224) includes:
- Proster 6000 Count Clamp Måler
- Proster Non-Contact Voltage Tester Pen
- Testledninger (rød og svart)
- K-Type Thermocouple (for temperature measurement)
- Bæreveske
- AAA Batteries (for Voltage Tester Pen)
- Brukerhåndbøker
4. Clamp Meter overview
The Proster 6000 Count Clamp Meter is a versatile tool for measuring various electrical parameters. Familiarize yourself with its components:

Figure 1: Proster Clamp Meter with its auto-ranging control dial and function buttons.
- Clamp Kjeve: For berøringsfri måling av AC/DC-strøm.
- Funksjonsskive: Selects measurement modes (NCV, AC/DC Current, AC/DC Voltage, Resistance/Capacitance/Diode/Continuity, Frequency, Temperature).
- SELECT/ID Button: Toggles between functions within a dial setting (e.g., AC/DC voltage, resistance/diode/continuity/capacitance). Also activates flashlight.
- RANGE/HOLD Button: Toggles auto-ranging or manual range selection. Long press activates data hold and backlight.
- Hz/DUTY Button: Velger frekvens- eller driftssyklusmåling.
- LCD-skjerm: Viser måleavlesninger, enheter og indikatorer.
- Inngangskontakter: For connecting test leads and thermocouple.
5. Non-Contact Voltage Testerpenn overview
The Non-Contact Voltage Tester Pen provides a safe and convenient way to detect AC voltage.

Figure 2: Proster Non-Contact Voltage Tester Pen, highlighting its compact design and integrated flashlight.
- Sondetips: Registrerer AC voltage uten direkte kontakt.
- Strømknapp: Slår enheten på/av.
- Sensitivity Adjustment Button: Toggles between high, medium, and low sensitivity modes. Long press activates the LED flashlight.
- LED-indikatorer: Visual indication of voltage presence and sensitivity level.
- Summer: Hørbar alarm for voltage deteksjon.
6. Oppsett
6.1. Installasjon av batteri
Both devices require batteries for operation. Ensure correct polarity during installation.
Clamp Måler:
Klamp meter typically uses 9V batteries. Refer to the battery compartment cover on the back of the device for specific instructions and battery type.
Non-Contact Voltage Tester Pen:
Voltage tester pen uses 2 x 1.5V AAA batteries. Unscrew the cap at the bottom of the pen to access the battery compartment. Insert the batteries according to the polarity markings and re-secure the cap.
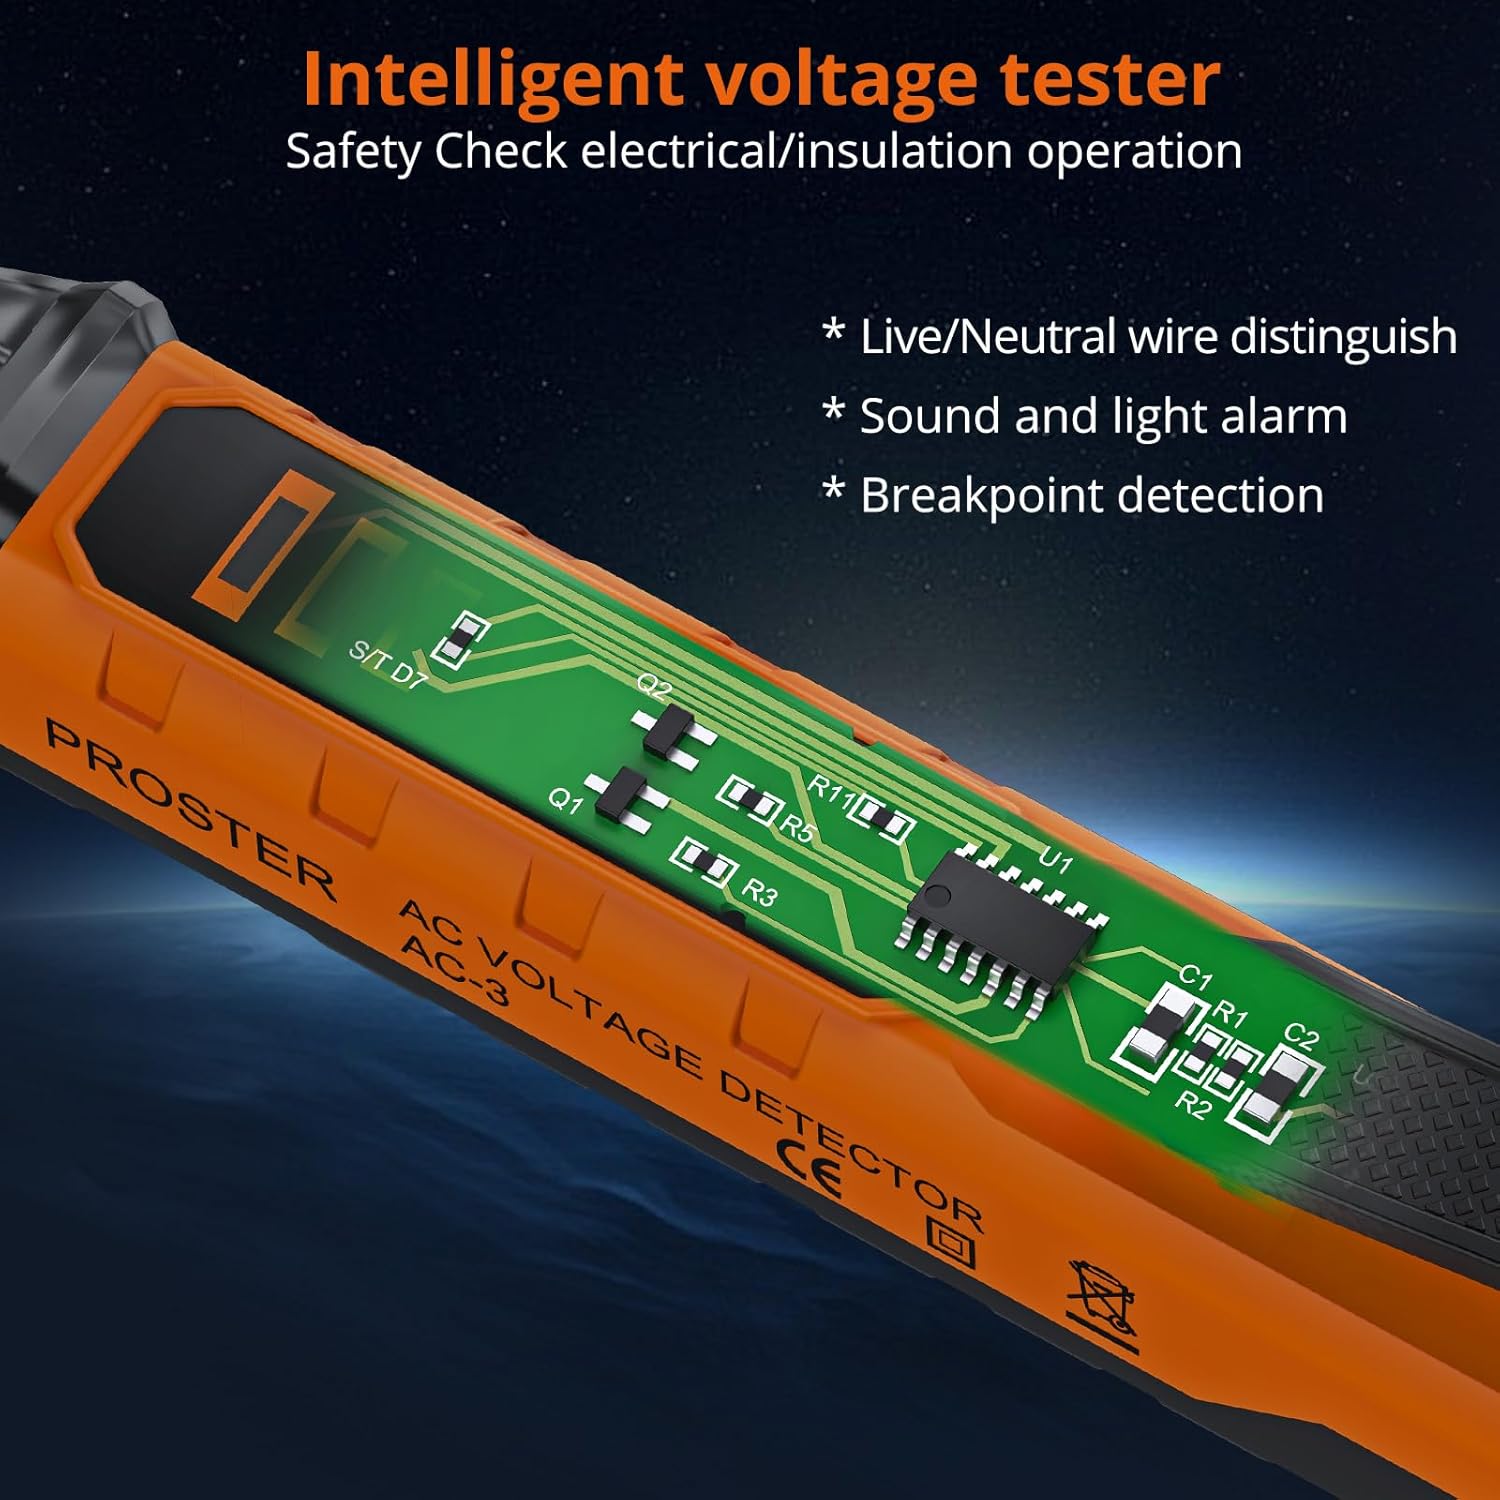
Figur 3: Intern view of the Voltage Tester Pen, illustrating its intelligent design for safety checks.
7. Operating the Clamp Måler
Turn the function dial to the desired measurement mode. The meter features auto-ranging, automatically selecting the appropriate range for most measurements.
7.1. Measuring AC/DC Current (Clamp)
- Turn the function dial to the 'A~' (AC Current) or 'A=' (DC Current) position.
- Åpne clamp kjeven og omslutt én leder. Sørg for at kjeven er helt lukket.
- Les gjeldende verdi på LCD-skjermen.
Video 1: Official Proster video demonstrating the Clamp Multimeter with True RMS, including current measurement.
7.2. Måling av AC/DC-volumtage (Leads)
- Sett den røde testledningen inn i 'VΩ'-kontakten og den svarte testledningen inn i 'COM'-kontakten.
- Vri funksjonshjulet til 'V~' (AC-volumtage) eller 'V=' (DC-volumtage) position. Use the SELECT button to toggle if needed.
- Connect the test probes to the circuit points you wish to measure.
- Les voltage-verdien på LCD-skjermen.

Figur 4: Måling av DC-volumtage using the test leads connected to the clamp måler.
7.3. Measuring Resistance, Capacitance, Diode, Continuity
- Sett den røde testledningen inn i 'VΩ'-kontakten og den svarte testledningen inn i 'COM'-kontakten.
- Turn the function dial to the 'Ω' (Resistance/Diode/Continuity/Capacitance) position.
- Use the SELECT button to cycle through Resistance (Ω), Diode, Continuity, and Capacitance (F) modes.
- Connect the test probes to the component under test. For continuity, a buzzer will sound if resistance is low.
7.4. Målefrekvens (Hz)
- Sett den røde testledningen inn i 'VΩ'-kontakten og den svarte testledningen inn i 'COM'-kontakten.
- Turn the function dial to the 'Hz' position.
- Connect the test probes to the circuit.
- Les frekvensverdien på LCD-skjermen.
7.5. Measuring Temperature (°C/°F)
- Insert the K-type thermocouple into the input jacks, observing polarity.
- Turn the function dial to the '°C/°F' position.
- Place the thermocouple tip on or in the object whose temperature you wish to measure.
- Read the temperature on the LCD display. Use the SELECT button to switch between Celsius and Fahrenheit.
7.6. Non-Contact Voltage (NCV) Deteksjon
- Vri funksjonshjulet til «NCV»-posisjonen.
- Flytt toppen av clamp meter near the conductor or circuit.
- Måleren vil pipe og NCV-indikatoren vil lyse hvis AC-volumettage er oppdaget.

Figure 5: NCV function of the clamp måler detekterende volumtagi nærheten av en stikkontakt.
7.7. Datahold og bakgrunnsbelysning
- Data Hold: Press the 'HOLD' button briefly to freeze the current reading on the display. Press again to release.
- Bakgrunnsbelysning: Long press the 'HOLD' button to turn the display backlight on or off, useful in low-light conditions.
8. Operating the Non-Contact Voltage Tester Pen
This pen-style tester is designed for quick and safe voltage sjekker.
Video 2: Official Proster video demonstrating the Non-Contact Voltage Tester Pen's features and operation.
8.1. Slå på/av
Press the green power button to turn the tester on. The green LED will illuminate. Press and hold the power button to turn it off.
8.2. Justering av følsomhet
Standard AC voltage detection range is 48-1000V. You can adjust the sensitivity to measure 12-1000V.
- Short press the sensitivity adjustment button (marked 'S') to cycle through high, medium, and low sensitivity modes.
- The LED indicators will change to reflect the selected sensitivity.
8.3. Live/Null Wire Distinction
When the probe tip is near a live wire, the tester will beep rapidly and the red LED will flash quickly. For a null wire, the buzzer will alarm slowly, and the green LED will flash slowly.

Figure 6: The voltage tester pen indicating null wire (slow beep, green flash) and live wire (fast beep, red flash).
8.4. Lommelyktfunksjon
Long press the sensitivity adjustment button ('S') to turn the built-in LED flashlight on or off. This is useful for working in dimly lit areas.
Figure 7: The integrated LED flashlight on the voltage tester pen assists in dark environments.
8.5. Deteksjon av bruddpunkt
The tester can help locate breakpoints in wires. Move the probe along the wire; the alarm will stop at the point where the circuit is interrupted.

Figure 8: Breakpoint detection feature of the voltage tester pen.
9. Vedlikehold
9.1. Rengjøring
Wipe the devices with a dry, clean cloth. Do not use abrasive cleaners or solvents. Ensure the devices are dry before storage.
9.2. Batteribytte
Replace batteries promptly when the low battery indicator appears on the display. Refer to section 6.1 for battery installation instructions.
9.3. Oppbevaring
Store the tools in their carrying pouch in a cool, dry place, away from direct sunlight and extreme temperatures. Remove batteries if the devices will not be used for an extended period.
10. Feilsøking
- Enheten slår seg ikke på: Sjekk batteriinstallasjonen og sørg for at batteriene ikke er utladet. Skift ut om nødvendig.
- Unøyaktige avlesninger: Ensure test leads are properly connected and the correct function is selected on the dial. For clamp meter, ensure only one conductor is within the jaw for current measurement.
- NCV tester constantly beeping/false positives: Adjust sensitivity to a lower setting. High sensitivity can pick up interference from nearby electrical fields.
- "EF" error on Clamp Måler: This typically indicates an overload or out-of-range condition. Ensure the measurement is within the device's specified limits.
11. Spesifikasjoner
| Trekk | Spesifikasjon |
|---|---|
| Merke | Proster |
| Modell | PST088c-PST224 |
| Strømkilde | Batteridrevet |
| Farge | Oransje |
| Sikkerhetsstandard | UL 61010-1, IEC 61010-2-030 |
| Øvre temperaturvurdering | 1000 grader Celsius |
| Clamp Meter Display Count | 6000 tellinger |
| NCV Detection Range (Default) | 48-1000V AC |
| NCV Detection Range (Adjustable) | 12-1000V AC |
| Clamp Kjeveåpningsstørrelse | Opp til 28 mm |
12. Garanti og støtte
Proster products are designed for reliability and performance. For warranty information, technical support, or service inquiries, please refer to the contact details provided on the product packaging or visit the official Proster webnettstedet. Ta vare på kjøpskvitteringen som kjøpsbevis.