1. Introduksjon
Thank you for choosing the KEENSTAR 20Bar Espresso Machine. This manual provides essential information for the safe operation, maintenance, and troubleshooting of your new espresso machine. Please read it thoroughly before first use and keep it for future reference.
2. Viktige sikkerhetsinstruksjoner
- Les alle instruksjonene før du bruker apparatet.
- Ikke berør varme overflater. Bruk håndtak eller knotter.
- For å beskytte mot brann, elektrisk støt og personskade må du ikke dyppe ledningen, støpslene eller apparatet i vann eller annen væske.
- Nøye tilsyn er nødvendig når et apparat brukes av eller i nærheten av barn.
- Koble fra stikkontakten når den ikke er i bruk og før rengjøring. La det avkjøles før du setter på eller tar av deler, og før du rengjør apparatet.
- Ikke bruk noe apparat med en skadet ledning eller støpsel eller etter at apparatet ikke fungerer, eller har blitt skadet på noen måte.
- Bruk av tilbehør som ikke er anbefalt av produsenten av apparatet kan føre til brann, elektrisk støt eller personskade.
- Ikke bruk utendørs.
- Ikke la ledningen henge over kanten av bordet eller benken, eller berør varme overflater.
- Ikke plasser på eller i nærheten av en varm gass- eller elektrisk brenner, eller i en oppvarmet ovn.
- Koble alltid støpselet til apparatet først, og deretter ledningen til stikkontakten. For å koble fra, slå av en hvilken som helst kontroll og ta deretter støpselet ut av stikkontakten.
- Ikke bruk apparatet til annet enn tiltenkt bruk.
- Vær ekstremt forsiktig når du kaster varm damp.
- Dette apparatet er kun til husholdningsbruk.
3. Pakkens innhold
Sjekk pakkens innhold når du pakker ut den for å sikre at alle varene er til stede og uskadet.
Bilde: All components included in the KEENSTAR 20Bar Espresso Machine package. This includes the main unit, portafilter with handle, single and double shot filters, coffee spoon with tamper, and a removable drip tray. The water tank and steam nozzle are also visible.
- KEENSTAR 20Bar Espresso Machine Main Unit
- Portafilterhåndtak
- 1-Shot Filter Basket
- 2-Shot Filter Basket
- Kaffeskje med Tamper
- Avtakbart dryppbrett
- Brukerhåndbok
4. Produktet er overview
Gjør deg kjent med de ulike delene av espressomaskinen din.

Bilde: Front view of the KEENSTAR 20Bar Espresso Machine, showcasing its sleek stainless steel design and key operational areas.
- Vanntank: Detachable, 1.1 Liter capacity. Located at the back of the machine.
- Kontrollpanel: Intuitive touch screen for selecting brew options (Espresso, Americano, Espresso Cool, Steam, ON/OFF, 2X Espresso).
- Portafilter: Holder malt kaffe til brygging.
- Dampstav: For frothing milk for lattes and cappuccinos. Features a 360-degree rotation.
- Dryppskål: Avtakbar for enkel rengjøring.
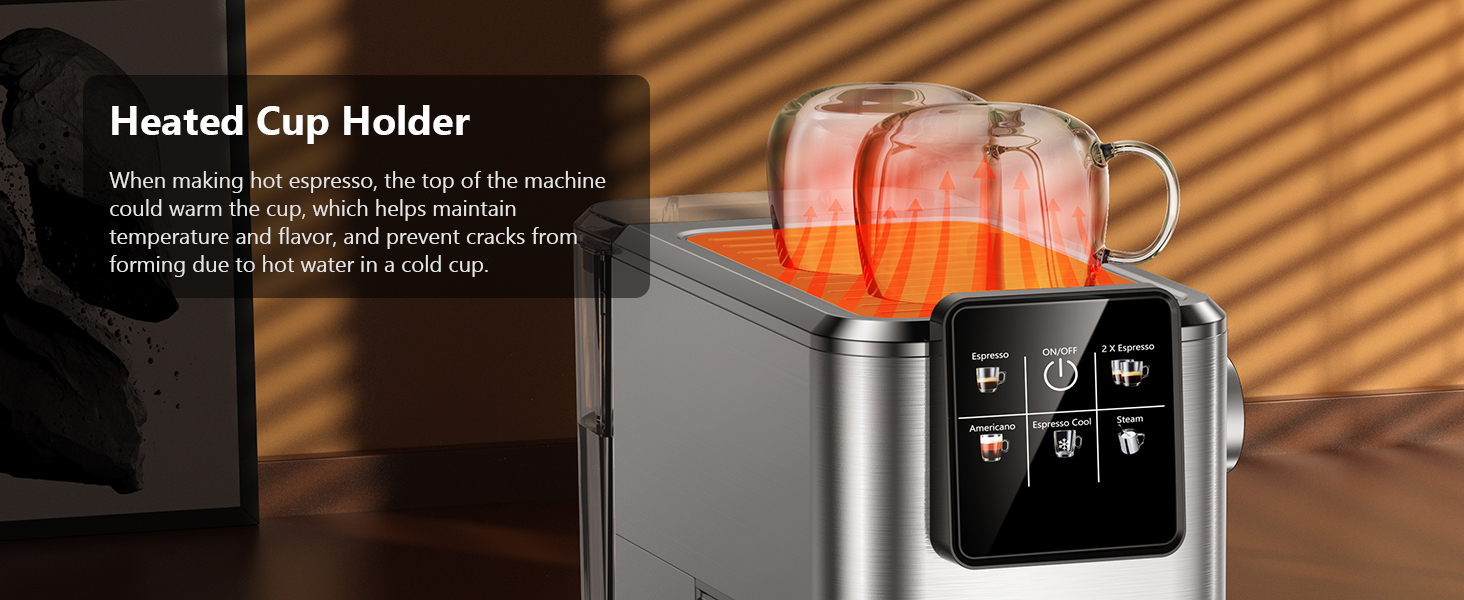
- Heated Cup Holder: Located on top of the machine to warm cups, maintaining coffee temperature.
5. Oppsett
5.1 Initial Use and Priming
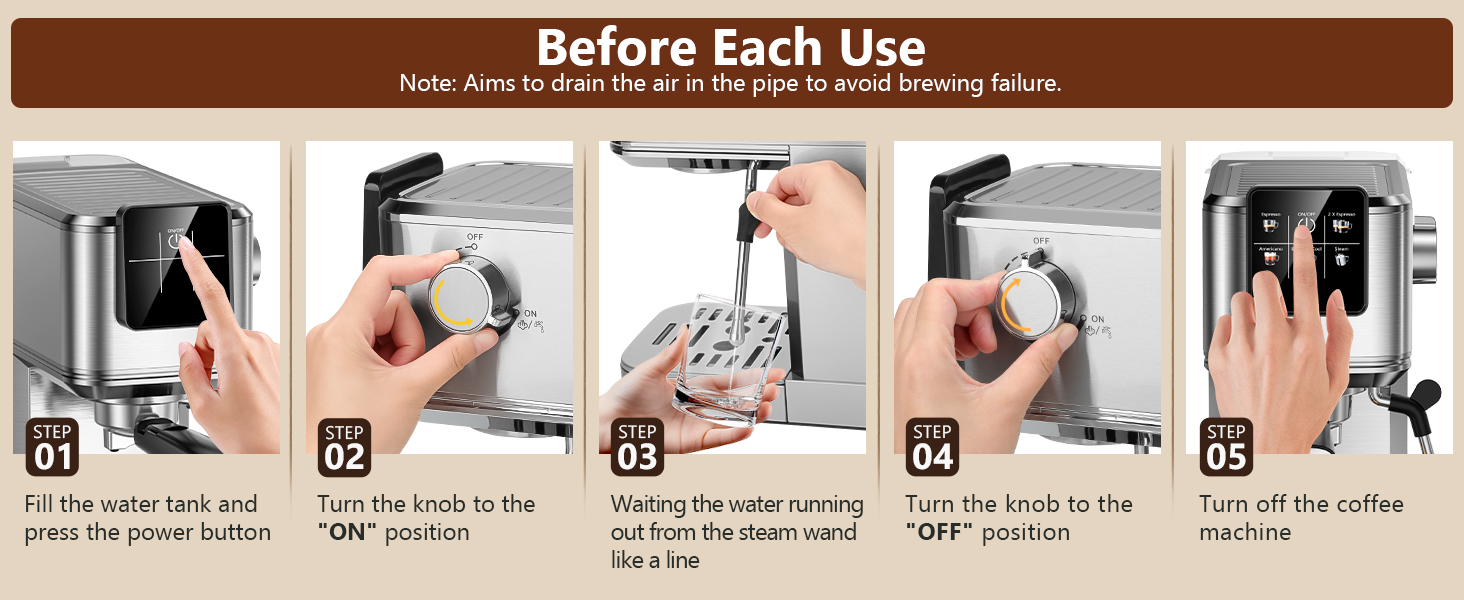
Before first use, or if the machine has not been used for a long time, it is essential to prime the system to ensure proper operation and remove any air from the pipes.
- Fill the water tank with fresh water and place it back into the machine. Ensure the tank cover is properly closed.
- Plug the machine into a power outlet. The ON/OFF button on the touch screen will illuminate.
- Press the ON/OFF button to turn on the machine. The indicator lights will blink as the machine preheats.
- Once the indicator lights are steady, the machine is ready.
- Plasser en tom kopp under damprøret.
- Turn the steam knob to the "ON" position. Water will run out from the steam wand like a line. Let it run for about 10-15 seconds to purge air.
- Turn the steam knob to the "OFF" position.
- Press the ON/OFF button to turn off the machine. The machine is now primed and ready for use.

Bilde: Visual steps for priming the espresso machine before its first use or after a period of inactivity. This process drains air from the internal pipes.
5.2 Vanntankfylling
The water tank has a maximum capacity of 1200ml. Do not exceed the maximum fill line to prevent overflow.
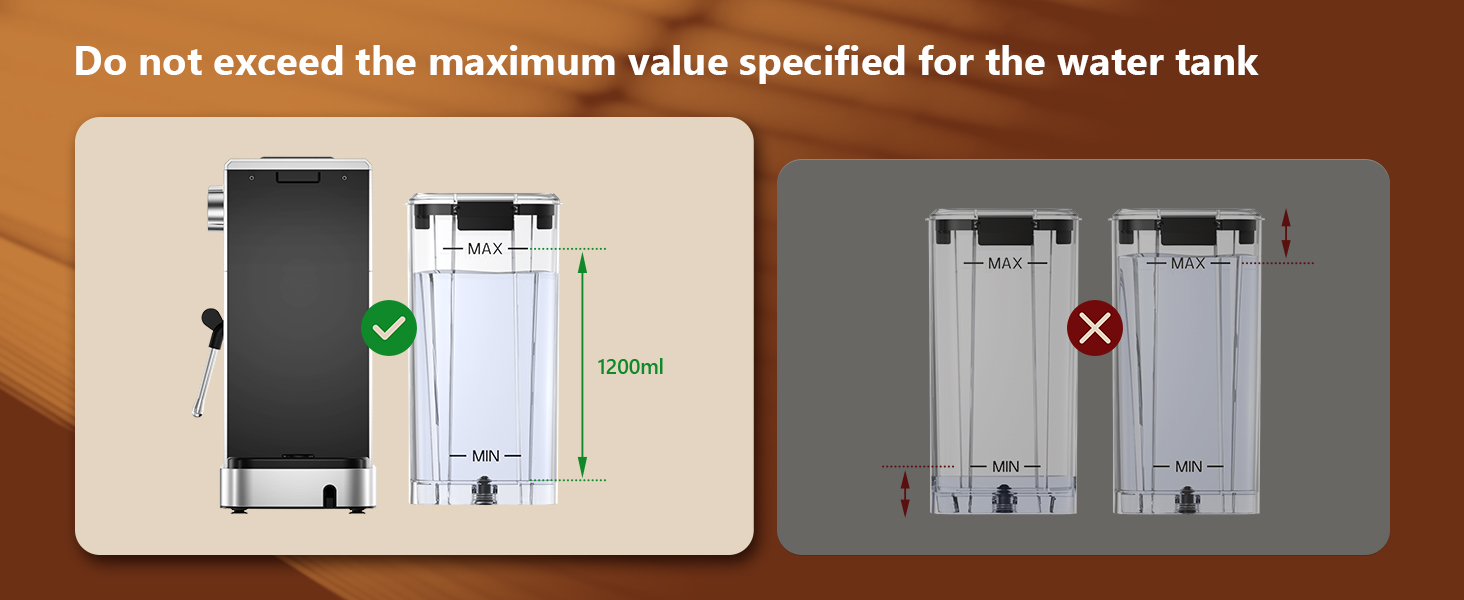
Bilde: Guidance on filling the water tank, indicating the 1200ml maximum fill level to avoid overfilling.
6. Bruksanvisning
6.1 Brygging av espresso
The machine features a 20-bar pressure system and pre-soak technology for rich espresso extraction.
- Ensure the steam knob is set to the "OFF" position before brewing coffee.
- Fill the water tank with fresh water and press the ON/OFF button to power on. Wait for the indicator to become steady, signifying preheating is complete.
- Select the appropriate filter basket (1-shot or 2-shot) and place it into the portafilter.
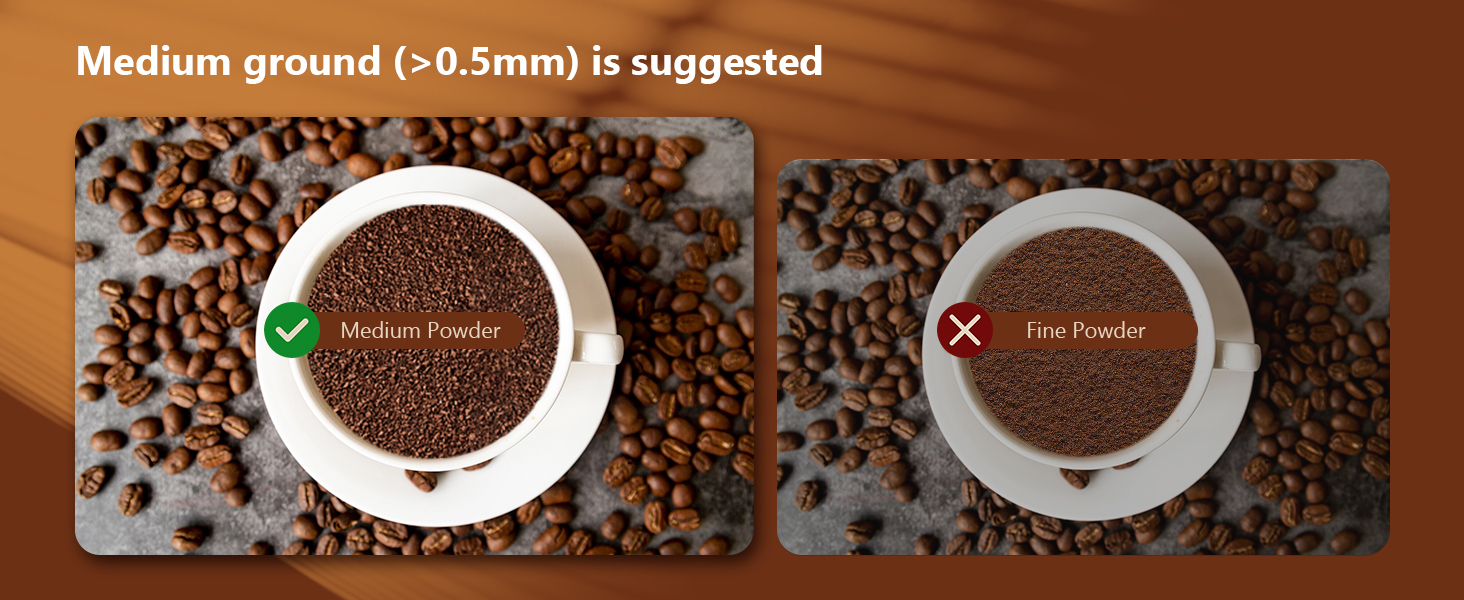
- Add ground coffee to the filter basket. Use medium ground coffee (greater than 0.5mm) for optimal results.
- Tamp the ground coffee firmly and evenly using the coffee tampeh.
- Attach the portafilter to the machine, ensuring it is fully locked into place.
- Place your cup(s) on the drip tray beneath the portafilter.
- Select "Espresso" for a single shot or "2 X Espresso" for a double shot on the touch screen. The machine will begin brewing.
- Når bryggingen er ferdig, stopper maskinen automatisk.

Bilde: Step-by-step visual instructions for brewing espresso, from preparing the machine to the final extraction.
Bilde: Illustration demonstrating the correct way to lock the portafilter before brewing to prevent leaks and ensure proper extraction.

Bilde: Recommended coffee grind size (medium, >0.5mm) for optimal espresso extraction, contrasting it with fine ground coffee.
6.2 Making Cold Brew Espresso
This machine offers a rapid cold brew function, producing smooth cold brew in as little as 10 minutes.
- Ensure the water tank is filled with iced water for the cold brew function.
- Prepare the portafilter with ground coffee as described in Section 6.1.
- Attach the portafilter to the machine and place a cup underneath.
- Select "Espresso Cool" on the touch screen. The machine will begin the cold brew process.
- Enjoy your rapid cold brew espresso.

Bilde: The espresso machine preparing cold brew, emphasizing the requirement for iced water in the tank.
6.3 Skumme melk
The powerful steam wand allows you to create creamy microfoam for lattes and cappuccinos.
- Fill the water tank with fresh water and press the ON/OFF button to power on.
- Press the "Steam" button on the touch screen to preheat the steam function. The indicator will blink during preheating and become steady when ready.
- After preheating, turn the steam knob to the "ON" position to release any remaining water in the pipe before frothing.
- Insert the steam nozzle approximately 1 inch into the surface of your milk.
- Gradually turn the steam knob to increase steam until the desired foam consistency is achieved.
- Once finished, turn the steam knob to the "OFF" position and clean the steam wand immediately.
Bilde: Visual instructions for frothing milk, detailing the steps from preheating to creating microfoam.
7. Vedlikehold og rengjøring
Regelmessig rengjøring sikrer lang levetid og optimal ytelse for espressomaskinen din.
- Generell rengjøring: Tørk utsiden av maskinen med adamp klut. Ikke bruk skuremidler eller skuremidler.
- Dryppskål: The removable drip tray should be emptied and cleaned regularly.
- Portafilter og filterkurver: Etter hver bruk, fjern portafilteret og kast brukt kaffegrut. Skyll portafilteret og filterkurven under rennende vann.
- Dampstav: Tørk av damprøret med en liten mengde vann rett etter at du har skummet melken.amp cloth to prevent milk residue from drying. Purge steam briefly to clear any internal blockages.
- Vanntank: Rengjør vanntanken med jevne mellomrom med et mildt vaskemiddel og skyll grundig.
- Avkalking: Depending on water hardness, descale the machine every 2-3 months. Follow the instructions provided with a suitable descaling solution.

Bilde: Important cleaning instruction: All accessories must be washed by hand and are not dishwasher safe.
8. Feilsøking
Se denne delen for vanlige problemer og løsninger på disse.
| Problem | Mulig årsak | Løsning |
|---|---|---|
| Ingen kaffe kommer ut / Sakte flyt |
|
|
| Water leaks from portafilter edge |
|
|
| Damprøret produserer ikke damp |
|
|
| Kaffen er ikke varm nok |
|
|
9. Spesifikasjoner
- Merke: KEENSTAR
- Modellnavn: JH-C5210
- Trykksystem: 20 Bar
- Makt: 1350W
- Vanntankkapasitet: 1.1 Liters (37oz)
- Produktdimensjoner: 11.8" D x 12.6" B x 5.5" H
- Varevekt: 4.6 pund
- Materiale: Rustfritt stål
- Spesialfunksjon: Programmable, Touch Screen, Milk Frother, Hot & Rapid Cold Brew
- Kaffeinngangstype: Malt kaffe
- Filtertype: Gjenbrukbare
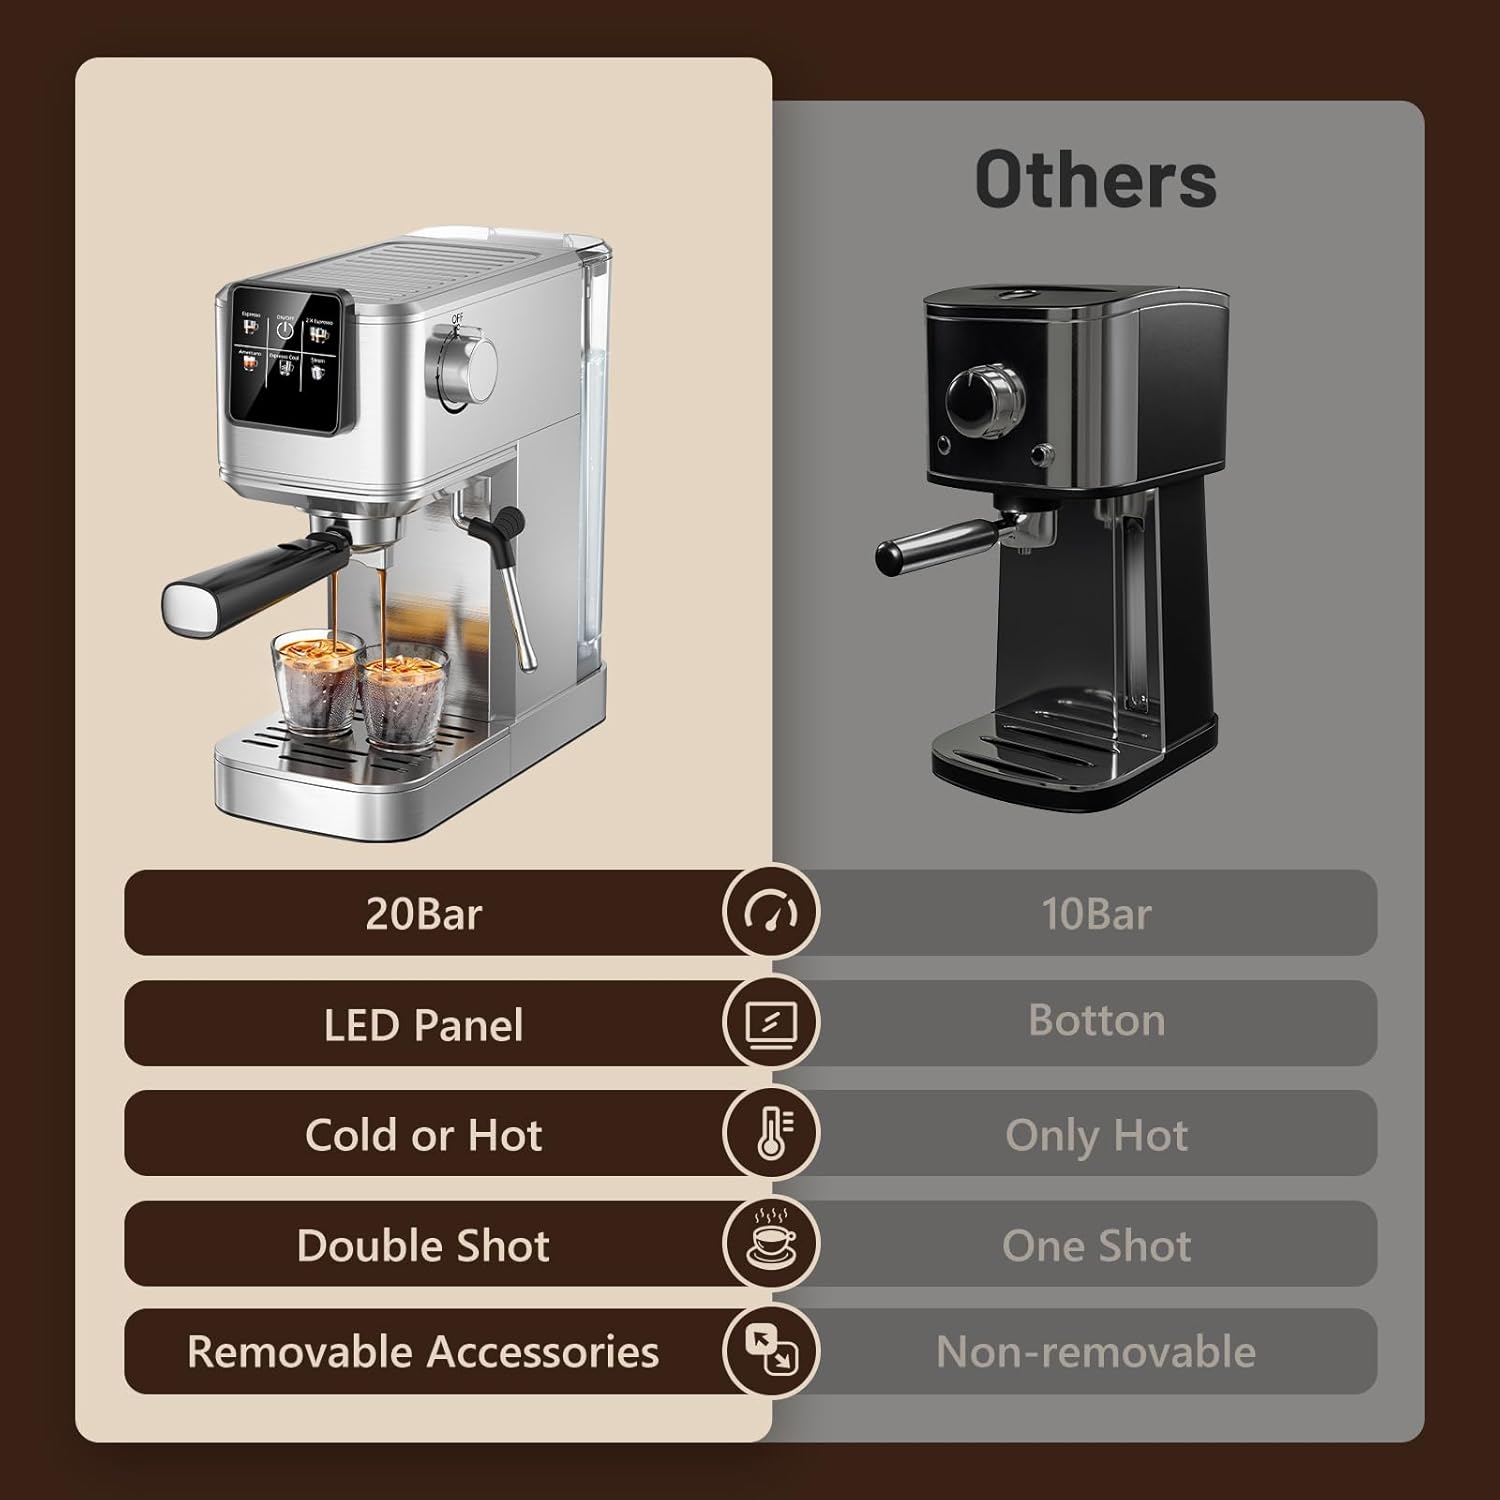
Bilde: Feature comparison of the KEENSTAR machine, emphasizing its 20Bar pressure, LED panel, and versatility for hot and cold beverages.

Bilde: Dimensions of the KEENSTAR espresso machine, indicating its compact size.
10. Garanti og støtte
For warranty information or technical support, please refer to the contact details provided on the product packaging or visit the official KEENSTAR webnettstedet. Ta vare på kjøpsbeviset for eventuelle garantikrav.