1. Introduksjon
This manual provides essential instructions for the safe assembly, operation, and maintenance of your Generic 1200LBS Multi-Function Power Rack. Please read this manual thoroughly before assembly and use to ensure proper function and user safety. Retain this manual for future reference.
Viktig sikkerhetsinformasjon
- Rådfør deg alltid med helsepersonell før du starter et nytt treningsprogram.
- Sørg for at alle bolter og muttere er godt strammet før hver bruk.
- Do not exceed the maximum weight capacities specified for the rack and its components.
- Use spotters when lifting heavy weights, especially during squats and bench presses.
- Hold barn og kjæledyr unna utstyret under bruk.
- Inspect the power rack for any signs of wear or damage before each workout. Do not use if damaged.
- Place the power rack on a flat, stable surface.
2. Produktet er overview og komponenter
The Generic 1200LBS Multi-Function Power Rack is designed for a comprehensive home gym experience, supporting various strength training exercises. It features a robust alloy steel frame and adjustable components for versatile use.

Figur 2.1: Labeled diagram of the Power Rack components, including the wide & narrow pull-up bar, barbell rack, 1.8mm steel tube, safety bar, and non-slip base.
Nøkkelfunksjoner:
- Kommersiell kvalitet: Constructed from 1.8mm high-density alloy steel tubing with a 2"x2" square frame.
- Høy vekt kapasitet: Supports up to 1200 lbs for the main frame and 800 lbs for J-hooks.
- Versatile Adaptability: Features 14 clearly marked adjustable holes for J-hooks and safety bars.
- Sikkerhetsforsikring: Equipped with large non-slip bases, scratch-resistant J-hooks, and quick-positioning barbell supports.
- Plassbesparende design: Compact footprint of 14.0 square feet.
- Integrated Pull-Up Bar: Wide and narrow grip options for varied exercises.

Figur 2.2: Image highlighting the commercial-grade construction, 1200 lbs weight capacity, 800 lbs J-hook capacity, and 1.88mm thick steel pipe.

Figur 2.3: Detaljert view of the wide & narrow pull-up bar, high-quality J-hook, barbell protection frame, 14 adjustable holes, and non-slip base.
3. Oppsett og montering
Carefully unpack all components and verify against the parts list (not provided in this manual, refer to packaging). Assembly typically requires two people. Ensure you have adequate space and the necessary tools (e.g., wrenches) before beginning.

Figur 3.1: Visual guide for the four main installation steps of the power rack.
Monteringstrinn:
- Trinn 1: Grunnrammemontering
Connect the two base frames using the horizontal support bars. Ensure all connections are finger-tightened initially. - Step 2: Upright Post Installation
Attach the four vertical upright posts to the assembled base frames. Ensure the posts are oriented correctly with the adjustment holes facing inwards. - Step 3: Top Frame and Pull-Up Bar Attachment
Secure the top frame to the upright posts. Install the wide and narrow pull-up bar onto the top frame. - Step 4: Final Tightening and Accessory Installation
Once the main structure is assembled, fully tighten all bolts and nuts. Install the J-hooks and safety bars into the desired positions.
After assembly, gently shake the rack to ensure stability. If any movement is detected, re-check all connections and tighten as necessary.
4. Bruksanvisning
The Power Rack is designed to facilitate a variety of exercises. Always ensure proper form and safety precautions during your workouts.
Adjusting J-Hooks and Safety Bars:
The power rack features 14 adjustable holes, allowing for precise positioning of J-hooks and safety bars. The barbell safety collars can be manually adjusted without tools.
- To adjust, simply lift the J-hook or safety bar, align it with the desired hole, and insert the pin securely.
- Ensure both J-hooks or safety bars are set at the same height to prevent uneven loading.
- For squats, position the J-hooks at a height that allows you to unrack the barbell comfortably. Set the safety bars just below your lowest squat depth.
- For bench press, position the J-hooks at a height that allows you to unrack the barbell with a slight elbow bend. Set the safety bars just above your chest at the bottom of the movement.

Figur 4.1: Illustration of the 14-speed adjustable holes for the barbell protection frame, allowing for flexible height adjustments.

Figur 4.2: Demonstrates the use of J-hooks for easy barbell placement and barbell protection racks for safety during squats.
Supported Exercises:
The power rack supports a variety of exercises, including but not limited to:
- Knebøy: Utilize the J-hooks and safety bars for barbell squats.
- Benkpress: Combine with a weight bench (not included) and use J-hooks and safety bars.
- Pull-ups: Use the integrated wide and narrow grip pull-up bar.
- Overheadpress: Perform standing overhead presses within the rack.
- Rack Pulls: Adjust safety bars to desired height for partial deadlifts.

Figur 4.3: Visuell eksamples of exercises that can be performed with the power cage, including bench press, deep squats, and pull-ups.
5. Vedlikehold
Regular maintenance ensures the longevity and safe operation of your power rack.
- Daglig: Tørk av rammen med en ren, damp klut etter hver bruk for å fjerne svette og støv.
- Ukentlig: Inspect all bolts, nuts, and connection points. Tighten any that appear loose.
- Månedlig: Perform a thorough inspection of the entire frame for any signs of rust, cracks, or structural damage. Pay close attention to welding points and areas of high stress.
- Rengjøring: Use mild soap and water for cleaning. Avoid abrasive cleaners or solvents that could damage the finish.
- Lagring: If storing for an extended period, ensure the rack is clean and dry. Store in a climate-controlled environment to prevent rust.
6. Feilsøking
| Problem | Mulig årsak | Løsning |
|---|---|---|
| Stativet føles ustabilt eller ustø. | Loose bolts or uneven floor surface. | Ensure all assembly bolts are fully tightened. Move the rack to a flat, level surface. |
| Difficulty adjusting J-hooks/safety bars. | Pin not fully aligned or obstruction in the hole. | Ensure the pin is perfectly aligned with the hole. Check for any debris inside the adjustment holes. |
| Knirkende lyder under bruk. | Loose connections or metal-on-metal friction. | Tighten all bolts. Apply a small amount of silicone lubricant to contact points if necessary (avoiding areas that contact skin or clothing). |
7. Spesifikasjoner
| Trekk | Detalj |
|---|---|
| Modell | 1200LBS Multi-Function Power Rack |
| Merke | Generisk |
| Materiale | Alloy Steel (1.8mm thick, 2"x2" square frame) |
| Varevekt | 105 pund |
| Max Weight Capacity (Rack) | 1200 LBS |
| Max Weight Capacity (J-Hooks) | 800 LBS |
| Adjustable Holes | 14-trinns justerbar |
| Fotspor | Omtrent 14.0 kvadratmeter |
| Farge | Svart |
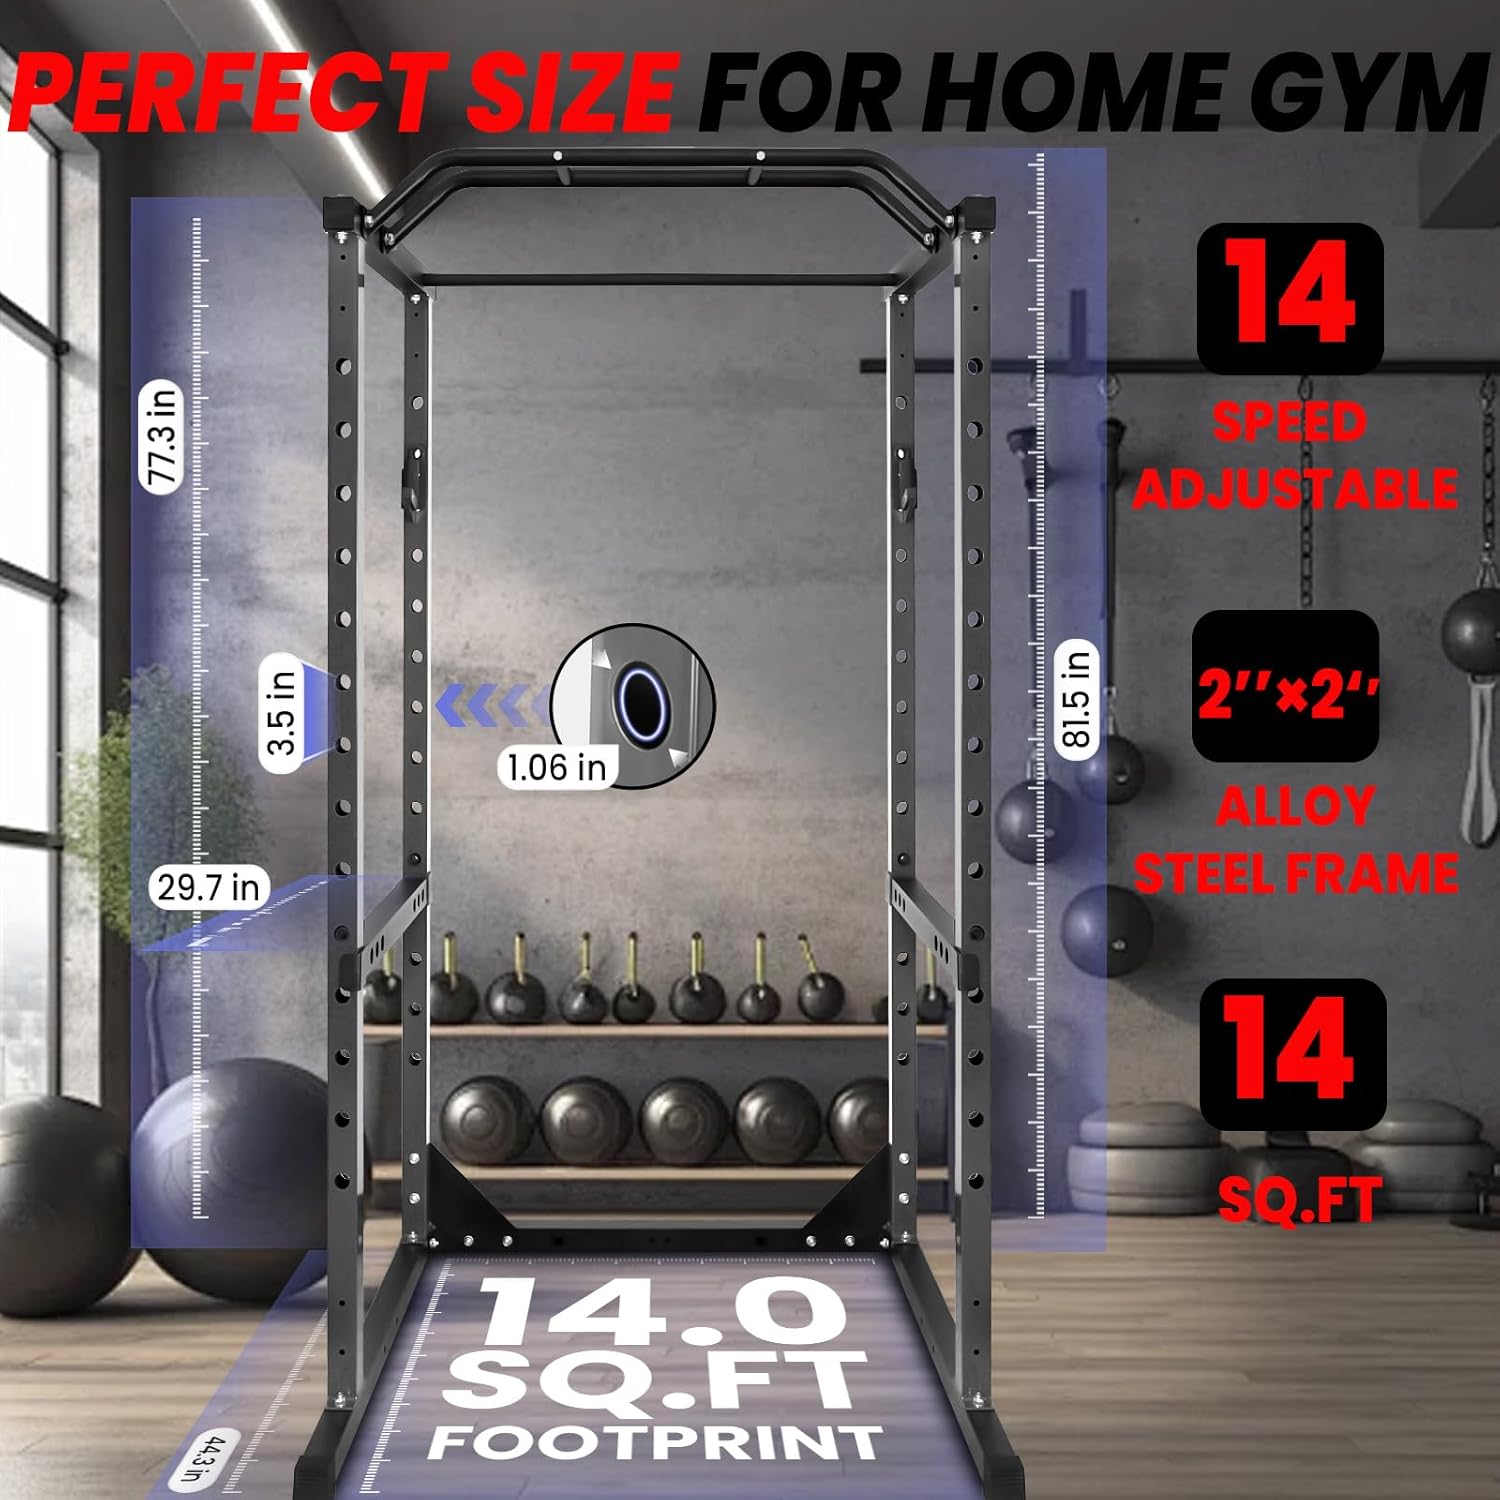
Figur 7.1: Diagram illustrating the dimensions and 14.0 sq. ft. footprint of the power rack, along with the 14-speed adjustability and 2"x2" alloy steel frame.
8. Garanti og støtte
Garanti: The manufacturer states that there is no warranty for this product. Please refer to your purchase documentation for any return or refund policies from the retailer.
Kundestøtte: For any questions regarding assembly, operation, or missing parts, please contact the seller directly through the platform where the product was purchased. The manufacturer is HHJU.