1. Introduksjon
This manual provides essential information for the proper setup, operation, and maintenance of your Pisichen 24 Inch Touchscreen Monitor (Model 24INSXT-1080P). Please read this manual thoroughly before using the product to ensure optimal performance and safety. Keep this manual for future reference.

Image 1.1: The Pisichen 24 inch touchscreen monitor, featuring a built-in webcam and a sleek design.
2. Pakkens innhold
Verify that all items are present in the package. If any items are missing or damaged, contact your retailer for assistance.
- Pisichen 24 Inch Touchscreen Monitor
- Power Adapter (DC)
- HDMI-kabel
- VGA-kabel
- USB-C-kabel
- Brukerhåndbok
3. Installasjonsinstruksjoner
3.1 Fysisk oppsett
Feste stativet: Carefully place the monitor face down on a soft, clean surface. Align the stand base with the monitor's mounting points and secure it with the provided screws. Ensure the stand is firmly attached before proceeding.
VESA-montering: This monitor supports VESA 100mm x 100mm mounting. If you plan to use a VESA-compatible arm or wall bracket, remove the stand and attach the monitor to your VESA mount according to the mount's instructions.

Image 3.1: The monitor's adjustable stand allows for height, tilt, swivel, and 90-degree pivot adjustments.
3.2 Koble til en enhet
The monitor offers multiple connectivity options. Ensure the monitor is powered off before making any connections.
- Strømtilkobling: Connect the DC power adapter to the monitor's DC Power Port and then plug it into a power outlet.
- Videotilkobling: Velg ett av følgende alternativer:
- HDMI: Connect one end of the HDMI cable to the monitor's HDMI Port and the other end to your computer's HDMI output.
- VGA: Connect one end of the VGA cable to the monitor's VGA Port and the other end to your computer's VGA output.
- USB-C: Connect one end of the USB-C cable to the monitor's Type C Port and the other end to your computer's USB-C port. Ensure your computer's USB-C port supports DisplayPort Alternate Mode for video output. This connection also supports touch functionality and data transfer.
- Lydtilkobling: If using HDMI or USB-C, audio will typically transmit automatically. For other setups or external speakers, use the Audio Port.

Bilde 3.2: Detaljert view of the monitor's rear ports, including HDMI, VGA, Type C, DC Power, and Audio ports.
3.3 Touchscreen and Webcam oppsett
For touchscreen functionality and webcam operation, ensure the USB-C cable is connected between the monitor and your computer, or a separate USB-A to USB-B cable (not always included, check package contents) is connected from the monitor's upstream USB port to your computer. Most operating systems will automatically detect and install the necessary drivers.

Image 3.3: Compatibility chart for touchscreen functionality. Multi-touch is supported on laptops, smartphones, tablets, all-in-one PCs, and desktop hosts. Single-touch is supported on MacBooks. Touch functionality is not supported on iPhones, iPads, Nintendo Switch, Xbox, PlayStation consoles, Fire TV devices, and Steam Deck.
4. Bruksanvisning
4.1 Strøm på/av
Trykk på av/på-knappen på skjermen for å slå den av eller på. Av/på-indikatorlampen lyser når skjermen er aktiv.
4.2 Bruke berøringsskjermen
The monitor features a 10-point multi-touch screen for intuitive interaction. Use gestures such as tapping, swiping, pinching to zoom, and dragging, similar to a tablet or smartphone. Ensure your operating system is configured for touch input.

Image 4.1: Demonstrating precise and fluid interaction with the 10-point multi-touch screen.
4.3 Webcam and Microphone Usage
Den innebygde webcam and microphone are designed for video conferencing and online communication. Once connected via USB-C or a dedicated USB cable, they should be automatically recognized by your computer's operating system and video conferencing applications. Adjust privacy settings within your operating system or application as needed.

Image 4.2: The integrated webcam facilitates clear video calls and online meetings.
4.4 Skjermjusteringer
The monitor's stand allows for various ergonomic adjustments:
- Høydejustering: Hev eller senk skjermen til ønsket nivå viewing høyde.
- Tilt: Adjust the screen's vertical angle (forward or backward) for optimal viewing.
- Sving: Rotate the monitor horizontally (left or right) on its base.
- Pivot: Rotate the screen 90 degrees to switch between landscape and portrait modes. This is useful for coding, document review, or specific creative tasks.
4.5 On-Screen Display (OSD)-meny
The OSD menu allows you to adjust various display settings such as brightness, contrast, color temperature, input source, and audio volume. Access the OSD menu using the buttons located on the monitor (refer to the physical layout for exact button locations).
5. Vedlikehold
5.1 Rengjøre skjermen
For å rengjøre skjermen, tørk den forsiktig med en myk, lofri klut. For gjenstridige merker, tørk den lett.ampen the cloth with water or a non-abrasive screen cleaner. Avoid using alcohol, ammonia, or abrasive cleaners, as these can damage the screen surface. For the monitor casing, bruk en myk, tørr klut.
5.2 Oppbevaring
Når du oppbevarer skjermen over lengre tid, må du sørge for at den er slått av og at alle kabler er koblet fra. Oppbevar den på et kjølig og tørt sted, helst i originalemballasjen, for å beskytte den mot støv og fysisk skade.
6. Feilsøking
Hvis du støter på problemer med skjermen, kan du se følgende vanlige problemer og løsninger:
| Problem | Mulig årsak | Løsning |
|---|---|---|
| Intet bilde på skjermen | Power cable loose; Video cable loose or incorrect input selected; Monitor is off. | Check power connections; Ensure video cable is securely connected and correct input source is selected via OSD; Press power button. |
| Berøringsskjermen svarer ikke | USB-C cable not connected or not supporting data; Drivers not installed; Device not compatible with touch. | Ensure USB-C cable is fully connected and supports data/touch; Check device compatibility (refer to Image 3.3); Restart computer. |
| Webcam/Microphone not working | USB-C cable not connected or not supporting data; Privacy settings blocking access; Drivers not installed. | Verify USB-C connection; Check privacy settings in your operating system and application; Restart computer. |
| Ingen lyd fra skjermens høyttalere | Volume too low; Incorrect audio output selected on computer; Audio cable not connected (if applicable). | Adjust monitor volume via OSD; Select monitor as audio output in computer settings; Ensure audio cable is connected if using VGA. |
| Screen flickers or displays distorted image | Loose video cable; Incorrect resolution/refresh rate; Interference. | Check video cable connection; Adjust display settings on your computer to 1920x1080 at 60Hz; Move away from other electronic devices. |
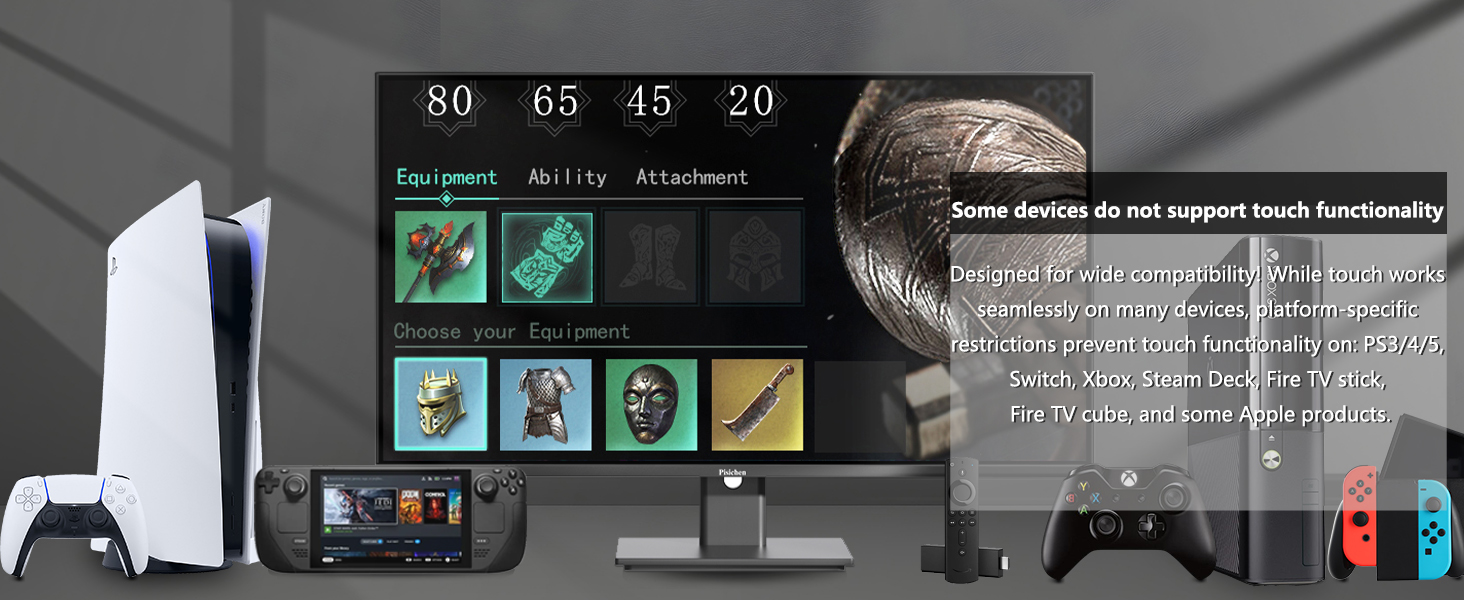
Image 6.1: Some devices, such as specific game consoles (PS3/4/5, Xbox, Steam Deck) and certain Apple products, do not support touch functionality with this monitor due to platform-specific restrictions.
7. Spesifikasjoner
| Trekk | Spesifikasjon |
|---|---|
| Modellnummer | 24INSXT-1080P |
| Skjermstørrelse | 23.8 tommer |
| Oppløsning | FHD 1920 x 1080p |
| Skjermteknologi | IPS lysdioder |
| Oppdateringsfrekvens | 60 Hz |
| Lysstyrke | 400 Candela |
| Kontrastforhold | 3000:1 |
| Responstid | 5 millisekunder |
| Berøringsskjerm | 10-Point Multi-touch |
| Tilkobling | 1x HDMI, 1x VGA, 1x USB 3.1 Type C, Audio Port, DC Power Port |
| Ekstra funksjoner | Built-In Speakers, Built-In Webcam, Swivel Adjustment, Tilt Adjustment, Height Adjustment, Pivot (90-degree rotation) |
| VESA-kompatibilitet | 100 mm x 100 mm |
| Dimensjoner (D x B x H) | 1.97"D x 21.26"W x 12.6"H (Monitor only, without stand) |

Image 7.1: Detailed product dimensions for the Pisichen 24 Inch Touchscreen Monitor.
8. Garanti og støtte
8.1 Garantiinformasjon
This product comes with a limited warranty. Please refer to the warranty card included in your package or contact Pisichen customer support for detailed warranty terms and conditions. The warranty typically covers manufacturing defects for a specified period from the date of purchase.
8.2 Kundestøtte
For technical assistance, troubleshooting not covered in this manual, or warranty claims, please contact Pisichen customer support. Contact information can usually be found on the product packaging, the official Pisichen webnettstedet eller kjøpsdokumentasjonen din.