1. Introduksjon
Thank you for choosing the Graef SKS 110 Twin Electric Slicer. This manual provides essential information for the safe and efficient operation, maintenance, and care of your new appliance. Please read these instructions thoroughly before first use and keep them for future reference.
The Graef SKS 110 Twin is a compact and modern electric food slicer designed for precision slicing of various foods. It features an energy-saving Eco Power motor and comes with both a serrated and a smooth blade for versatile use.
2. Sikkerhetsinstruksjoner
ADVARSEL: Unnlatelse av å følge disse sikkerhetsinstruksjonene kan føre til elektrisk støt, brann og/eller alvorlig skade.
- Koble alltid apparatet fra strømforsyningen før montering, demontering eller rengjøring.
- Hold hender og redskaper unna det bevegelige bladet under bruk.
- Dette apparatet er ikke beregnet for bruk av personer (inkludert barn) med reduserte fysiske, sensoriske eller mentale evner, eller mangel på erfaring og kunnskap, med mindre de har fått tilsyn eller instruksjoner om bruk av apparatet av en person som er ansvarlig for deres sikkerhet.
- Barn bør overvåkes for å sikre at de ikke leker med apparatet.
- Ikke bruk skjæremaskinen med en skadet ledning eller støpsel, eller etter at apparatet ikke fungerer som det skal eller har blitt skadet på noen måte.
- Use only original Graef accessories and spare parts.
- Sørg for at apparatet er plassert på en stabil, flat og tørr overflate under bruk.
- The appliance is equipped with overload protection. If the motor stops, switch off the appliance, unplug it, and allow it to cool down before resuming operation.
- Senk aldri motorenheten i vann eller andre væsker.
- Exercise extreme caution when handling the blades, as they are very sharp.
3. Pakkens innhold
Vennligst sjekk at alle gjenstander er til stede og uskadet:
- Graef SKS 110 Twin Electric Slicer unit
- 1 x Serrated blade (pre-installed or separate)
- 1 x Smooth blade
- Food holder/pusher
- Bruksanvisning (dette dokumentet)
4. Komponenter overview
Familiarize yourself with the parts of your Graef SKS 110 Twin Electric Slicer:
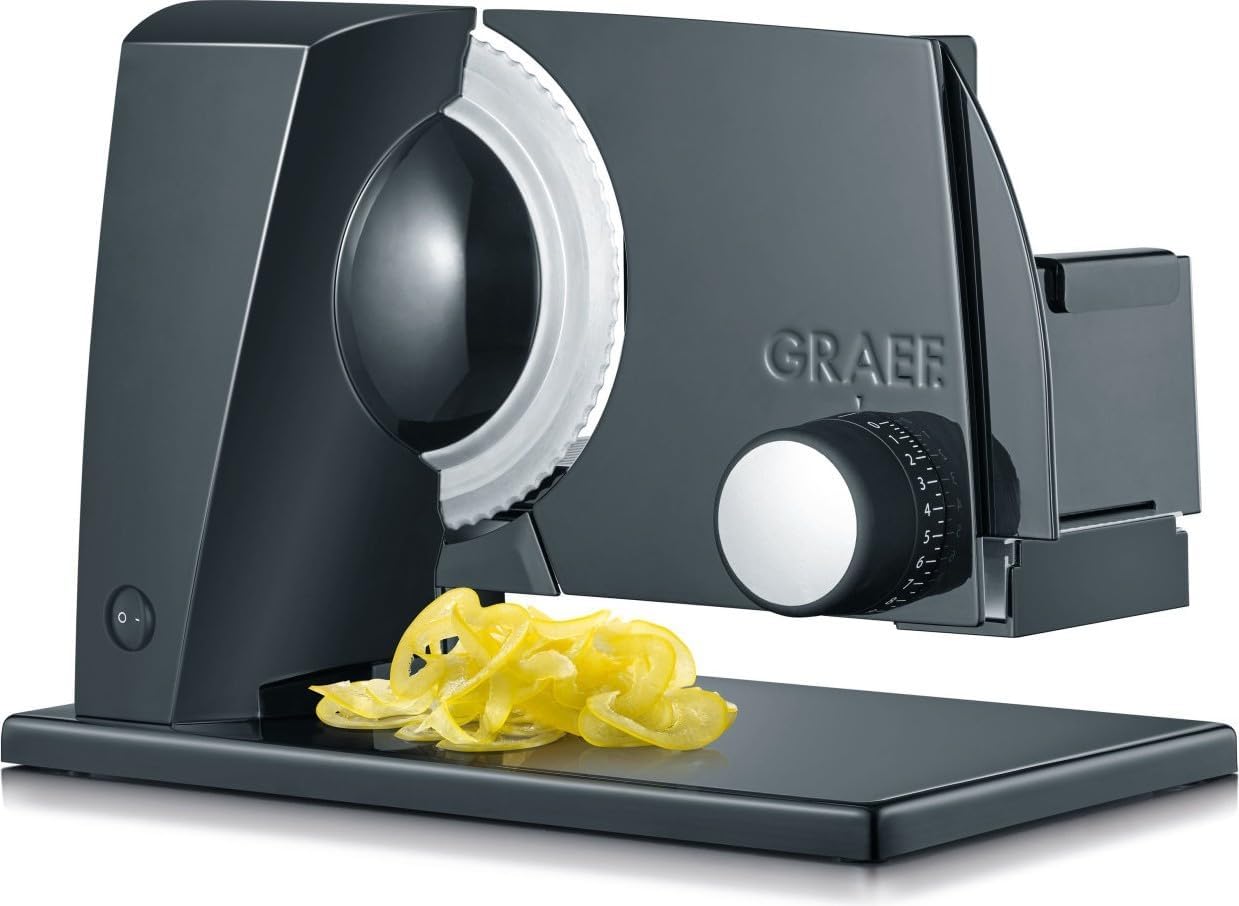
Image: The Graef SKS 110 Twin Electric Slicer in black, featuring a serrated blade, a slice thickness adjustment knob, and a power switch. Sliced yellow peppers are shown on the base.
- Strømbryter (på/av)
- Motorhus
- Blade (Serrated or Smooth)
- Blade Cover/Guard
- Slice Thickness Adjustment Knob
- Matvogn
- Food Holder/Pusher
- Base Plate
5. Oppsett
- Utpakking: Carefully remove all packaging materials and ensure no parts are missing.
- Plassering: Place the slicer on a clean, dry, stable, and non-slip surface. Ensure there is enough space around the appliance for safe operation.
- Innledende rengjøring: Before first use, wipe all parts that will come into contact with food (blade, food carriage, food holder) with a damp klut. Se avsnittet «Rengjøring og vedlikehold» for detaljerte instruksjoner.
- Bladinstallasjon: The serrated blade is typically pre-installed. If you need to install or change a blade, refer to the "Changing Blades" section.
- Strømtilkobling: Ensure the power switch is in the "Off" position (0) before plugging the appliance into a grounded 230V ~ 50Hz power outlet.
6. Bruksanvisning
6.1. Skifte av blader
Always unplug the slicer before changing blades. Handle blades with extreme care.
- Ensure the slicer is unplugged and the slice thickness is set to "0".
- Locate the blade locking mechanism (usually a central knob or lever on the blade).
- Turn the locking mechanism counter-clockwise to loosen and remove the blade.
- Carefully lift the blade off.
- To install a new blade, align it with the motor shaft and press it firmly into place.
- Turn the locking mechanism clockwise until the blade is securely fastened. Do not overtighten.
6.2. Adjusting Slice Thickness
The slice thickness can be adjusted from 0 to 20 mm.
- Turn the slice thickness adjustment knob (Component 5) to your desired thickness. The scale on the knob indicates the approximate thickness in millimeters.
- For very thin slices (e.g., carpaccio), set the knob to a lower number. For thicker slices (e.g., bread), set it to a higher number.
6.3. Slicing Food
Use the food holder/pusher at all times to protect your hands.
- Place the food item (e.g., bread, cheese, meat, vegetables) onto the food carriage (Component 6).
- Secure the food with the food holder/pusher (Component 7).
- Adjust the slice thickness using the knob (Component 5).
- Plug in the slicer and switch it on using the power switch (Component 1).
- Gently push the food carriage towards the rotating blade using the food holder. Apply even pressure.
- Collect the sliced food from the base plate (Component 8).
- Once finished, switch off the slicer and unplug it from the power outlet.
Tips for Slicing:
- For best results with soft cheeses or meats, chill them slightly before slicing.
- Use the serrated blade for bread, hard cheeses, and roasted meats.
- Use the smooth blade for cold cuts, vegetables, and very thin slices.
7. Rengjøring og vedlikehold
Regular cleaning ensures optimal performance and extends the lifespan of your slicer. Koble alltid fra apparatet før rengjøring.
- Blader: Carefully remove the blade as described in "Changing Blades". Wash the blade by hand with warm soapy water and a brush. Rinse thoroughly and dry immediately.
- Food Carriage and Food Holder: These parts can be removed and washed by hand with warm soapy water. Rinse and dry thoroughly.
- Motorhus og base: Tørk av de utvendige overflatene med adamp klut. Ikke bruk slipende rengjøringsmidler eller senk motorenheten i vann.
- Slice Thickness Plate: Ensure no food particles are lodged behind the slice thickness plate. Clean with a damp klut.
- Lagring: Store the slicer in a clean, dry place. Ensure the slice thickness is set to "0" for safety during storage.
Viktig: All parts should be hand washed only. Do not wash any parts in a dishwasher.
8. Feilsøking
| Problem | Mulig årsak | Løsning |
|---|---|---|
| Sliceren slår seg ikke på. | Ikke koblet til; strømbryter av; strømmen er slått avtage. | Check power cord connection; ensure switch is "On"; check power supply. |
| Motoren stopper under drift. | Overload protection activated; food too hard or too much pressure. | Switch off, unplug, let cool for 15-20 minutes. Reduce pressure or pre-cut very hard items. |
| Slices are uneven or torn. | Blade dull; incorrect blade for food type; food not firm enough. | Ensure blade is clean and sharp. Use appropriate blade (serrated for bread/hard items, smooth for delicate). Chill food if necessary. |
| Blade is difficult to remove/install. | Food residue or overtightened. | Ensure slicer is unplugged. Clean around the blade mechanism. Apply gentle, firm pressure. |
If the problem persists after attempting these solutions, please contact Graef customer support.
9. Spesifikasjoner
| Modell | SKS 110 Twin |
| Merke | TELLE |
| Makt | 230 V ~ 50 Hz, 45-170 W |
| Bladdiameter | Ø 17 cm |
| Skivetykkelse | 0–20 mm |
| Materiale | Stainless steel (body, blades), Plastic (base) |
| Dimensjoner (L x B x H) | 32.5 x 23 x 24 cm |
| Vekt | 2.33 kg |
| Spesielle funksjoner | Eco Power motor, Overload protection, Includes serrated and smooth blades |
| Vedlikeholdsinstruksjoner | Kun håndvask |
10. Garanti og støtte
For warranty information, technical support, or to order spare parts, please refer to the official GRAEF webnettstedet eller kontakt kundeservicen deres direkte. Ta vare på kjøpsbeviset for garantikrav.
GRAEF Customer Service: Vennligst besøk www.graef.de for contact details and further information.


